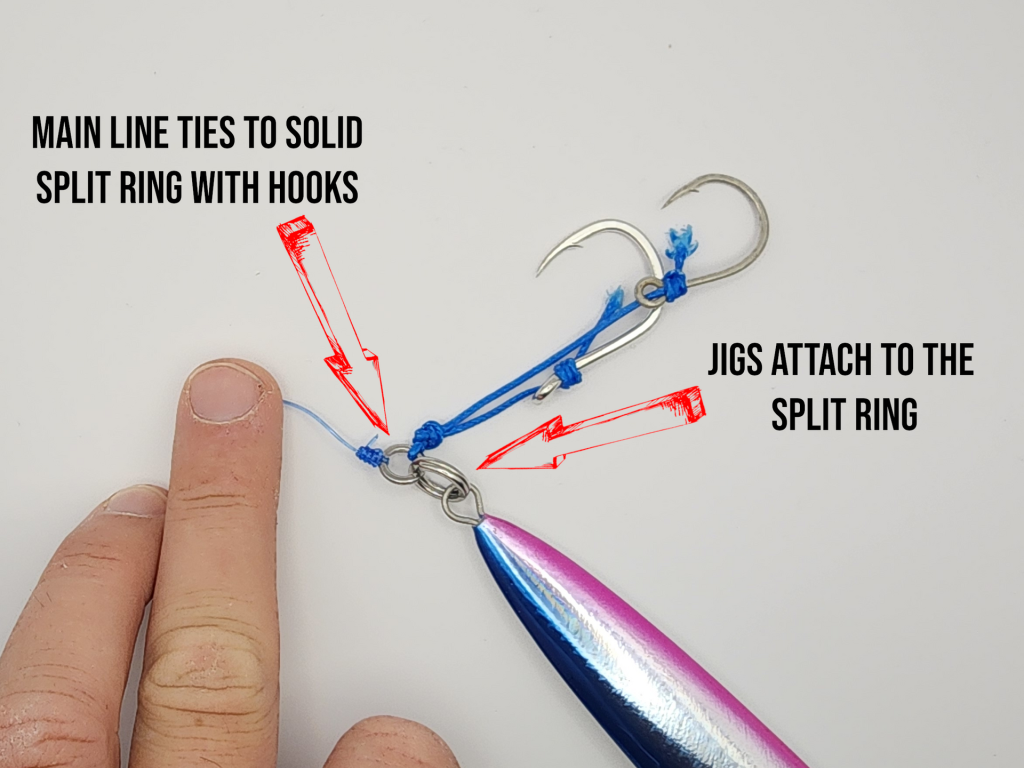
If you want to catch more fish, knowing how to tie a jig to your fishing line is a skill you can’t afford to miss. A properly tied jig gives you better control, stronger hooks, and fewer lost fish.
But if you’ve ever struggled with knots that slip or tangle, you’re not alone. This guide will walk you through simple, step-by-step instructions that anyone can follow. By the end, you’ll feel confident tying your jig every time, making your fishing trips more successful and enjoyable.
Ready to upgrade your fishing game? Let’s get started.

Credit: jimswansonmanofthewoods.wordpress.com
Choosing The Right Jig And Line
Tying a jig to your fishing line needs care. Picking the right jig and line helps you catch fish better.
Different jigs and lines work best for different fish and water conditions. Learning about them makes fishing easier.
Types Of Jigs
Jigs come in many shapes and weights. Each type suits a fishing style or fish species.
- Football Jig:Has a round head. Good for rocky bottoms.
- Grass Jig:Slim and smooth. Moves well in weeds.
- Creature Jig:Shaped like a bug. Attracts bass and panfish.
- Swim Jig:Designed to swim fast. Works well in open water.
- Tube Jig:Hollow and light. Used for slow drops.
Choose a jig based on water type and fish habits. Weight matters for casting distance and depth.
Selecting Fishing Line
Fishing line strength and type affect how well your jig works. Match the line to your jig and fish size.
Common lines include monofilament, fluorocarbon, and braided lines. Each has unique traits.
- Monofilament:Stretchy and easy to tie. Good for beginners.
- Fluorocarbon:Nearly invisible underwater. Better for clear water.
- Braided:Very strong and thin. Best for heavy cover fishing.
Pick a line with enough strength for your target fish. Thin lines cast better but may break easier.

Credit: www.reddit.com
Preparing The Line And Jig
Before tying the jig, prepare your fishing line carefully. Proper preparation helps secure the jig firmly and improves fishing success.
Focus on trimming the line to the right length and positioning the jig correctly on the line. These steps make the knot tying easier and stronger.
Trimming The Line
Trim the fishing line to remove any damaged or frayed ends. A clean line end prevents knot slipping and line breakage.
- Use sharp scissors or nail clippers to cut the line.
- Cut about one inch from the line end for a fresh tip.
- Avoid crushing or fraying the line while trimming.
- Check the trimmed end for smoothness before tying.
Positioning The Jig
Place the jig on the line carefully before tying the knot. Correct positioning ensures the jig moves naturally in water.
| Positioning Tip | Reason |
|---|---|
| Slide jig 12-18 inches from rod tip | Gives good casting distance and control |
| Align jig eye with line center | Helps knot sit evenly and secure |
| Keep jig steady before knot tying | Prevents line twisting and tangling |
Popular Knots For Jig Tying
Tying a jig to your fishing line needs a strong and reliable knot. Good knots keep your jig secure while fishing. This helps you catch more fish without losing your gear.
There are several knots that anglers use for jig tying. Each knot has its own benefits and works well in different fishing situations.
Improved Clinch Knot
The improved clinch knot is simple and very popular for tying jigs. It holds well and is easy to tie even with thin lines. This knot works best with monofilament and fluorocarbon lines.
To tie it, thread the line through the jig eye, wrap around the line five to seven times, then pass the tag end through the small loop near the eye. Finally, pull tight to secure.
- Easy to learn and tie
- Strong and reliable
- Good for light to medium lines
Palomar Knot
The Palomar knot is very strong and keeps the jig attached even under heavy strain. It works well with braided, monofilament, and fluorocarbon lines. This knot keeps the line from twisting.
Double the line and pass it through the jig eye. Tie a loose overhand knot, then pass the jig through the loop. Pull the knot tight and trim the tag end.
- Very strong and secure
- Works well with all line types
- Maintains line strength
Loop Knot
The loop knot lets your jig move freely on the line. This movement can make your jig look more natural to fish. It is a good choice for jigs that need extra action in the water.
Make a small loop in the line, pass it through the jig eye, then tie a simple overhand knot around the standing line. Pull tight and leave a small loop for jig movement.
- Allows jig free movement
- Good for lifelike jig action
- Easy to tie and adjust
Step-by-step Knot Tying Guide
Learning to tie a jig to your fishing line is essential. Different knots can affect your fishing success.
This guide will show you how to tie three popular knots. These knots are strong and easy to learn.
Tying The Improved Clinch Knot
The Improved Clinch Knot is a trusted choice. It’s strong and works well for many fishing situations.
- Thread the line through the jig eye.
- Wrap the line around itself five times.
- Pass the end through the first loop by the jig eye.
- Then, pass it through the big loop.
- Wet the knot and pull it tight.
Tying The Palomar Knot
The Palomar Knot is very strong. It’s also quick and easy to tie.
- Double the line and pass it through the jig eye.
- Tie a loose overhand knot with the doubled line.
- Pass the jig through the loop.
- Wet the line and pull it tight.
Tying The Loop Knot
The Loop Knot gives the jig more movement. It’s useful for live bait fishing.
- Make a simple overhand knot in the line.
- Pass the line through the jig eye.
- Run the line back through the overhand knot.
- Make another overhand knot with the free end.
- Pull the line to tighten the knot.
Tips For Stronger Knots
Tying a jig to your fishing line needs care to keep the knot strong. A good knot stops the jig from slipping off during fishing.
Follow these tips to help your knot hold tight and last longer. Strong knots improve your chances of catching fish.
Moistening The Line
Before pulling the knot tight, wet the line with water or saliva. Moistening the line reduces friction and heat, which can weaken the knot.
- Use a small amount of water or saliva to wet the knot area.
- Make sure the line is evenly moist, not soaked.
- Do this right before tightening the knot.
Pulling The Knot Tight
Pull the knot slowly and firmly to tighten it. Quick or uneven pulling can cause the knot to slip or weaken.
| Tip | Why It Helps |
| Pull evenly on both ends | Prevents twisting and slipping |
| Pull slowly | Allows the knot to settle properly |
| Use steady pressure | Ensures tight, secure knot |
Trimming Excess Line
After tightening, cut the extra line close to the knot. Leaving too much line can catch on weeds or rocks and weaken the knot.
- Use sharp scissors or nail clippers for a clean cut.
- Leave about 2-3 millimeters of tag end to avoid knot slipping.
- Check the trimmed area for any frayed ends.
Common Mistakes To Avoid
Tying a jig to your fishing line seems simple but often goes wrong. Small errors can cause lost fish and gear.
Knowing common mistakes helps you tie stronger knots. This guide covers three key errors to avoid.
Incorrect Knot Wrapping
Wrapping the line around the jig or itself wrongly causes weak knots. Make sure the wraps are neat and tight.
- Do not overlap the line unevenly during wraps.
- Avoid too few wraps; more wraps hold better.
- Keep wraps close to each other to prevent slipping.
Weak Knot Tightening
Tightening the knot softly can cause it to come undone. Pull the line firmly but carefully to secure it.
| Common Problem | Effect | Solution |
|---|---|---|
| Loose knot tightening | Knot slips or unties | Pull line firmly and slowly |
| Over-tightening | Line weakens or breaks | Tighten just enough, avoid snapping |
Ignoring Line Condition
Using old or damaged fishing line lowers knot strength. Check line for frays or cracks before tying.
- Replace line if it shows visible wear.
- Do not tie knots on dirty or wet line.
- Use line suitable for your jig size and weight.

Credit: wholesalejigs.com.au
Frequently Asked Questions
How Do You Securely Tie A Jig To Fishing Line?
Use a strong knot like the improved clinch knot. Thread the line through the jig eye, wrap it around five times, pass through the loop, and tighten. This ensures a secure and reliable connection that holds during fishing.
What Is The Best Knot For Jig Fishing?
The improved clinch knot is the best for jig fishing. It is simple, strong, and easy to tie. It provides excellent knot strength and reliability, making it ideal for securing jigs to your fishing line.
Can I Tie A Jig To Braided Fishing Line?
Yes, you can tie a jig to braided line using the Palomar knot. This knot preserves the line strength and holds well. It is quick to tie and works great with braided fishing lines for jigging.
Why Is Tying A Jig Properly Important?
Tying a jig properly prevents line slippage and lost fish. A secure knot ensures your jig stays attached during casts and strikes. Properly tying improves fishing efficiency and success rates.
Conclusion
Tying a jig to your fishing line is simple and important. A strong knot keeps your jig secure and helps catch fish. Practice the steps slowly until you feel confident. Using the right knot also saves time and frustration on the water.
Remember, a good knot makes your fishing more fun and successful. Try it today and enjoy your next fishing trip!