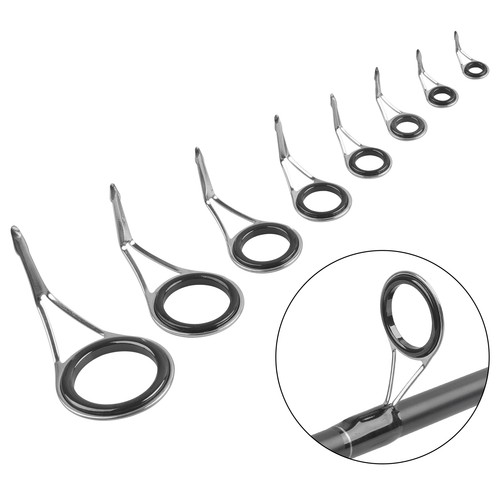
Have you ever noticed a damaged or broken eye on your fishing rod and wondered how to fix it? Replacing a fishing rod eye might seem tricky, but with the right steps, you can do it yourself and save money.
Imagine heading out on your next fishing trip with a fully repaired rod, ready to catch the biggest fish. In this guide, you’ll learn simple, clear instructions to replace your fishing rod eye quickly and confidently. Keep reading to discover how easy it is to get your rod back in perfect shape.
Tools And Materials Needed
Replacing a fishing rod eye is a simple repair that can save your rod. You need the right tools and materials to do the job well.
This guide will help you understand the types of fishing rod eyes and the essential tools for replacement.
Types Of Fishing Rod Eyes
Fishing rod eyes come in different styles. Each style fits different fishing needs and rod types.
The most common types include single-foot, double-foot, and stainless steel eyes. Each has a unique shape and strength.
- Single-foot eyes:Light and simple, used on light rods.
- Double-foot eyes:Stronger and more stable, used on heavy rods.
- Stainless steel eyes:Rust-resistant, good for saltwater fishing.
Essential Tools For Replacement
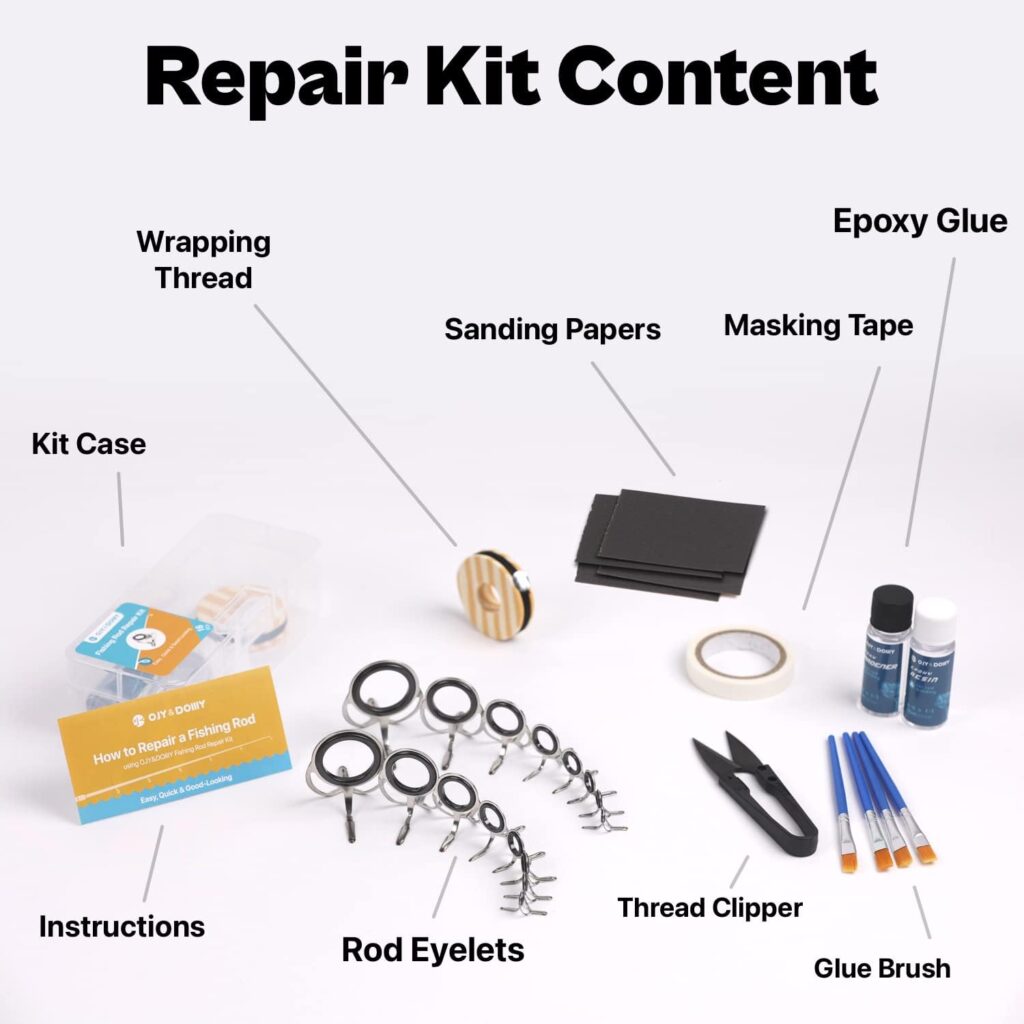
You need a few basic tools to replace a fishing rod eye. These tools help remove the old eye and attach the new one securely.
Having the right materials also makes the process easier and safer for your rod.
- Small flathead screwdriver to remove thread wraps
- Sharp knife or blade to cut old thread
- Replacement fishing rod eye of the right size
- Rod wrapping thread to secure the new eye
- Epoxy or rod finish glue to seal the thread
- Fine sandpaper to smooth the rod surface
- Small brush to apply epoxy or glue
- Heat source (optional) to cure the epoxy faster

Credit: www.amazon.com
Preparing The Rod
Replacing a fishing rod eye is easy with the right steps. First, prepare the rod properly to ensure a smooth process.
This guide will help you remove the old eye and clean the rod surface. Follow these steps for a successful repair.
Removing The Old Eye
Start by carefully heating the old eye with a lighter. This softens the glue holding it in place.
Once heated, gently twist and pull the eye off the rod. Use pliers for a better grip if needed.
- Heat the eye for a few seconds
- Twist and pull to remove
- Use pliers carefully
Cleaning The Rod Surface
After removing the eye, clean the rod surface. This ensures the new eye adheres properly.
Use sandpaper to smooth the area. Remove any leftover glue or debris.
- Use fine sandpaper for cleaning
- Ensure no glue remains
- Wipe with a clean cloth
Choosing The Right Replacement Eye
Replacing a fishing rod eye needs care to keep your rod working well. Picking the right replacement eye matters for performance and durability.
This guide helps you choose the best eye by focusing on size, style, and material.
Matching Size And Style
It is important to match the size and style of the new eye to the old one. Wrong size can affect casting and line flow.
- Measure the diameter of the old eye’s frame
- Check the ring size where the line passes
- Match the shape and height of the frame
- Choose a style that fits your rod type and use
Material Considerations
The material of the replacement eye affects its strength and resistance to corrosion and wear.
| Material | Benefits | Drawbacks |
| Stainless Steel | Strong and rust-resistant | Heavier than other materials |
| Aluminum Oxide | Lightweight and smooth for line | Less durable under heavy load |
| Ceramic | Very smooth, reduces line friction | Can be brittle and break |
| Titanium | Very strong and corrosion-proof | Expensive compared to others |
Attaching The New Eye
Replacing a fishing rod eye is a simple task if you follow the right steps. This guide will help you attach the new eye securely.
Make sure to take your time positioning, wrapping, and sealing the eye for best results.
Positioning The Eye Correctly
Place the new eye exactly where the old one was. Align it with the other guides on the rod. The eye should sit straight and not tilt to one side.
Securing With Thread Wraps
Use strong thread to wrap the eye foot tightly to the rod blank. Wrap the thread evenly and close together for a solid hold.
- Start wrapping a few millimeters before the eye foot
- Wrap over the foot multiple times for strength
- Finish the wrap a few millimeters past the foot
- Tie off the thread securely with a knot
Applying Epoxy For Durability
Cover the thread wraps with epoxy to protect and strengthen the attachment. Use a thin coat first, then add a second coat after it dries.
| Epoxy Step | Purpose | Dry Time |
| First coat | Seal thread and fill gaps | 4-6 hours |
| Second coat | Smooth finish and extra strength | 12-24 hours |
Finishing Touches
Replacing a fishing rod eye needs care after installation. Proper finishing keeps the repair strong and smooth.
These final steps improve the rod’s look and protect the wraps from damage.
Sanding And Smoothing Wraps
After the epoxy has dried, lightly sand the wraps to smooth rough edges. Use fine-grit sandpaper and be gentle to avoid damage.
- Start with 400-grit sandpaper for uneven spots
- Use 600-grit or finer for a smooth finish
- Wipe away dust with a clean cloth
- Check for any bumps or loose fibers
- Repeat sanding if needed for even surface
Curing Time And Care Tips
Allow the epoxy to cure fully before using the rod. This ensures strength and durability of the repair.
| Task | Recommended Time |
| Initial Set | 4 to 6 hours |
| Full Cure | 24 to 48 hours |
| Handling | Gentle after 6 hours |
| Normal Use | After full cure |
Keep the rod in a dry place during curing. Avoid bending or stressing the repaired section.
Credit: collegeofems.com
Preventing Future Damage
Replacing a fishing rod eye is important, but preventing damage is better. Taking care of your rod helps it last longer and work well.
Simple steps can protect your rod from breaks and wear. Follow these tips to keep your fishing gear in top shape.
Regular Rod Maintenance
Check your fishing rod often for cracks, loose parts, or dirt. Cleaning and inspecting the rod keeps it safe and strong.
- Wipe the rod with a soft cloth after each use.
- Use mild soap and water to clean the guides and handle.
- Dry the rod completely before storing it away.
- Store the rod in a cool, dry place away from sunlight.
- Check the rod eyes for any signs of rust or bending.
Handling Tips To Avoid Breakage
Handle your fishing rod gently. Rough use can cause cracks or damage the rod eyes.
| Handling Tip | Reason |
| Do not lean the rod against hard surfaces | This can cause bending or breaks |
| Carry the rod in a protective case | Protects from scratches and accidental hits |
| Avoid dropping the rod | Prevents damage to the rod and eyes |
| Use proper casting techniques | Reduces stress on the rod and guides |
| Do not overload the rod with heavy line or lures | Keeps the rod from bending too much |

Credit: www.amazon.com
Frequently Asked Questions
How Do I Remove A Broken Fishing Rod Eye?
To remove a broken eye, first cut the thread wrapping it. Gently heat the area to soften glue. Then carefully slide off the old eye.
What Tools Are Needed To Replace A Fishing Rod Eye?
You need a new rod eye, thread, glue, scissors, and a heat source like a lighter or heat gun.
How Do I Secure A New Fishing Rod Eye?
Place the new eye in position. Wrap tightly with thread. Apply glue or epoxy to seal and let dry fully.
Can I Replace A Fishing Rod Eye Myself?
Yes, with basic tools and patience, you can replace a rod eye at home. Follow step-by-step guides carefully.
Conclusion
Replacing a fishing rod eye is simple with the right steps. Take your time and follow each part carefully. Use the right tools to avoid damage. A new eye can improve your fishing experience. Fixing it yourself saves money and builds confidence.
Practice makes the process easier next time. Keep your rod in good shape for many trips. Small repairs keep fishing fun and stress-free. Try it out and enjoy your time on the water.