Have you ever wished your older car had a backup camera? It’s not just a fancy feature for new vehicles anymore.
Installing a backup camera in your older car can make parking safer and easier. But is it really possible? And what does it take to add this handy gadget to a car that wasn’t built for it? If you want to protect yourself, your passengers, and your car from accidents, keep reading.
You’ll discover simple answers and practical tips that can change the way you drive every day.
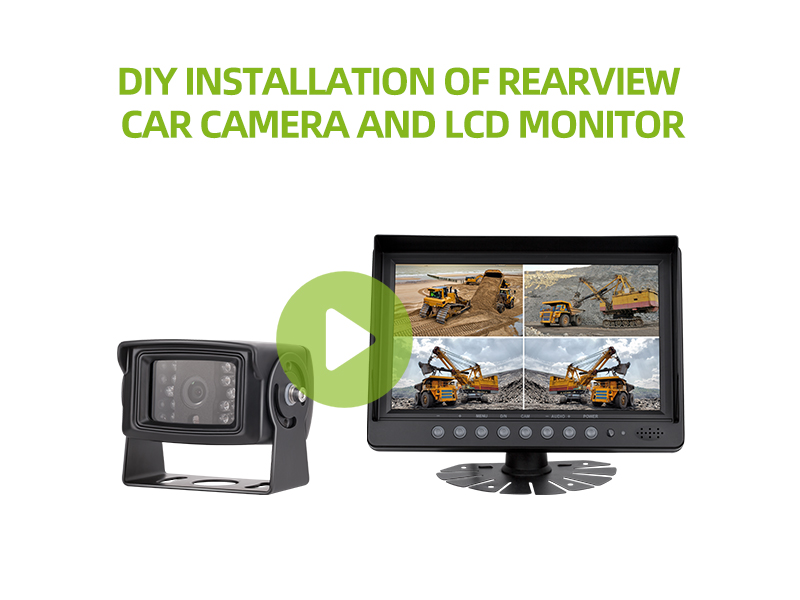
Credit: luview.com
Benefits Of Backup Cameras
Backup cameras are helpful devices that show the area behind a car. They help drivers see things that might be hard to spot in mirrors.
You can add backup cameras to older cars, giving them useful features found in newer models.
Improved Safety
Backup cameras reduce the risk of accidents by showing obstacles behind the car. Drivers can spot children, pets, or objects easily.
This extra view helps prevent injuries and damage to the vehicle or property.
- See blind spots clearly
- Avoid hitting small objects
- Protect pedestrians and pets
Enhanced Parking Accuracy
Backup cameras guide drivers during parking. You can align your car better in tight spaces.
The camera helps judge distances and angles, making parking faster and easier.
- See parking lines clearly
- Avoid hitting curbs or other cars
- Park quickly in small spots
Increased Vehicle Value
Installing a backup camera can raise your car’s resale value. Buyers like cars with added safety features.
This upgrade makes your older car look more modern and well-maintained.
- Appeals to safety-conscious buyers
- Shows you keep the car updated
- May increase resale price

Credit: www.reddit.com
Types Of Backup Cameras
Installing a backup camera in an older car can improve safety. There are different types of backup cameras to choose from.
Each type has its own features and installation needs. Knowing them helps you pick the right one for your car.
Wired Cameras
Wired backup cameras connect to your car’s display using cables. They usually give a stable video signal.
Installing wired cameras can take more time. You need to run wires through your car’s interior.
- Clear and reliable video quality
- Requires running cables from rear to front
- Often works with factory or aftermarket displays
- Installation may need professional help
Wireless Cameras
Wireless backup cameras send video signals without cables. This makes installation easier and faster.
They use Wi-Fi or radio signals to connect the camera and display. Some signal interference is possible.
- No need to run long cables
- Easy to install in older cars
- Signal can be affected by obstacles
- May require battery or power from the car
Integrated Display Options
Backup cameras can show images on different screens. Some use existing car displays, others add new ones.
Options include built-in dashboard screens, rearview mirror displays, or standalone monitors.
- Use factory screen if compatible
- Attach display to rearview mirror for easy view
- Standalone monitors can fit on dashboard
- Choose display type based on your car and needs
Compatibility With Older Cars
Installing a backup camera in an older car can improve safety and convenience. Many older vehicles did not come with built-in camera systems.
Before installing, check if your car’s wiring, screen options, and power supply can support the camera system.
Assessing Vehicle Wiring
Older cars may have simpler wiring that lacks connectors for modern cameras. You need to locate the reverse light wiring to trigger the camera.
- Find the reverse light wires behind the tail light.
- Use a multimeter to confirm the correct wires.
- Consider using wire taps or connectors for installation.
- Check the length of wiring needed to reach the dashboard.
- Be careful not to damage existing wires.
Display Screen Options
Older cars often lack built-in screens for backup cameras. You must choose a suitable display option.
| Display Type | Description | Compatibility |
| Aftermarket Rearview Mirror | Mirror with built-in screen | Fits most older cars |
| Dashboard Monitor | Small screen mounted on dashboard | Requires space on dash |
| In-Dash Screen | Replaces factory stereo screen | Needs stereo replacement |
Power Source Considerations
The backup camera needs power from the car’s electrical system. Older cars may not have easy power access points.
- Tap power from the reverse light circuit to turn on the camera when reversing.
- Use a fuse tap to connect to the car’s fuse box safely.
- Consider a separate power source if needed, like the cigarette lighter.
- Ensure all connections are secure to avoid electrical issues.
Installation Steps
Installing a backup camera in an older car can improve safety and convenience. This guide explains the basic steps to add one yourself.
The process involves mounting the camera, connecting power, and linking it to your display. Follow each step carefully to get the best results.
Gathering Tools And Materials
Before starting, collect all tools and parts needed for the installation. This saves time and avoids interruptions.
- Backup camera kit with cables
- Power drill and drill bits
- Screwdrivers (flathead and Phillips)
- Wire strippers and electrical tape
- Multimeter or voltage tester
- Zip ties and mounting brackets
- User manual for your specific camera model
Mounting The Camera
Find a good spot at the rear of your car to place the camera. Usually, it goes near the license plate.
Drill holes carefully if needed. Attach the camera with screws or brackets included in the kit.
- Clean the mounting area before attaching
- Use waterproof sealant around holes
- Ensure camera lens faces directly backward
- Secure all screws tightly to avoid vibration
Connecting To Power And Display
Connect the camera’s power cable to your car’s reverse light wire. This allows the camera to turn on automatically when reversing.
Run the video cable from the camera to the display screen inside your car. Hide wires under trim panels for a clean look.
- Use a multimeter to find the reverse light wire
- Strip and connect wires securely with electrical tape
- Route video cable along existing wiring paths
- Connect video cable to the display’s video input
Testing The System
Turn your car’s ignition to the accessory position and shift to reverse. Check if the camera image shows on the display.
Adjust the camera angle if needed. Make sure the picture is clear and the camera turns off when not reversing.
- Test in daylight and low light
- Look for any loose connections
- Secure any loose wires after testing
- Make sure the display switches back when not reversing
Common Challenges
Installing a backup camera in an older car can be tricky. The process has some common challenges you should know about.
These challenges often relate to wiring, display setup, and protecting the camera from weather damage.
Wiring Difficulties
Older cars may not have ready wiring for a backup camera. Finding power and signal cables can be hard.
- Locating reverse light wires for power
- Running cables through tight or hidden spaces
- Dealing with old or brittle wiring insulation
- Connecting video cables to older stereo systems
Display Integration Issues
Older cars often lack screens to show the camera view. Adding a display or using an existing one can be tough.
| Display Option | Pros | Cons |
| Aftermarket Monitor | Easy to install, clear image | Extra dashboard space needed |
| Replace Existing Stereo Screen | Integrated look | Complex wiring, may need new stereo |
| Use Phone or Tablet | No car modification needed | Requires mounting and Bluetooth or Wi-Fi |
Weatherproofing Concerns
Backup cameras face rain, dust, and heat. Protecting the camera keeps it working well over time.
Key weatherproofing points to consider:
- Choose cameras with a strong waterproof rating (IP67 or higher)
- Seal all cable connections with waterproof tape or heat shrink
- Mount the camera in a sheltered area, like under the trunk handle
- Inspect and clean the lens regularly to prevent dirt buildup
Professional Vs Diy Installation
Installing a backup camera in an older car can improve safety and convenience. You can choose to do it yourself or hire a professional.
Each option has its benefits and challenges. Understanding cost, skill, and time helps you decide.
Cost Comparison
Professional installation usually costs more because you pay for labor. They also supply all needed parts and tools.
DIY installation saves money on labor but may require buying extra tools. You only pay for the camera and materials.
- Professional installation: $100 to $300 or more
- DIY installation: $50 to $150 for parts and tools
- DIY may need extra costs for tools you don’t have
Skill Requirements
Professional installers have experience with wiring and mounting cameras. They handle electrical connections safely.
DIY requires basic knowledge of car wiring and tools. You need to read instructions carefully and work with patience.
- Professionals handle complex wiring and adjustments
- DIY needs skills in drilling and electrical wiring
- Wrong connections can cause damage or failure
Time Investment
Professional installation is faster. Experts often finish within one to two hours.
DIY installation takes longer. You may spend several hours or even a full day to complete it.
- Professionals work quickly and efficiently
- DIY may need extra time for troubleshooting
- Time depends on your experience and tools
Maintenance Tips
Installing a backup camera in an older car improves safety. Proper maintenance keeps the camera working well.
Regular checks help avoid problems. Focus on cleaning, connections, and software updates.
Cleaning The Camera Lens
Dirt and dust on the camera lens reduce image quality. Clean the lens often to keep the picture clear.
- Use a soft, lint-free cloth
- Apply a small amount of glass cleaner if needed
- Wipe gently to avoid scratching the lens
- Clean after rain or mud exposure
Checking Connections
Loose or damaged wires cause signal loss or camera failure. Check all connections regularly.
| Connection Point | Check For | Action |
| Power Cable | Firmness and corrosion | Secure and clean contacts |
| Video Cable | Damage and loose plugs | Replace or reconnect properly |
| Ground Wire | Secure attachment | Tighten or repair as needed |
Software Updates
Some backup cameras use software or apps. Updates fix bugs and improve performance.
Check the camera or car system manual for update instructions. Follow these tips:
- Connect to Wi-Fi for faster downloads
- Use official sources for updates
- Restart the system after updating
- Regularly check for new updates
Credit: autopartia.com
Frequently Asked Questions
Can I Install A Backup Camera In Any Older Car Model?
Yes, most older cars can have backup cameras installed. Compatibility depends on the car’s power source and display options. Aftermarket kits with wireless cameras and monitors make installation easier for various models, even without built-in screens.
What Tools Do I Need To Install A Backup Camera?
You typically need basic tools like screwdrivers, wire strippers, electrical tape, and a drill. Some kits may require additional tools depending on your car’s design. Always read the installation manual for specific tool requirements and safety tips.
How Much Does It Cost To Add A Backup Camera To An Old Car?
Costs vary from $50 to $300 based on the camera type and features. Wireless systems tend to be cheaper and easier to install. Professional installation can add to the cost but ensures proper setup and safety.
Is Professional Installation Necessary For Backup Cameras In Older Cars?
Professional installation is recommended but not always necessary. DIY kits come with instructions for those comfortable with wiring and mounting. Professionals ensure correct placement, wiring safety, and optimal camera performance.
Conclusion
Installing a backup camera in an older car is possible and useful. It helps you see behind your vehicle more clearly. Many kits fit well and are easy to install yourself. This upgrade can improve safety while parking and driving in reverse.
Choose a camera that suits your car and budget. Take time to follow instructions carefully for best results. Enjoy the extra confidence and safety on the road.