Are you tired of sweating through hot days and nights? A portable air conditioner might be the perfect solution for you.
But how do you install one quickly and correctly? You don’t need to be a tech expert or spend hours figuring it out. In this guide, you’ll discover simple, step-by-step instructions that make installing your portable AC easy and stress-free.
Keep reading, and soon you’ll enjoy cool, refreshing air without any hassle.
Choosing The Right Portable Ac
Choosing the right portable air conditioner depends on several key factors. Assessing room sizehelps determine the cooling power needed. Measure the room’s square footage and check the unit’s BTU rating to match it.
Checking power requirementsis crucial. Make sure your electrical outlet can handle the unit’s wattage. This prevents tripping breakers or damage.
Considering noise levelsmatters for comfort. Look for models with low decibel ratings for quieter operation. This is important for bedrooms or study rooms.
| Factor | What to Check | Why It Matters |
|---|---|---|
| Room Size | Square footage and BTU rating | Proper cooling power |
| Power Requirements | Electrical wattage and outlet type | Safe and efficient operation |
| Noise Levels | Decibel rating | Comfort during use |

Credit: www.youtube.com
Unpacking And Inspecting The Unit
After unpacking the portable air conditioner, check all parts listed in the manual. Make sure the unit, exhaust hose, window kit, and remote controlare included. Missing parts can affect installation and use.
Carefully inspect the air conditioner for any visible damage. Look for cracks, dents, or broken pieces on the body and vents. Check the exhaust hose for holes or tears.
Any defects or damage should be reported to the seller before installation. Using a damaged unit can cause poor performanceor safety issues.
Selecting Installation Location
Choose a windowthat opens easily and is near an electrical outlet. The window should be large enough to fit the air conditioner’s vent hose. Avoid windows with security bars or screens that block installation.
Proper ventilationis key. The unit needs to push hot air outside. Make sure the vent hose can reach the window without bending or kinking. Keep the hose as straight as possible.
- Keep the area around the unit free from obstacles.
- Avoid placing it near curtains or furniture that block airflow.
- Make sure nothing blocks the window vent.
Assembling The Exhaust Hose
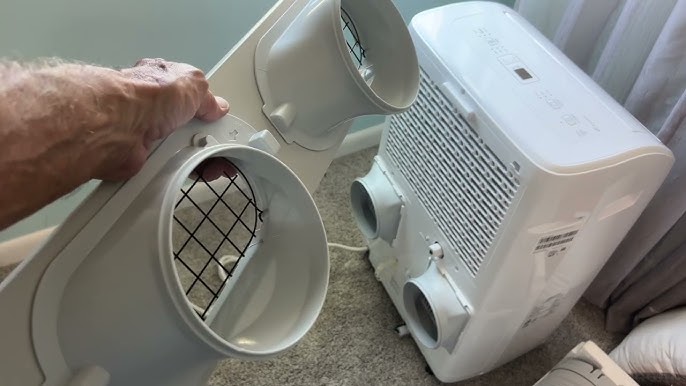
Attach the exhaust hose securely to the portable air conditioner’s vent outlet. Ensure the connection is tight to prevent air leaks. Then, connect the other end to the window adapter for proper ventilation.
Connecting Hose To Unit
First, find the exhaust port on your air conditioner. Attach one end of the exhaust hose to it. Ensure the hose is securely connected. Twist the hose if needed for a tight fit. This prevents air from escaping. Check for any gaps or loose connections. A tight connection helps the unit work better.Attaching Hose To Window Kit
Place the window kit in your window frame. Adjust the kit to fit the window size. Attach the other end of the exhaust hose to the kit. Make sure it snaps in place. This keeps the hose stable. Seal any gaps between the kit and window frame. Use foam strips if necessary. A good seal keeps hot air out. `Installing The Window Kit
Measure the width and height of your window opening. Use a tape measure for accuracy. Write down these numbers.
Check if the window kit fits the window size. Most kits adjust to fit different widths.
Place the window kit in the window slot. Make sure it sits firmly.
Use screws or brackets to secure the kit. Tighten them to avoid gaps.
- Seal any openings to keep air from escaping.
- Ensure the exhaust hose attaches properly to the kit.
- Test the setup by closing the window gently.
Setting Up The Drainage System
The water tank collects moisture from the air during cooling. It must be emptied often to keep the air conditioner working well. Some models have a full tank indicator. Pour the water out carefully to avoid spills. Use a shallow container to catch the water if needed.
Some portable air conditioners allow a drain hose connection. This lets water drain continuously without emptying the tank. Connect the hose firmly to the drain port. Make sure the hose leads to a safe drainage area, like a floor drain or outside.
- Check the hose for kinks or bends that block water flow.
- Secure the hose to prevent leaks.
- Empty the tank periodically if no hose is used.
Powering The Portable Ac
Choose a grounded outletthat matches the portable AC’s power needs. Make sure the outlet is not damaged or loose. It should be close enough to avoid stretching the cord.
Avoid using extension cordsas they may cause overheating or power loss. They can also be a safety hazard. If you must use one, pick a heavy-duty cord rated for the air conditioner’s wattage.
- Check the AC’s power rating on the label.
- Use a dedicated outlet to avoid overload.
- Keep the cord away from water and heat.
- Plug the unit directly into the wall socket whenever possible.
Operating The Unit
The portable air conditioner has simple controls to make cooling easy. Adjust the temperature settingsusing the control panel or remote. Set the desired temperature, usually between 60°F and 85°F. The unit will cool until it reaches this temperature.
Use the timer functionto set when the unit turns on or off automatically. This helps save energy and keeps your room comfortable. Timer settings often range from 1 to 24 hours.
The mode functionlets you select different ways to cool:
- Cool modelowers the room temperature.
- Fan modecirculates air without cooling.
- Dry modereduces humidity in the room.
Use the mode and timer features together for better comfort and efficiency.
Maintaining Your Portable Ac
Cleaning the filtersis key for good air flow and cool air. Take the filters out carefully. Use a soft brush or vacuum to remove dust. Wash them with warm water and mild soap. Let filters dry completely before putting them back. This helps your unit work better and last longer.
Storing your portable AC during the off-season keeps it safe. Clean the unit fully to avoid mold and smells. Dry all parts well. Cover it with a cloth or plastic cover to keep dust away. Store in a dry, cool place. This keeps your AC ready for next summer.

Credit: www.youtube.com

Credit: www.youtube.com
Frequently Asked Questions
How Do I Set Up A Portable Air Conditioner Window Vent?
To set up the vent, attach the exhaust hose to the unit. Insert the window kit into your window frame. Connect the hose to the window kit. Seal gaps to prevent air leaks for efficient cooling.
Can I Install A Portable Ac Without Professional Help?
Yes, most portable AC units are designed for easy DIY installation. Follow the manufacturer’s instructions carefully. Ensure the exhaust hose is properly connected and vented outside to avoid overheating.
What Tools Do I Need To Install A Portable Air Conditioner?
You typically need a screwdriver, measuring tape, and window sealing kit. Some units come with installation hardware included. Having these tools ensures a smooth and secure setup process.
How Do I Properly Vent A Portable Air Conditioner?
Vent the exhaust hose through a window, sliding door, or wall vent. Use the window kit to secure the hose in place. Proper venting removes hot air, improving unit efficiency and room cooling.
Conclusion
Installing a portable air conditioner can be simple and quick. Follow each step carefully for best results. Make sure the unit fits well near a window or vent. Keep the exhaust hose straight and secure to avoid leaks. Check the power source before plugging in your AC.
Regular cleaning helps the machine work better and last longer. Enjoy cool air without much hassle or cost. This guide helps you stay comfortable during hot days. Simple tools and clear steps make the job easy. Your home can feel fresh and cool in no time.