Are you ready to spend more time fishing and less time struggling with your gear? Learning how to put fishing line on a reel might seem tricky at first, but once you get the hang of it, you’ll save yourself hours of frustration.
Whether you’re a beginner or just need a quick refresher, this guide will walk you through simple, step-by-step instructions. By the end, you’ll feel confident and ready to cast like a pro. Keep reading—your next great catch is waiting!
Credit: www.epicflyrods.com
Choosing The Right Fishing Line
Choosing the right fishing line is important for a good fishing experience. The line helps you catch fish and works with your reel and rod.
Many types of fishing lines exist. Picking the right one depends on the type of fish and where you fish.
Types Of Fishing Lines
There are three main types of fishing lines. Each type has unique features for different fishing needs.
- Monofilament:This line is stretchy and easy to use. It is good for beginners.
- Fluorocarbon:This line is hard to see in water. It sinks faster and is strong.
- Braid:This line is very strong and thin. It has little stretch and lasts long.
Line Strength And Thickness
Line strength is how much weight the line can hold before breaking. Thickness affects how the line moves in water.
Stronger lines are thicker but harder to cast far. Thinner lines cast easily but may break more.
- Light lines (2-6 lb) are good for small fish.
- Medium lines (8-12 lb) work for most fishing.
- Heavy lines (15+ lb) are for big fish and tough conditions.
Considering Fishing Conditions
Fishing conditions affect the choice of line. Clear water may need a less visible line. Rough water needs a stronger line.
Think about the fish type, water type, and how you fish. This will help you pick the best line.
- Use thin, clear lines in clear water.
- Use strong lines in thick weeds or rocky areas.
- Use lines with some stretch for active fish that fight hard.
Preparing Your Reel
Putting fishing line on a reel needs good preparation. This helps the line last longer and work well. Start by getting your reel ready before adding new line.
Check your reel carefully to avoid problems while fishing. Follow these steps to prepare your reel properly.
Removing Old Line
Take off the old fishing line before putting on new line. Old line can get weak or tangled. Removing it makes space for fresh line.
- Open the bail arm to release the line
- Cut the line near the spool with scissors
- Pull the old line off the reel slowly
- Dispose of the old line safely to protect nature
Inspecting The Reel
Look over your reel for damage or dirt. Check parts like the spool, drag system, and bail arm. Clean the reel if needed to keep it working well.
| Reel Part | What to Check |
| Spool | Look for cracks or dents |
| Drag System | Test for smooth operation |
| Bail Arm | Check if it opens and closes properly |
| Handle | Make sure it turns easily |
Attaching The Reel To The Rod
Secure your reel to the fishing rod before spooling line. A tight fit helps control the reel and rod together. This step makes fishing easier and safer.
Follow these tips to attach the reel:
- Place the reel foot into the reel seat on the rod
- Turn the reel seat locking ring to tighten the reel
- Check the reel does not move or wiggle
- Hold the rod and reel together to test comfort
Attaching The Line To The Reel
Attaching the fishing line to your reel is an important step for a successful fishing experience. Properly securing the line ensures smooth casting and prevents tangles.
Follow these simple steps to attach the line correctly and ensure your fishing adventure starts off on the right foot.
Threading The Line Through Guides
First, you need to thread the fishing line through the guides on your fishing rod. This helps in directing the line properly during casting and retrieving.
- Open the bail of your reel.
- Insert the line through the rod’s tip guide.
- Continue threading through each guide towards the reel.
- Make sure the line is straight and not twisted.
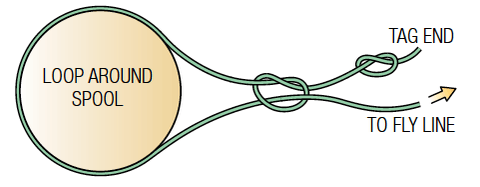
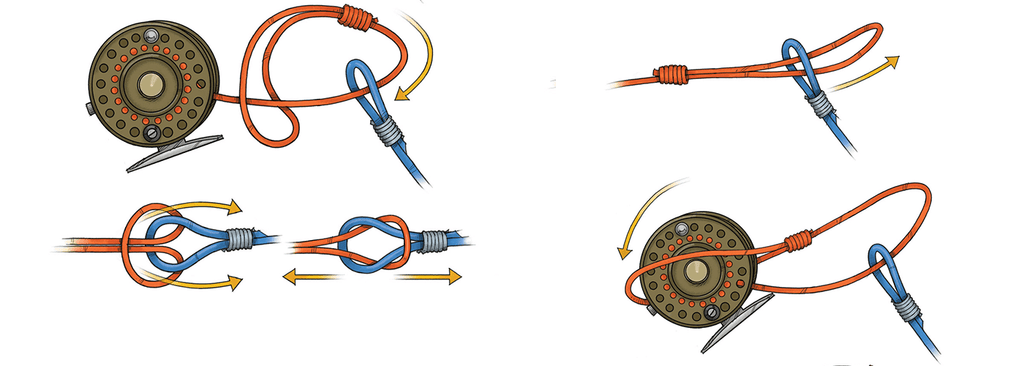
Tying The Arbor Knot
Now, it’s time to secure the line to the reel spool using the arbor knot. This knot is reliable and easy to tie, making it ideal for beginners.
1. Wrap the line around the spool. 2. Tie an overhand knot with the tag end around the standing line. 3. Tie a second overhand knot in the tag end. 4. Pull both knots tight against the spool.
Securing The Line Properly
To secure the line properly, make sure it is tight and evenly wound on the spool. This prevents line slippage and ensures smooth operation.
| Action | Purpose |
| Close the bail | Prevents the line from slipping |
| Hold the line taut | Ensures even winding |
| Reel in slowly | Prevents tangles |

Credit: www.youtube.com
Spooling The Line
Spooling the fishing line onto your reel is an important skill. It helps you cast smoothly and avoid tangles on the water.
This guide covers key points to keep your line tight, prevent twists, and fill the spool the right way.
Maintaining Proper Tension
Keeping the right tension on the line while spooling is essential. Too loose, and the line will tangle. Too tight, and it may snap or damage the spool.
- Use your fingers or a cloth to hold the line firmly as it goes on the reel.
- Ask a friend to hold the line spool with gentle pressure if needed.
- Keep the line flat and even across the spool as you wind it.
Avoiding Line Twists And Overlaps
Line twists cause knots and weak spots. Overlaps make casting difficult. Prevent these by following careful steps.
| Cause | Tip to Avoid |
|---|---|
| Reel direction mismatch | Match spool rotation to line direction |
| Loose tension | Keep line tight while spooling |
| Incorrect line feeding | Feed line through guides properly |
| Twisted or tangled spool | Untwist line before spooling |
Filling The Spool Correctly
Fill the spool evenly and leave some space at the edges. Overfilling or underfilling causes problems during fishing.
- Stop spooling when the line is about 1/8 inch below the spool rim.
- Check the spool size and line capacity for best results.
- Wind the line smoothly to avoid bumps or gaps.
Finishing Up
After you spool the fishing line onto your reel, you need to finish the setup. This part ensures your line is ready for fishing. It helps avoid problems while casting or reeling in fish.
Follow these simple steps to complete the job. They make your fishing experience smooth and enjoyable.
Cutting The Line
Cut the line leaving about 6 inches past the reel spool. This extra length helps tie your terminal tackle easily.
Use sharp scissors or line cutters for a clean cut. A clean cut prevents fraying and slipping from the reel.
Checking For Smooth Operation
Turn the reel handle to check if the line moves smoothly on the spool. The line should wrap evenly without gaps or overlaps.
Make sure the drag system works well. Pull the line gently and feel if it resists properly without sudden jerks.
- Spin the handle slowly to watch the line
- Adjust the drag knob if needed
- Look for any line twists or tangles
Adding Terminal Tackle
Attach your hook, lure, or swivel to the end of the line. Use a strong knot like the improved clinch knot for security.
Check your terminal tackle for any damage. Replace old or rusty parts to avoid losing fish.
- Thread the line through the terminal tackle eye
- Tie a secure knot and trim excess line
- Test the knot by pulling firmly
Credit: windrider.com
Tips For Line Maintenance
Keeping your fishing line in good shape helps you catch more fish. Proper care avoids tangles and breaks.
Use simple steps to store, check, and replace your line. This saves time and money over the long run.
Storing Your Reel
Store your reel in a cool, dry place away from sunlight. Heat and moisture can weaken the fishing line.
- Remove the line if you won’t fish for a long time
- Keep the reel covered to stop dust buildup
- Avoid leaving the reel in direct sunlight
- Store reels vertically to keep line tension even
Regular Line Inspection
Check your fishing line before every trip. Look for damage like cracks, frays, or discoloration.
| Damage Type | What to Look For | Why It Matters |
| Cracks | Small splits in the line | Weak spots that may snap |
| Frays | Loose fibers along the line | Can cause line to tangle or break |
| Discoloration | Faded or cloudy areas | Sign of old line losing strength |
Replacing Old Line
Replace your fishing line regularly to keep it strong. Old line loses flexibility and breaks easily.
- Remove the old line completely from the reel
- Choose the right type and strength for your fishing needs
- Attach the new line securely to the spool
- Wind the line evenly and tightly on the reel
- Trim any excess line to avoid tangles
Frequently Asked Questions
How Do I Choose The Right Fishing Line For My Reel?
Choose a fishing line based on your target fish and reel type. Consider line strength, material, and thickness for optimal performance and durability.
What Is The Best Way To Secure The Fishing Line On The Reel?
Tie a secure knot like the arbor knot to the spool. This prevents slipping and ensures the line stays firmly attached during casting and reeling.
How Much Fishing Line Should I Put On The Reel?
Fill the spool until it’s about 1/8 inch below the reel’s edge. This balance prevents line tangling and allows smooth casting and retrieval.
Can I Use Any Fishing Line For All Reel Types?
No, different reels require specific line types. Spinning reels prefer lighter lines, while baitcasting reels handle heavier, stronger lines for best results.
Conclusion
Putting fishing line on a reel is easier than it seems. Follow the steps carefully and take your time. Make sure the line is tight and even on the spool. This helps avoid tangles and line breaks while fishing. Practice a few times to feel more confident.
Soon, you will prepare your reel quickly and enjoy your fishing trips. Remember, patience and care lead to better results. Keep your gear ready, and happy fishing!