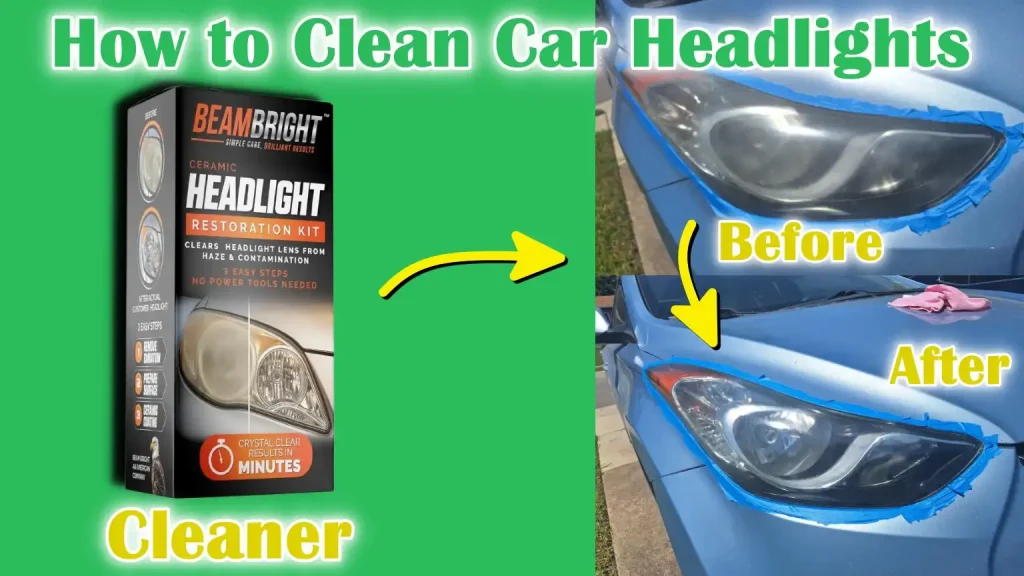
Are your car headlights looking dull or cloudy? This can make driving at night harder and even unsafe.
You might think cleaning them is complicated or expensive, but it’s actually something you can do yourself—quickly and easily. Imagine how much better your headlights will shine, improving your visibility and making your car look newer. Keep reading, and you’ll discover simple steps to restore your headlight lenses to crystal-clear condition.
Your safety and your car’s appearance depend on it!
Why Headlight Cleaning Matters
Clean headlights help you see clearly while driving at night or in bad weather. Dirty lenses block light and reduce your view.
Regular cleaning keeps headlights working well and protects your safety on the road.
Impact On Visibility
Dirty or foggy headlight lenses lower the light output. This makes it harder to see the road, signs, and obstacles.
- Reduced brightness
- Shorter visible distance
- Increased glare for other drivers
- Poor light focus and spread
Safety And Legal Concerns
Clean headlights are essential for safe driving. Many places have laws requiring headlights to be clear and bright.
| Safety Risk | Effect |
| Poor visibility | Accidents increase |
| Blinding glare | Other drivers distracted |
| Legal fines | Penalties for dirty lights |
| Failed inspections | Car not roadworthy |
Signs Your Headlights Need Cleaning
Watch for these signs to know when to clean your headlights.
- Lights look dim or yellowed
- Headlights appear cloudy or hazy
- Reduced night driving visibility
- Light beam is uneven or scattered
Common Causes Of Headlight Cloudiness
Car headlights can become cloudy over time. This cloudiness reduces light output and makes driving at night hard.
Understanding the causes helps you clean and protect your headlights better.
Oxidation
Oxidation happens when the plastic lens reacts with oxygen and water. This reaction forms a cloudy layer on the lens.
The cloudiness from oxidation blocks light and makes headlights look dull.
Road Debris And Dirt
Driving exposes headlights to dust, dirt, and small stones. These particles scratch and cover the lens.
Road debris and dirt build up over time and cause the lens to lose clarity.
- Dust and mud stick to the surface
- Small stones cause tiny scratches
- Insects and bugs leave marks
Uv Damage
Sunlight has ultraviolet (UV) rays that harm plastic. UV rays break down the lens surface and cause yellowing.
UV damage makes headlights look faded and cloudy, reducing their brightness.
Essential Tools And Materials
Cleaning car headlight lenses needs the right tools and materials. Using the correct supplies makes the job easier and safer. This guide covers the essential items you need to clean your headlights well.
Each tool and material has a specific role in removing dirt, oxidation, and scratches. Prepare these before you start to get the best results.
Cleaning Solutions
Cleaning solutions help break down grime and restore clarity. Choose a solution that suits your lens type and level of dirt.
- Mild soap mixed with water for light dirt
- Special headlight cleaner for tougher stains
- Vinegar and baking soda paste for natural cleaning
- Isopropyl alcohol for removing grease and oils
Sandpaper And Buffing Pads
Sanding and buffing remove oxidation and smooth the lens surface. Use different grit sandpapers to avoid scratches.
| Tool | Purpose | Grit/Type |
| Wet/Dry Sandpaper | Remove oxidation and scratches | 400 to 2000 grit |
| Buffing Pads | Polish the lens for shine | Foam or microfiber |
| Polishing Compound | Enhance smoothness and clarity | Fine abrasive paste |
Protective Gear
Protective gear keeps you safe during the cleaning process. It also prevents damage to your skin and eyes.
- Safety goggles to shield your eyes
- Gloves to protect your hands from chemicals
- Mask to avoid inhaling dust or fumes
- Old clothes to prevent stains

Credit: www.youtube.com
Preparation Before Cleaning
Cleaning car headlight lenses helps improve visibility and car appearance. Proper preparation makes the cleaning easy and effective.
Before you start, prepare the right tools and protect your car’s paint and parts. This prevents damage during cleaning.
Gathering Supplies
Collect all the supplies you need before cleaning. This saves time and keeps the process smooth.
- Mild soap or car wash shampoo
- Clean water
- Soft microfiber cloths or sponges
- Masking tape
- Plastic bags or paper towels
- Protective gloves (optional)
Washing The Headlights
Start by washing the headlights with soap and water. This removes dirt and grime on the surface.
Use a soft cloth or sponge to avoid scratching the lens. Rinse well with clean water after washing.
Protecting Surrounding Areas
Protect the car paint and trim near the headlights before cleaning. This stops damage from cleaning products or tools.
- Use masking tape to cover edges around the headlight
- Cover nearby areas with plastic bags or paper towels
- Remove any jewelry or accessories that can scratch the lens
Step-by-step Cleaning Process
Cleaning car headlight lenses helps improve visibility and car appearance. Dirt, grime, and oxidation make lenses look cloudy.
This guide covers safe and effective methods to clean your headlights using sanding, polishing, and buffing.
Wet Sanding Techniques
Wet sanding removes the outer layer of oxidation and scratches. It smooths the lens surface for better clarity.
- Clean the headlights with soap and water, then dry them.
- Cover areas around headlights with tape to protect car paint.
- Start sanding with 800-grit wet sandpaper. Keep the paper wet while sanding.
- Sand in horizontal strokes evenly across the lens.
- Switch to 1500-grit wet sandpaper and sand vertically to remove deeper scratches.
- Finish with 2000-grit sandpaper using circular motions.
- Wipe the lens clean and check the surface smoothness.
Applying Polishing Compound
Polishing helps restore the lens shine by removing fine scratches left by sanding. Use a plastic polish or headlight-specific compound.
| Polish Type | Purpose | Application |
|---|---|---|
| Plastic Polish | Removes fine scratches | Apply with microfiber cloth in circular motions |
| Headlight Compound | Restores clarity and shine | Use a polishing pad or cloth gently |
| Rubbing Compound | Heavy scratch removal | Use sparingly, follow with polish |
Buffing To Shine
Buffing finalizes the cleaning by adding gloss and protecting the lens surface. Use a clean cloth or buffer machine.
- Apply a small amount of polishing compound on the headlight.
- Use a microfiber cloth or electric buffer set to low speed.
- Buff the lens in circular motions for several minutes.
- Wipe away excess polish with a clean cloth.
- Check the lens for clarity and repeat if needed.

Credit: www.carsales.com.au
Alternative Cleaning Methods
Cleaning car headlight lenses improves your night driving safety. Some easy methods use items you may already have at home.
This guide covers toothpaste, commercial kits, and natural remedies to clear foggy headlights.
Using Toothpaste
Toothpaste can act as a mild abrasive to remove dirt and haze. Use a non-gel, plain white toothpaste for best results.
- Apply toothpaste on a soft cloth.
- Rub the headlight lens in small circles for a few minutes.
- Rinse with clean water to remove residue.
- Dry the lens with a clean towel.
Commercial Headlight Restoration Kits
These kits include all materials needed for headlight cleaning. They often contain sandpaper, polish, and a sealant.
| Kit Item | Purpose |
| Sandpaper | Remove surface scratches and oxidation |
| Polish | Restore clarity and shine |
| Sealant | Protect lens from future damage |
Follow the instructions carefully for best results. These kits offer a more thorough cleaning.
Natural Remedies
Some natural items can help clean headlights without harsh chemicals. Common options include baking soda and vinegar.
Try this simple natural cleaning paste:
- Mix 2 tablespoons of baking soda with 1 tablespoon of water.
- Apply the paste to the lens using a soft cloth.
- Rub gently in circular motions for 5 minutes.
- Rinse the lens with water and dry with a towel.
You can also wipe the lenses with a cloth soaked in white vinegar to remove grime.
Sealing And Protecting Headlights
Cleaning your car’s headlight lens is important for safe driving. After cleaning, sealing the headlights helps keep them clear longer. It protects the lens from dirt, water, and sun damage.
Sealing also prevents the lens from getting cloudy again quickly. This guide explains how to apply a UV sealant and maintain your headlights.
Applying Uv Sealant
After cleaning the headlight lens, apply a UV sealant to protect it. This sealant blocks harmful rays from the sun.
Use a clean cloth to spread the sealant evenly on the lens. Let it dry fully before driving your car.
- Choose a sealant made for headlights
- Apply in a shaded area to avoid quick drying
- Cover the entire lens surface
- Allow at least 30 minutes to dry
Regular Maintenance Tips
Keep your headlights clear by cleaning and sealing regularly. Dirt and grime can build up fast on the lens.
Wash your headlights with soap and water during car washes. Avoid harsh chemicals that can damage the sealant.
- Clean headlights every two weeks
- Check for cracks or chips in the lens
- Reapply UV sealant if water spots appear
- Park in the shade to reduce sun damage
When To Repeat The Process
Repeat cleaning and sealing when headlights look dull or hazy again. This usually happens after several months.
If water or dirt stays on the lens after rain, it may be time to reseal. Regular care keeps your headlights bright and safe.
- Reseal headlights every 6 to 12 months
- Clean before resealing for best results
- Look for yellowing or foggy spots
- Do not wait for severe damage to clean

Credit: www.carsales.com.au
Troubleshooting Common Issues
Car headlight lenses get dirty and damaged over time. Cleaning them helps improve light brightness and safety.
This guide covers ways to fix common problems like stains and scratches on your headlights.
Removing Stubborn Stains
Stains can come from bugs, dirt, or road salt. Some stains are hard to remove with just soap and water.
Try using a mixture of baking soda and water or a special headlight cleaner. Rub gently with a soft cloth.
- Mix baking soda and water to make a paste
- Apply paste to the lens with a cloth
- Rub in small circular motions
- Rinse off with clean water
- Dry with a soft towel
Dealing With Deep Scratches
Deep scratches reduce headlight clarity and light output. Light scratches can be polished out, but deep ones need more care.
Use fine sandpaper or a headlight restoration kit to smooth scratches. Always wet the lens before sanding to avoid more damage.
- Wet the lens and sandpaper before use
- Sand gently with fine-grit sandpaper (1000-3000 grit)
- Polish the lens after sanding
- Apply a UV sealant to protect the lens
When To Seek Professional Help
If stains or scratches are too deep, professional help is best. They have tools and products to restore headlights well.
Also seek help if your headlights have cracks or moisture inside. These issues can affect safety and need repair.
- Cracks in the headlight lens
- Moisture or fog inside the headlight
- Severe yellowing or cloudiness
- Scratches that polishing can’t fix
Frequently Asked Questions
How Often Should Car Headlight Lenses Be Cleaned?
Car headlight lenses should be cleaned every 3 to 6 months. Regular cleaning prevents dirt buildup and maintains brightness. Frequent cleaning also extends lens lifespan and improves nighttime visibility, ensuring safer driving conditions.
What Household Items Effectively Clean Headlight Lenses?
Common household items like toothpaste, baking soda, and vinegar clean headlight lenses effectively. They remove grime and minor oxidation gently. Use a soft cloth to apply and rinse with water afterward for best results.
Can I Restore Yellowed Headlights At Home?
Yes, you can restore yellowed headlights at home using DIY kits or natural methods like toothpaste. Sanding and polishing remove oxidation and improve clarity. Regular maintenance prevents future yellowing and ensures better light output.
Is Professional Headlight Cleaning Worth It?
Professional headlight cleaning is worth it for severe oxidation or damage. Experts use specialized tools for deep restoration. It saves time and provides longer-lasting results compared to DIY methods.
Conclusion
Bright headlights mean safer night drives. Regular cleaning keeps them clear. Dirty lenses reduce visibility and look unattractive. Simple household items can work wonders. Gentle scrubbing removes grime without scratching. Rinse and dry thoroughly for best results. Repeat every few months for lasting brightness.
Safe, clear headlights enhance your driving experience. Enjoy clearer roads and safer journeys. Keep your car looking sharp and your path well-lit. Embrace the habit of cleaning and see the difference. Happy driving!