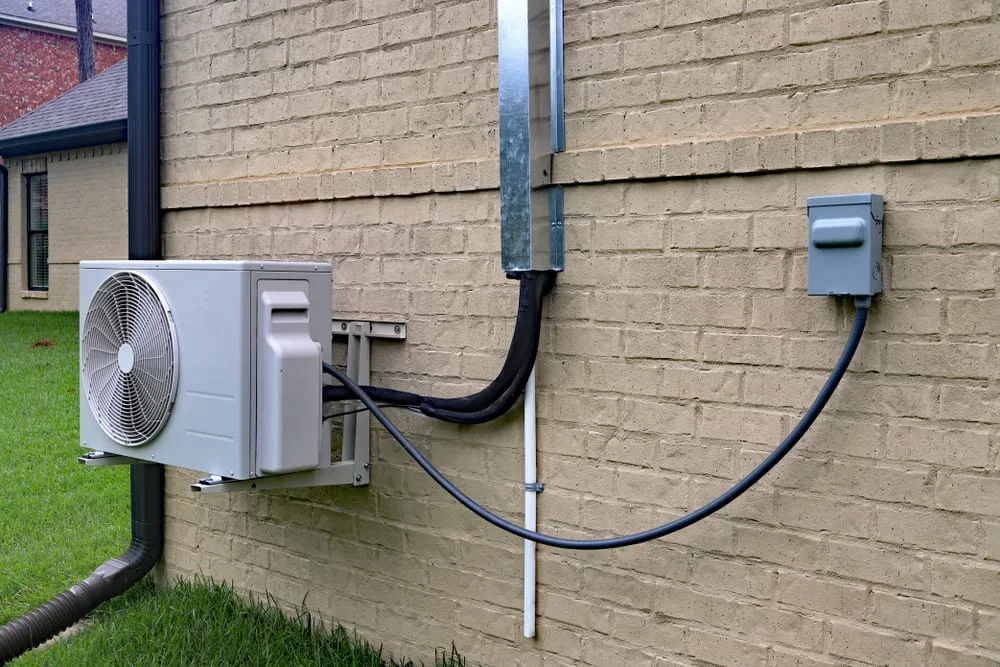
Looking to cool your home without the hassle of bulky ducts? Installing a ductless air conditioner might be the perfect solution for you.
It’s energy-efficient, easy to control, and can be set up in just a few simple steps. But how do you install one yourself and make sure it works perfectly? In this guide, you’ll discover clear, straightforward instructions that anyone can follow.
By the end, you’ll feel confident handling the installation and enjoying cool, comfortable air in your space. Keep reading to learn exactly what you need to do!
Choosing The Right Ductless Ac
Installing a ductless air conditioner starts with picking the right unit. The correct choice keeps your room cool and saves energy. Consider your space and needs before buying.
This guide helps you choose the best ductless AC for your home. Focus on room size, unit capacity, and energy ratings to get the best fit.
Assessing Room Size And Cooling Needs
Measure your room size in square feet. Larger rooms need more cooling power. Think about how many people use the room and the sunlight it gets.
Rooms with many windows or strong sun need a stronger AC. Also, consider if you want to cool just one room or several connected spaces.
Selecting The Appropriate Unit Capacity
Unit capacity is measured in BTUs (British Thermal Units). Choose a unit that matches your room size for best cooling.
A unit that is too small will not cool well. A unit that is too big wastes energy and may cause humidity problems.
- Up to 150 sq. ft.: 5,000 BTUs
- 150 to 250 sq. ft.: 6,000-8,000 BTUs
- 250 to 350 sq. ft.: 9,000-12,000 BTUs
- 350 to 550 sq. ft.: 14,000-18,000 BTUs
Considering Energy Efficiency Ratings
Look for the Energy Efficiency Ratio (EER) or Seasonal Energy Efficiency Ratio (SEER). Higher ratings mean lower energy use.
Energy-efficient units reduce electricity bills and help the environment. Check for ENERGY STAR® labels for trusted efficiency.
- EER above 12 is good
- SEER ratings above 20 are excellent
- ENERGY STAR® certified units save more energy
Gathering Necessary Tools And Materials
Installing a ductless air conditioner requires specific tools and materials. Getting these ready before you start can save time and make the process smoother.
Knowing what you need helps avoid trips to the store and reduces delays. Below are the main tools and extra supplies for a basic installation.
Basic Installation Tools
These tools help you mount and connect the air conditioner safely and correctly.
- Power drill with drill bits
- Level to ensure straight installation
- Screwdrivers (Phillips and flathead)
- Measuring tape for accurate placement
- Adjustable wrench to tighten fittings
- Hole saw for making wall openings
- Stud finder to locate wall supports
Additional Equipment And Supplies
Extra materials help complete the installation and ensure the system works well.
| Equipment or Supply | Purpose |
| Mounting bracket | Supports the indoor unit on the wall |
| Refrigerant piping | Connects indoor and outdoor units for coolant flow |
| Insulation foam | Prevents energy loss around pipes |
| Electrical wiring | Supplies power to the unit |
| Drain hose | Removes condensation from the indoor unit |
| Sealant or caulk | Seals holes and prevents air leaks |
Preparing The Installation Site
Installing a ductless air conditioner needs a good plan. Preparing the installation site helps the system work well. It also makes the setup easier and safer.
Focus on the right place for the indoor and outdoor units. Check for enough space and support. These steps keep the system steady and effective.
Selecting Indoor Unit Location
Pick a spot inside that lets air flow freely. Avoid places near heat sources or direct sunlight. The unit should be easy to reach for cleaning and maintenance.
- Mount the unit high on the wall
- Keep it away from furniture and curtains
- Choose a central area for even cooling
- Ensure no obstacles block air flow
- Stay clear of places with high humidity
Choosing Outdoor Unit Placement
Place the outdoor unit where air can move freely. Avoid dusty or dirty spots. Pick a location that is easy to service and protected from weather.
| Consideration | Recommended | Not Recommended |
| Airflow | Open space with no blockages | Near walls or fences |
| Weather Exposure | Shaded or covered area | Direct sunlight or heavy rain |
| Access | Easy for maintenance and repairs | Difficult or cramped spots |
| Noise | Far from bedrooms or neighbors | Near quiet rooms or outdoor seating |
Ensuring Proper Clearance And Support
Check that both units have enough space around them. Proper clearance helps with airflow and prevents damage. Secure strong support to hold the units safely.
- Leave at least 6 inches around indoor unit
- Allow 12 to 24 inches clearance around outdoor unit
- Use sturdy brackets or pads to support weight
- Make sure the mounting surface is level
- Confirm no vibrations or movement after installation

Credit: www.youtube.com
Mounting The Indoor Unit
Installing a ductless air conditioner requires careful mounting of the indoor unit. This process ensures the unit works efficiently and looks neat on your wall.
The following sections explain how to install the mounting plate, drill the hole for refrigerant lines, and secure the indoor unit properly.
Installing The Mounting Plate
Start by choosing a strong wall area that can hold the unit’s weight. Use a level to mark the mounting plate position to keep the unit straight.
- Hold the mounting plate against the wall.
- Mark the drill holes using a pencil.
- Drill holes matching the marks.
- Insert wall anchors if needed.
- Secure the mounting plate with screws.
Drilling The Hole For Refrigerant Lines
Drill a hole through the wall for the refrigerant lines, drain pipe, and electrical wires. The hole should slope slightly downward to the outside to allow water to drain.
| Hole Diameter | About 3 inches (7.5 cm) |
| Angle | 5 degrees downward slope |
| Position | Near the mounting plate |
Securing The Indoor Unit
After preparing the mounting plate and hole, attach the indoor unit to the plate. Make sure the unit is stable and all connections are tight.
- Align the unit’s rear hooks with the mounting plate slots.
- Hang the unit carefully on the plate.
- Check that the unit is level and firm on the wall.
- Connect refrigerant lines, drain pipe, and wires through the hole.
- Seal the hole outside with caulk to prevent air and water leaks.
Installing The Outdoor Unit
Installing the outdoor unit of a ductless air conditioner is important for its efficiency. You must place it correctly and connect all parts safely.
This guide covers three main tasks: positioning the unit, connecting refrigerant lines, and attaching electrical wiring.
Positioning The Unit On A Stable Surface
The outdoor unit needs a flat and sturdy base. This keeps it steady and reduces noise and damage.
- Choose a level spot with good air flow.
- Use a concrete pad or metal brackets for support.
- Keep the unit away from direct sunlight and heavy rain.
- Ensure the area is free from plants and debris.
- Leave enough space around the unit for maintenance.
Connecting Refrigerant Lines
Refrigerant lines carry coolant between the indoor and outdoor units. Proper connection prevents leaks and ensures cooling.
| Task | Details |
| Clean the lines | Remove dust and dirt before connecting. |
| Use flare nuts | Tighten flare nuts to secure the connection. |
| Check for leaks | Use a leak detector or soapy water on joints. |
| Insulate lines | Wrap lines with foam to avoid energy loss. |
Attaching Electrical Wiring
Electrical wiring powers the outdoor unit. Follow safety rules to avoid hazards.
- Turn off the main power before starting.
- Use wires that match the unit’s voltage and amperage.
- Connect wires to the correct terminals according to the manual.
- Secure all connections tightly to prevent shorts.
- Cover wiring with weatherproof conduits.
Connecting Refrigerant Lines And Electricals
Installing a ductless air conditioner needs careful connection of refrigerant lines and electrical parts. These connections help the system work safely and efficiently.
Follow each step closely to avoid leaks and electrical problems. Proper setup keeps the air conditioner running well for a long time.
Flare Connections And Tightening
Flare connections join the refrigerant pipes to the air conditioner. They must be tight to stop leaks but not too tight to damage the flare.
Use two wrenches to tighten the flare nuts. Hold one wrench on the fitting and turn the other on the flare nut. This prevents twisting the pipes.
- Check that flare ends are clean and smooth
- Push pipe fully into the fitting before tightening
- Tighten flare nuts firmly but gently
- Avoid over-tightening to prevent damage
Vacuuming The Lines To Remove Moisture
After connecting the lines, use a vacuum pump to remove air and moisture. Moisture can cause damage inside the system.
Attach the vacuum pump to the service port and run it for at least 15 minutes. This clears the pipes and prepares the system for refrigerant.
- Connect vacuum pump to the service port
- Run vacuum pump for 15 to 30 minutes
- Check vacuum gauge to ensure proper vacuum
- Close valves and turn off the pump after vacuuming
Checking For Leaks
Leaks in refrigerant lines reduce cooling and can harm the environment. Test all connections before starting the system.
Use a leak detector or soapy water on flare joints. Look for bubbles or listen for hissing sounds to find leaks.
- Apply soapy water to all flare connections
- Watch for bubbles that show escaping gas
- Use an electronic leak detector for better accuracy
- Fix any leaks by tightening or repairing fittings
Testing And Starting The System
After installing your ductless air conditioner, the next step is to test and start the system. This ensures the unit works properly and cools the space efficiently.
Follow these steps to power on, adjust settings, and monitor the system’s performance. Doing this carefully helps avoid problems later.
Powering On The Unit
Before turning on the air conditioner, check that all electrical connections are secure. Make sure the outdoor unit has power and the indoor unit is connected properly.
- Switch on the main power supply to the unit.
- Use the remote control to turn on the indoor unit.
- Listen for any unusual sounds coming from the unit.
- Check that the unit’s indicator lights are on.
Adjusting Settings And Controls
Set the air conditioner to your preferred temperature and mode. You can usually choose between cooling, heating, or fan modes.
| Control | Function |
|---|---|
| Temperature Setting | Set desired room temperature |
| Mode | Choose cooling, heating, or fan |
| Fan Speed | Adjust airflow speed |
| Timer | Schedule automatic on/off times |
Adjust these controls slowly and observe how the unit responds to each change. Use the remote for easy access to settings.
Monitoring Performance And Troubleshooting
Watch the unit run for at least 15 minutes. Check if the room cools down and if the air feels fresh.
- Listen for strange noises or vibrations.
- Check for any water leaks near the indoor unit.
- Look at the outdoor unit for ice buildup or blockages.
- Use the remote to reset the unit if it stops responding.
If problems appear, consult the manual or contact a professional technician. Early detection helps keep your system running smoothly.

Credit: www.thisoldhouse.com
Maintenance Tips For Longevity
Keeping a ductless air conditioner in good shape helps it last longer. Regular care stops problems early.
Follow simple maintenance steps to keep your AC running well. This saves money and avoids breakdowns.
Cleaning Filters Regularly
Dirty filters block airflow and reduce cooling. Clean the filters every two weeks during heavy use.
Take out the filters and wash them with warm water. Let them dry fully before putting them back.
- Turn off the unit before removing filters
- Use a soft brush to remove dust
- Do not use harsh chemicals
- Replace filters if damaged or worn out
Inspecting And Servicing Components
Check the indoor and outdoor parts regularly. Look for dirt, leaks, or broken parts.
Clean the coils and fan blades carefully. Tighten any loose screws or connections.
- Check drain pipes for clogs
- Clean the outdoor unit from leaves and dirt
- Listen for unusual noises
- Replace worn-out parts on time
Scheduling Professional Checkups
Hire a technician to inspect your system at least once a year. They find hidden issues early.
Technicians clean internal parts deeply and check refrigerant levels. They keep your AC efficient.
- Book checkups before hot seasons
- Ask for a full system inspection
- Follow technician advice for repairs
- Keep records of service dates

Credit: www.youtube.com
Frequently Asked Questions
How Do You Prepare The Wall For A Ductless Ac?
You must choose a suitable wall with enough space. Drill a hole for the refrigerant lines, drain pipe, and wiring. Ensure the hole is properly sealed to prevent leaks and maintain insulation. This step is crucial for efficient installation and operation.
What Tools Are Needed For Ductless Ac Installation?
Common tools include a drill, screwdriver, level, wrench, and stud finder. You also need a vacuum pump and refrigerant gauges. Having the right tools ensures a smooth, safe, and professional installation process.
How Do You Mount The Indoor Unit Of A Ductless Ac?
First, attach the mounting plate securely to the wall. Use a level to ensure it’s straight. Then, hang the indoor unit on the plate. Connect the refrigerant lines, drain pipe, and electrical wiring carefully.
Can I Install A Ductless Ac Myself Safely?
Yes, you can if you follow instructions and safety guidelines. However, handling refrigerant requires certification in many areas. For best results and warranty compliance, consider professional installation.
Conclusion
Installing a ductless air conditioner can save energy and space. Follow the steps carefully to ensure proper setup. Choose the right location for the indoor and outdoor units. Connect the refrigerant lines and electrical wiring safely. Test the system to confirm it works well.
Regular maintenance will keep it running smoothly. A well-installed unit cools your home efficiently and quietly. Take your time and enjoy a comfortable, cool space all year. Simple steps lead to lasting comfort.