Are you looking to add a unique, handmade touch to your garden or home? Hypertufa planters are the perfect blend of rustic charm and durability.
Making your own hypertufa planter is easier than you might think, and it gives you the freedom to create custom shapes and sizes that fit your style. You’ll discover simple steps to craft your own beautiful planters that will impress your friends and make your plants stand out.
Ready to get your hands a little dirty and create something truly special? Keep reading!
What Is Hypertufa
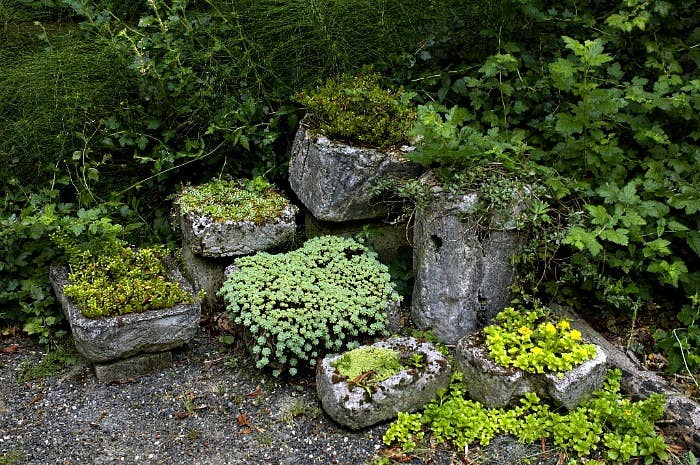
Hypertufa is a lightweight, porous material used to make garden planters. It looks like natural stone but is easier to shape and work with.
People use hypertufa because it is durable and lets plants breathe well. It is made from simple materials mixed together.
Materials Used In Hypertufa
Hypertufa is made by mixing three main materials. Each part adds strength and texture.
- Portland cement – acts as a binder
- Peat moss – adds lightness and porosity
- Perlite or vermiculite – improves drainage and air flow
How Hypertufa Is Made
First, mix the dry ingredients well to get an even blend. Then add water slowly and stir until the mix feels like thick mud.
After mixing, press the hypertufa into molds to form shapes like pots or troughs. Let it dry slowly to become hard and strong.
Benefits Of Using Hypertufa Planters
Hypertufa planters are good for many reasons. They are light, which makes moving them easy.
They also hold moisture well but do not trap water. This helps plants grow healthy roots.
- Lightweight compared to real stone
- Porous to allow air and water flow
- Durable and weather-resistant
- Can be shaped into many designs
Materials Needed
Hypertufa planters are a creative way to display plants. They have a rustic look and are easy to make.
To start, you need some basic materials. These materials are easy to find and not expensive.
Portland Cement
Portland cement is a key ingredient for hypertufa. It acts as a binder.
Use it to hold the other materials together. Buy it at hardware stores.
Peat Moss
Peat moss is added for texture. It makes the planter light and porous.
This helps with drainage and plant health. Find it in garden centers.
Perlite
Perlite adds more texture to the mix. It also helps with drainage.
Perlite is light and white. It is found in the gardening section.
Water
Water is needed to mix all ingredients. It makes the mixture workable.
Add water slowly. You want a thick but moldable consistency.
Mold
A mold shapes the planter. Use old containers or find molds online.
Choose a mold that fits the size you want. Plastic and silicone molds work well.
Protective Gear
Wear gloves to protect your hands. The cement can be harsh on skin.
Use a mask to avoid inhaling dust. Safety glasses protect your eyes.
Optional Decorations
Decorations can make your planter unique. Try adding stones or shells.
Use paint to add color. These extras add personal style.
- Stones for a natural look
- Shells for a beach theme
- Paint for vibrant colors
Preparing The Mixture
Making hypertufa planters starts with preparing the right mixture. This mix creates a light, strong, and porous material.
The mixture usually includes cement, peat moss, and perlite. Each part helps the planter hold moisture and stay sturdy.
Gathering Your Materials
First, collect all materials needed for the hypertufa mix. You will need Portland cement, peat moss, and perlite.
Use quality materials to get the best texture and strength in your planter.
- Portland cement – the binder
- Peat moss – adds lightness and holds moisture
- Perlite – improves aeration and drainage
Measuring The Ingredients
Measure the ingredients carefully for a balanced mixture. A common ratio is 1 part cement, 1.5 parts peat moss, and 1.5 parts perlite.
This ratio creates a good mix that is both lightweight and durable for planters.
- 1 part Portland cement
- 1.5 parts peat moss
- 1.5 parts perlite
Mixing Dry Ingredients
Combine the dry ingredients in a large container or wheelbarrow. Mix them until evenly blended.
Make sure there are no clumps. This helps the cement spread evenly when wet.
Adding Water
Slowly add water to the dry mix. Stir the mixture as you pour to keep it even.
Stop adding water when the mix feels like thick mud. It should hold shape but not be too wet.
- Mix water in small amounts
- Stir constantly for even moisture
- Look for a thick, moldable texture
Testing The Mixture
Check the mixture by squeezing a handful. It should hold its shape without dripping water.
If the mix is too dry, add a little more water. If it is too wet, add more dry ingredients.
Credit: dengarden.com
Choosing A Mold
Choosing the right mold is key to making good hypertufa planters. The mold shapes the planter’s size and form.
You can use many types of molds. Think about what shape and size you want before picking one.
Plastic Containers
Plastic containers are easy to find and use as molds. They come in many shapes and sizes.
They work well because you can remove the hardened hypertufa without breaking it.
- Use clean containers like buckets or bowls
- Lightweight and easy to handle
- Can be reused many times
Wooden Boxes
Wooden boxes make sturdy molds for square or rectangular planters. They hold their shape well.
Line the inside with plastic or wax paper to stop hypertufa from sticking.
- Good for larger planters
- Custom sizes possible
- Use nails or screws to hold shape
Styrofoam Or Foam Blocks
Styrofoam shapes make unique molds. You can carve them into any shape before using.
Coat the foam with a sealant to protect it from moisture.
- Lightweight and easy to shape
- Great for creative designs
- Needs sealing before use
Old Pots And Bowls
Old clay or plastic pots can serve as molds for hypertufa planters. They add natural shapes.
Line them with plastic to help remove the planter after it sets.
- Easy to find around the house
- Variety of shapes and sizes
- Good for traditional planter looks
Forming The Planter
Making a hypertufa planter starts with shaping the mix carefully. The process helps the planter hold its form and last long.
Each step in forming the planter is important. You need to layer the mix, shape the planter, and add drainage holes.
Layering The Mix
First, prepare the hypertufa mix by combining peat moss, perlite, and cement. Then, layer the mix inside the mold.
- Start by spraying the mold with a release agent.
- Add a thin base layer of mix to the bottom.
- Press firmly to remove air pockets.
- Build up the sides with thicker layers.
- Make sure the walls are even and at least 1 inch thick.
Shaping And Smoothing
After layering, shape the planter by smoothing the surface. Use your hands or a trowel for a clean look.
Tips for shaping and smoothing:
- Wear gloves to protect your skin.
- Use water to keep the surface moist.
- Tap the mold gently to settle the mix.
- Smooth rough edges carefully.
Creating Drainage Holes
Drainage holes help water flow out and keep plants healthy. You must add these before the mix dries.
- Choose spots at the bottom for holes.
- Use a stick or small pipe to poke through the mix.
- Make at least two holes for good drainage.
- Check that holes go all the way through the planter.
Curing Process
Making hypertufa planters requires careful curing. This process strengthens the planter. It also prevents cracks and breaks. Proper curing ensures durability and longevity.
The curing process has three main stages. These are initial drying, moist curing, and final drying. Each stage plays an important role in the planter’s quality.
Initial Drying
After shaping your hypertufa planter, start with initial drying. Keep the planter in a shady, dry spot. Avoid direct sunlight to prevent fast drying and cracks. Let it dry slowly for about 24 to 48 hours. The planter should feel firm but still damp.
Moist Curing
Moist curing helps the planter gain strength. It keeps the planter damp to allow chemical reactions. This stage usually lasts 1 to 2 weeks. Keep the planter covered with plastic or wet burlap. Mist it with water daily to keep moisture. Avoid letting it dry out completely.
- Cover planter with plastic sheeting or damp cloth
- Mist surface with water once or twice a day
- Keep planter in a cool, shaded place
- Check daily to maintain moisture
- Do not let planter dry out
Final Drying
After moist curing, move to final drying. Remove coverings and let planter air dry. This stage takes about 1 to 2 weeks. It allows the planter to dry fully and harden. Place it in a shaded, well-ventilated area. Avoid direct sun to reduce cracking risk.
| Stage | Duration | Conditions |
|---|---|---|
| Initial Drying | 1-2 days | Shady, dry, avoid direct sun |
| Moist Curing | 1-2 weeks | Covered, damp, cool, shaded |
| Final Drying | 1-2 weeks | Shaded, ventilated, dry air |
Finishing Touches
Finishing your hypertufa planters well protects them and makes them look great. Two main tasks help with this: sanding and sealing, and adding decorative elements.
These steps improve the planter’s durability and add a personal style to your project.
Sanding And Sealing
After the hypertufa mix has fully cured, sanding smooths rough edges. This step makes the surface safe to handle and nicer to touch.
- Use medium-grit sandpaper to smooth sharp corners.
- Move to fine-grit sandpaper for a softer finish.
- Remove dust with a damp cloth before sealing.
- Apply a breathable sealant to protect from moisture.
- Let the sealant dry completely before use.
Adding Decorative Elements
Decorative touches make each planter unique. You can add texture, color, or shapes to personalize your work.
| Decoration Type | Description | Materials Needed |
|---|---|---|
| Embedding Stones | Press small stones or shells into the surface before it dries. | Stones, shells, hypertufa mix |
| Painting | Use outdoor acrylic paint after sealing for color accents. | Acrylic paint, brushes, sealant |
| Stenciling | Apply stencils and paint patterns or shapes. | Stencils, paint, brushes |
| Carving | Carve designs into the surface with tools once partially dry. | Carving tools, hypertufa mix |
Planting Tips
Hypertufa planters are light and porous. They let plants breathe well. You can create a good home for many plants.
Planting in hypertufa needs care. Use the right soil and watering to help plants grow strong.
Choose The Right Plants
Pick plants that like dry soil. Succulents and herbs work well. Avoid plants that need too much water.
- Succulents like aloe and sedum
- Herbs like thyme and rosemary
- Small flowers like pansies
Use Well-draining Soil
Hypertufa planters drain water fast. Use soil that keeps some moisture but drains well. Mix potting soil with sand or perlite.
- Potting soil for nutrients
- Sand or perlite for drainage
- Mix one part sand to two parts soil
Planting Techniques
Fill the planter with soil, leaving some space at top. Place plants carefully, then cover roots with soil. Press soil lightly to hold plants.
- Leave 1-2 inches of space at the top
- Place plants without damaging roots
- Press soil gently but firmly
Watering Tips
Water plants right after planting. Let soil dry between watering. Hypertufa planters dry fast, so check soil often.
- Water deeply but not too often
- Check soil moisture with your finger
- Avoid waterlogging roots
Positioning Your Planter
Place your hypertufa planter where plants get enough light. Most succulents and herbs like full sun or partial shade.
- Sunny spots for succulents
- Partial shade for some herbs
- Protect from strong winds
Common Mistakes To Avoid
Making hypertufa planters is a fun project, but some mistakes can cause trouble. Avoiding these errors helps your planter last longer and look better.
Read on to learn about common problems and how to skip them for a successful hypertufa planter.
Using The Wrong Mix Ratio
Using too much cement or peat moss can weaken the planter. The right balance is key for strength and good texture.
Too much cement makes the planter heavy and prone to cracking. Too little cement makes it soft and crumbly.
Not Wearing Protective Gear
Hypertufa mix contains cement dust that can irritate skin and lungs. Always protect yourself.
- Wear gloves to protect your hands.
- Use a dust mask to avoid breathing dust.
- Wear safety glasses to protect your eyes.
Skipping The Curing Process
Hypertufa must cure slowly to gain strength. Rushing this step causes cracks and weak spots.
Keep your planter moist and covered for at least two weeks. This helps it harden evenly.
Using A Poor Mold Or No Mold Release
Without a good mold, your planter may have rough edges or stick to the mold. Mold release helps the planter come out cleanly.
| Common Mold Materials | Notes |
| Plastic Containers | Use vegetable oil as release |
| Wooden Boxes | Line with plastic wrap |
| Silicone Molds | No release needed |
Ignoring Drainage Holes
Drainage holes keep plants healthy by letting water escape. Without holes, roots may rot.
Tip:Use a drill or a stick to create holes before the mix hardens.

Credit: hamiltonparkhome.com
Maintaining Hypertufa Planters
Hypertufa planters are lightweight and durable. They can last for years with proper care.
Regular maintenance keeps your planters looking good and protects them from damage.
Cleaning Your Hypertufa Planters
Clean hypertufa planters to remove dirt and prevent mold. Use gentle tools and avoid harsh chemicals.
- Use a soft brush to remove loose dirt
- Rinse with water, avoid soaking for long periods
- For tough stains, use mild soap and water
- Dry planters in the sun to prevent moisture buildup
Protecting From Weather Damage
Hypertufa planters can crack if exposed to freezing temperatures. Take steps to protect them in winter.
- Move planters indoors or to a sheltered area
- Elevate planters off the ground to avoid water pooling
- Seal the surface with a breathable water repellent every year
- Empty soil and water from planters before freezing weather
Repairing Cracks And Chips
Small cracks and chips can be fixed to extend the planter’s life. Use materials that match hypertufa.
Mix cement, peat moss, and perlite to create a patching compound. Apply it to damaged areas and smooth it out.
Seasonal Care Checklist
| Task | Spring | Summer | Fall | Winter |
| Clean Planter | ✔️ | ✔️ | ||
| Inspect for Cracks | ✔️ | ✔️ | ||
| Apply Sealant | ✔️ | |||
| Move to Shelter | ✔️ | |||
| Remove Soil/Water | ✔️ |

Credit: www.youtube.com
Frequently Asked Questions
What Materials Are Needed To Make Hypertufa Planters?
You need Portland cement, peat moss, perlite, water, and a mold. These ingredients create a lightweight, durable planter ideal for gardening.
How Long Does Hypertufa Take To Cure?
Hypertufa typically takes 24 to 48 hours to set. Full curing requires about 4 to 6 weeks for maximum strength.
Can Hypertufa Planters Be Made In Any Shape?
Yes, hypertufa is moldable and can be shaped into various forms. Use flexible molds or create custom shapes for unique planters.
Is Hypertufa Safe For Outdoor Plants?
Yes, hypertufa is porous and breathable, promoting healthy root growth. It withstands outdoor conditions without harming plants.
Conclusion
Making hypertufa planters is a fun and simple project. You only need a few basic materials like cement, peat moss, and perlite. Mixing and shaping the blend lets you create unique, lightweight pots. These planters look natural and last long outdoors.
Plus, they allow good drainage for your plants. Try different shapes and sizes to fit your garden style. Enjoy crafting and watching your plants grow happily in your handmade hypertufa planters. Give it a go and add a personal touch to your garden space!