Are your pinking shears not cutting as cleanly as they used to? If your fabric edges are fraying or your cuts look uneven, it might be time to sharpen your pinking shears.
Keeping these special scissors sharp is key to getting those perfect zigzag edges every time. You’ll discover simple, effective ways to sharpen your pinking shears yourself—saving you money and frustration. Ready to bring your shears back to life and make your sewing projects look professional?
Let’s dive in.

Credit: www.youtube.com
Choosing The Right Tools
Sharpening pinking shears needs the right tools to keep the blades sharp. Using the proper tools makes the job easier and safer.
Choosing good sharpening tools helps maintain the blade’s edge and extends the life of your pinking shears.
Types Of Sharpening Tools
You can use different tools to sharpen pinking shears. Each tool works best for certain blade types and conditions.
- Sharpening Stone:A fine grit stone is good for careful, precise sharpening.
- Diamond File:Works well on very sharp blades and hard metal.
- Sharpening Rod:Helps keep blades aligned and slightly sharp.
- Electric Sharpener:Quick and easy but may not fit all pinking shears.
Materials Needed
Gathering the right materials helps you sharpen your pinking shears properly and safely.
| Material | Purpose |
| Sharpening stone or diamond file | To sharpen the cutting edges |
| Cleaning cloth | To remove metal dust and oil |
| Lubricating oil | To keep blades moving smoothly |
| Screwdriver or wrench | To adjust or remove the blades if needed |
| Protective gloves | To protect hands during sharpening |

Credit: blog.treasurie.com
Preparing Your Pinking Shears
Sharpening pinking shears needs careful preparation. Clean and take them apart before sharpening.
This keeps the blades safe and helps you sharpen well. Start by cleaning the blades and disassembling the shears.
Cleaning The Blades
Before sharpening, clean the blades to remove dirt and sticky residue. This stops damage and helps you see the edges clearly.
Use a soft cloth and some rubbing alcohol or mild soap with water. Wipe the blades gently to avoid cutting yourself.
- Hold the shears closed while cleaning
- Use a soft cloth to avoid scratching
- Dry the blades fully after cleaning
Disassembling The Shears
Take the shears apart to sharpen each blade evenly. This also makes cleaning easier.
Use a screwdriver or the right tool to remove the screw or bolt that holds the blades together. Keep all parts safe.
- Open the shears fully
- Find the screw in the middle
- Unscrew carefully and separate the blades
- Place screws and small parts in a safe spot
Sharpening Techniques
Pinking shears are essential for sewing and crafting. Keeping them sharp is vital for clean cuts. Here are some techniques to sharpen them effectively.
Using A Sharpening Stone
A sharpening stone can restore the edge of your pinking shears. It is a simple and effective tool for sharpening.
- Place the stone on a flat surface.
- Open the shears and position one blade against the stone.
- Slide the blade along the stone at the same angle as its bevel.
- Repeat for the other blade.
Employing A Diamond File
A diamond file is another tool for sharpening pinking shears. It’s ideal for more precise work on the blades.
- Hold the file at the same angle as the blade’s edge.
- Gently file along the edge, maintaining even pressure.
- Repeat the process until the blade is sharp.
Alternative Sharpening Methods
There are other methods you can try if you don’t have a sharpening stone or a diamond file.
| Method | Description |
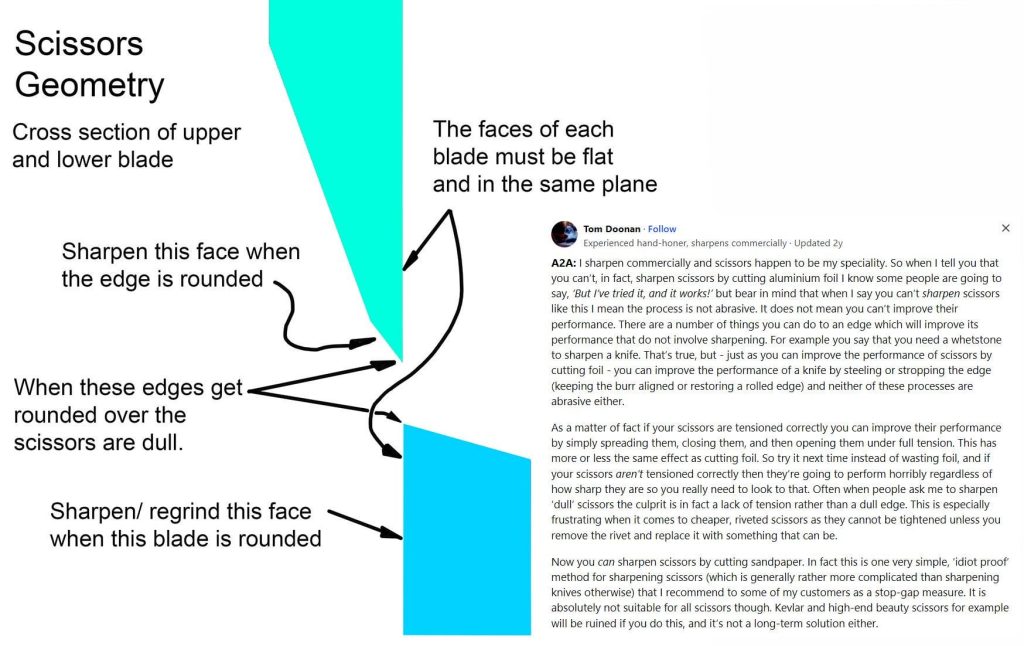
| Aluminum Foil | Cut through folded foil multiple times to sharpen the blades. |
| Sandpaper | Cut through sandpaper to hone the blades. |
Reassembling And Testing
After sharpening pinking shears, you need to put them back together correctly. Testing them ensures they cut fabric well. This step keeps your tools working right.
Follow careful steps to reassemble, check blade alignment, and test with fabric. Each part is important for good cutting results.
Putting The Shears Back Together
Start by placing the blades in their original positions. Make sure the pivot screw is clean before tightening. Tighten the screw enough so the blades move smoothly without wobbling.
- Place the bottom blade in its slot.
- Align the top blade over the bottom one.
- Insert the pivot screw through the holes.
- Turn the screw clockwise to tighten.
- Test blade movement and adjust if needed.
Checking Blade Alignment
Blade alignment is key for clean cuts. Hold the closed shears up to light. Look for even contact along the blade edges. Misaligned blades can cause uneven cutting or fabric damage.
| Check Point | What to See | Action if Needed |
| Blade Edges | Edges meet evenly | Adjust pivot screw |
| Blade Movement | Blades move smoothly | Loosen or tighten screw |
| Blade Gap | No large gaps | Realign blades carefully |
Cutting Test Fabric
Use a scrap piece of fabric to test the shears. Cut along a straight line and a zigzag pattern. Check the edges for smoothness and evenness. The pinking shears should create clean, scalloped edges.
- Use medium-weight cotton fabric for best results.
- Cut several times to check consistency.
- Look for any snagging or pulling.
- Repeat sharpening if cuts are rough.
Maintenance Tips
Keeping your pinking shears sharp is important for clean cuts. Proper care helps them last longer.
Follow simple maintenance tips to keep your shears in good shape. This guide covers cleaning, storage, and knowing when to get help.
Regular Cleaning Routine
Clean your pinking shears after each use. Remove fabric bits and lint from the blades to stop buildup.
Use a soft cloth or brush to wipe the blades. Avoid water as it can cause rust. Apply a drop of oil to keep blades smooth.
- Wipe blades with a dry cloth
- Use a small brush for tight spots
- Apply light machine oil on blades
- Open and close shears to spread oil
Proper Storage
Store your pinking shears in a dry place. Keep them away from moisture to prevent rusting.
Use a protective case or sheath. Avoid dropping or banging shears to protect the blades from damage.
- Keep shears in a dry container
- Use blade guards or covers
- Store in a safe spot, out of reach of children
- Avoid stacking heavy objects on top
When To Seek Professional Help
If your pinking shears become dull or nicked, sharpening at home may not work well. A professional sharpener can restore the blades properly.
Look for a sharpening service experienced with pinking shears. They use special tools to keep the zigzag edge sharp and even.
- Blades do not cut smoothly after cleaning
- Visible nicks or chips on the edges
- Shears feel stiff or hard to open and close
- Home sharpening tools do not improve cutting

Credit: www.youtube.com
Frequently Asked Questions
How Often Should I Sharpen Pinking Shears?
Sharpen pinking shears every 3 to 6 months with regular use. Dull blades cause uneven cuts and fabric damage. Frequent sharpening keeps the blades sharp and extends their lifespan.
Can I Sharpen Pinking Shears At Home?
Yes, you can sharpen pinking shears at home using a sharpening stone or diamond file. Follow blade angles carefully and avoid damaging the serrations. Home sharpening saves time and cost compared to professional services.
What Tools Are Best For Sharpening Pinking Shears?
The best tools for sharpening pinking shears are a fine diamond file or sharpening stone. These tools maintain the blade’s serrated edges without dulling the cutting teeth. Avoid using grinders as they can ruin the blades.
How Do I Maintain Sharpness After Sharpening Pinking Shears?
Clean blades after each use and oil the pivot regularly. Store shears in a dry place to prevent rust. Proper maintenance preserves sharpness and improves cutting performance over time.
Conclusion
Sharpening pinking shears keeps your cuts clean and precise. Regular care helps the blades last longer and work better. Use the right tools and take your time. Keep the blades free of rust and dirt. Test your shears on fabric after sharpening.
Sharp pinking shears make sewing easier and more fun. Small efforts lead to great results. Try these steps and see the difference yourself.