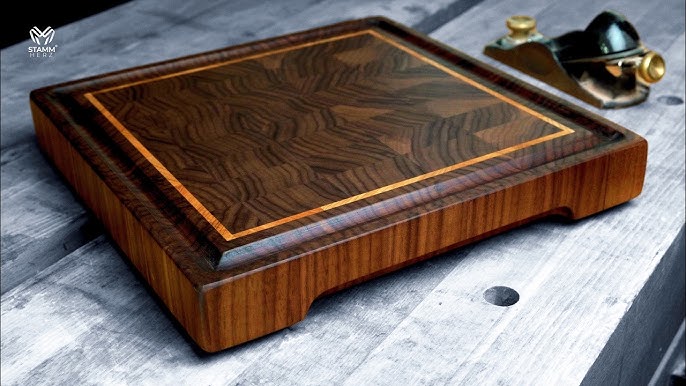
Are you tired of using boring, store-bought cutting boards that don’t quite fit your kitchen style? Imagine creating a cutting board that’s not only practical but also personal—made by your own hands.
Making your own cutting board is easier than you think, and it adds a unique touch to your cooking space. In this guide, you’ll discover simple steps to craft a beautiful, durable cutting board that you’ll be proud to use every day.
Ready to transform your kitchen experience? Let’s get started!
Choosing The Right Wood
Choosing the right wood is key for making a good cutting board. The wood must be strong, safe, and easy to clean.
Not all woods are fit for cutting boards. Some woods last longer and resist damage better than others.
Best Wood Types For Cutting Boards
Hardwoods with tight grains work best. They resist knife marks and last long. Popular woods include maple, walnut, and cherry.
- Maple:Very durable and has a fine grain.
- Walnut:Dark color and strong wood.
- Cherry:Smooth texture and rich color.
- Beech:Hard and light-colored wood.
- Teak:Oil-rich wood that resists water well.
Wood Grain And Durability
Wood grain affects how the board wears down. Tight grains stop bacteria and dirt from hiding. Open grains soak in water and stain easily.
| Grain Type | Durability | Maintenance |
|---|---|---|
| End Grain | Very durable and knife-friendly | Needs regular oiling |
| Edge Grain | Moderately durable | Easier to clean |
| Face Grain | Less durable, shows cuts | Needs frequent care |
Avoiding Toxic Woods
Some woods release harmful oils or chemicals. Avoid woods like pine, cedar, and redwood for cutting boards. They can hurt your health or taste.
- Do not use:Pine, cedar, redwood
- Choose safe woods:Maple, walnut, cherry
- Check for finishes:Use food-safe oils only

Credit: www.youtube.com
Tools And Materials Needed
Making a cutting board is a rewarding project. You need the right tools and materials to start. This guide covers what beginners should have.
Using proper finishes and safety gear ensures your board is safe and lasts long. Let’s explore each section carefully.
Essential Tools For Beginners
To make a cutting board, some basic tools are needed. These tools help you cut, shape, and smooth the wood.
- Table saw or circular saw for cutting wood pieces
- Planer or hand plane to smooth surfaces
- Random orbital sander with sandpaper of various grits
- Clamps to hold wood pieces tightly together
- Measuring tape and pencil for accurate measurements
- Wood glue for joining pieces
- Workbench or sturdy surface to work on
Wood Finishes And Food-safe Oils
Finishing your cutting board protects it and keeps it food safe. Choose finishes that are non-toxic and easy to apply.
| Finish Type | Description | Use |
| Mineral Oil | Odorless, tasteless oil | Penetrates wood and protects from water |
| Beeswax | Natural wax from bees | Adds shine and water resistance |
| Coconut Oil (refined) | Food-safe plant oil | Moisturizes and protects wood surface |
| Walnut Oil | Natural oil from walnuts | Dries hard and seals wood |
Safety Gear To Use
Safety gear protects you from accidents and dust. Always wear protective equipment when working.
- Safety glasses to protect your eyes
- Dust mask or respirator to avoid inhaling wood dust
- Ear protection like earplugs or earmuffs
- Work gloves to protect your hands from cuts
- Proper clothing that fits well and covers your body
Preparing The Wood
Preparing the wood well is key for a strong cutting board. It makes the board last longer and look better.
This section covers measuring and cutting, sanding, and joining wood pieces. Each step helps build a good board.
Measuring And Cutting To Size
Start by measuring the wood pieces carefully. Use a ruler or tape measure to get the right size for your board.
Mark the wood clearly. Then cut along the marks using a saw. Make straight cuts for clean edges.
- Measure the length and width you want.
- Mark the measurements on the wood.
- Use a saw to cut the wood pieces.
- Check that all pieces are the same size.
Sanding Techniques For Smooth Surfaces
Sanding removes rough spots and splinters. It makes the board safe and nice to touch.
- Start with coarse sandpaper to smooth big bumps.
- Use medium grit to even the surface.
- Finish with fine grit for a silky feel.
- Sand all sides and edges of each piece.
Joining Pieces Together
Glue and clamp the wood pieces to join them. This holds the board strong and flat.
| Tool | Purpose | Tip |
| Wood glue | Bonds pieces tightly | Apply evenly on edges |
| Clamps | Hold wood while drying | Tighten without damaging wood |
| Scraper | Remove excess glue | Wipe before glue dries |
Leave the clamped wood for several hours to dry fully. Then check the joints for strength.

Credit: www.youtube.com
Shaping And Designing
Shaping and designing a cutting board adds style and function. You can make your board unique and easier to use. This guide covers edges, juice grooves, and custom details.
Each design choice changes how the board looks and works. Learn simple ways to shape and decorate your board for a perfect fit in your kitchen.
Edge Profiles And Styles
Edges protect the board and add a finished look. You can choose smooth or decorative edges. Rounded and beveled edges are popular for comfort and style.
- Rounded Edge:Smooth curve, easy on hands.
- Beveled Edge:Angled cut, sharp and modern.
- Chamfered Edge:Small flat edge, adds detail.
- Ogee Edge:Decorative S-shape, classic look.
Adding Juice Grooves
Juice grooves catch liquids and keep your countertop clean. They are shallow channels carved near the edge. You can cut grooves on one or more sides.
| Groove Type | Description | Best Use |
| Single Groove | One channel on a long side | Simple fruit cutting |
| Double Groove | Channels on two sides | More liquid control |
| Full Perimeter | Groove all around the board | Heavy juices like meat |
Customizing With Inlays Or Engraving
Inlays and engraving add personal style to your cutting board. Inlays use different wood pieces to form patterns or shapes. Engraving cuts designs into the surface.
- Stripes or lines
- Geometric shapes
- Initials or monograms
- Nature-inspired patterns
Finishing Touches
Finishing your cutting board properly makes it safe and durable. It also improves the look and feel of the wood.
This part involves protecting the wood and giving it a smooth surface to use every day.
Applying Food-safe Oil
Use food-safe oil to protect the wood from moisture. It helps keep the cutting board from cracking or drying out.
Apply the oil with a clean cloth. Cover every surface evenly and let it soak in for a few hours.
- Choose oils like mineral oil or beeswax-based oil
- Apply several thin coats instead of one thick coat
- Wipe off extra oil to avoid sticky surfaces
Buffing And Polishing
Buffing makes the board smooth and shiny. It removes rough spots and brings out the wood’s natural beauty.
Use a soft cloth or a buffing pad. Rub the surface in circles until you see a nice shine.
- Buff after oiling for best results
- Use clean, lint-free cloths
- Polish gently to avoid damaging the wood
Curing Time And Maintenance Tips
Let the cutting board dry fully before use. This usually takes 24 hours after the last oil coat.
Keep your board in good shape by oiling it regularly. Clean it with mild soap and dry it well after each use.
- Allow 24 hours curing time after oiling
- Oil the board every few weeks or when dry
- Wash with warm water and mild soap only
- Never soak the board in water
- Store in a dry, cool place away from direct sunlight
Common Mistakes To Avoid
Making a cutting board is a fun project, but some errors can ruin your work. Avoid these common mistakes to get a strong and nice board.
Knowing what to skip and what to do right helps you make a cutting board that lasts long and looks great.
Using The Wrong Wood
Choosing the wrong wood can cause your cutting board to crack or wear out fast. Soft woods get cut marks easily. Some woods may also stain or smell bad.
- Avoid soft woods like pine or cedar
- Pick hardwoods like maple, walnut, or cherry
- Use wood that is food safe and not toxic
- Make sure the wood is dry and free of cracks
Skipping Sanding Steps
Not sanding properly leaves your board rough and unsafe. Rough spots hold dirt and can hurt your hands. Sanding smooths the surface for easy cleaning.
| Sanding Grit | Purpose |
| 80-100 | Remove saw marks and rough edges |
| 120-150 | Smooth surface after rough sanding |
| 220-320 | Final smooth finish |
Neglecting Proper Finishing
Skipping the finishing step leaves your board unprotected. Water and food stains can damage the wood. A good finish keeps your board clean and safe.
Use these finishes for your cutting board:
- Food-grade mineral oil
- Beeswax mixed with mineral oil
- Pure tung oil (food safe)
Avoid finishes that are not safe for food contact.
Credit: medium.com
Frequently Asked Questions
What Materials Are Best For Cutting Boards?
Wood, bamboo, and plastic are popular materials for cutting boards. Wood is durable and gentle on knives. Bamboo is eco-friendly and sustainable. Plastic is dishwasher safe and affordable. Each material has its benefits, so choose based on your needs and preferences.
How Do I Maintain A Wooden Cutting Board?
Maintain a wooden cutting board by regularly oiling it with mineral oil. Wash it with mild soap and water after use. Avoid soaking it to prevent warping. Dry it thoroughly to prevent mold. Proper maintenance prolongs its lifespan and keeps it in good condition.
Can I Make A Cutting Board At Home?
Yes, you can make a cutting board at home. Choose a hardwood like maple or walnut for durability. Cut, sand, and finish the wood properly. Ensure all surfaces are smooth to avoid knife damage. Homemade cutting boards can be customized to your preferences.
How Often Should I Replace My Cutting Board?
Replace your cutting board when it shows deep cuts or warping. These can harbor bacteria and damage knives. Regular inspection helps determine its condition. Wooden boards last longer with proper care. Plastic boards may need more frequent replacement due to wear.
Conclusion
Making your own cutting board is a fun and useful project. You can choose the wood and size that fits your kitchen best. It also saves money and lets you add a personal touch. With some simple tools and steps, anyone can create a sturdy board.
Remember to take care of your board by oiling it regularly. This keeps it strong and safe for food. Enjoy the pride of using a cutting board you made yourself!