
Are you ready to boost your vehicle’s performance and fuel efficiency? Adjusting your carburetor with a vacuum gauge might just be the secret weapon you’ve been missing.
Imagine your engine running smoother and wasting less fuel, all by spending a little time tweaking the settings yourself. You don’t need to be a mechanic to do this; with the right guidance, you can transform your driving experience. In this guide, we’ll break down the simple steps to help you make precise adjustments, ensuring your engine runs like a dream.
Curious to see how easy it can be? Let’s dive in and unlock the potential of your vehicle together!
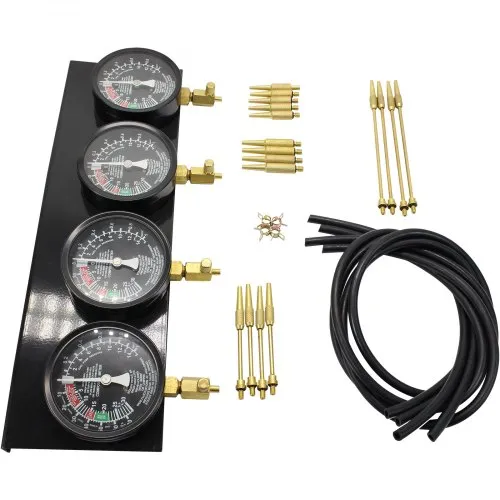
Credit: www.vevor.com
Carburetor Basics
The carburetor is a key part of many engines. It mixes air and fuel to help the engine run well. Understanding carburetor basics helps you keep your engine smooth and strong. Adjusting the carburetor with a vacuum gauge can improve engine performance and fuel efficiency.
Knowing how the carburetor works and why adjustments matter makes the process easier. This knowledge helps you spot problems early and fix them correctly.
Role Of The Carburetor
The carburetor mixes air and fuel in the right amount. This mix powers the engine. It controls the engine speed and response. The carburetor adjusts the fuel flow based on engine needs. A good mix ensures smooth running and saves fuel.
Why Adjustments Matter
Carburetors can get out of tune over time. Dirt, wear, or weather can affect their settings. Wrong settings cause poor engine performance and higher fuel use. Adjusting the carburetor with a vacuum gauge helps fix these issues. It ensures the engine runs efficiently and lasts longer.
Vacuum Gauge Essentials
A vacuum gauge is a vital tool for tuning a carburetor. It measures the engine’s vacuum pressure, helping to identify the air-fuel mixture and engine performance. Knowing the basics of a vacuum gauge ensures accurate adjustments and smoother engine running.
Choosing The Right Gauge
Select a gauge that fits your engine type and size. Look for a dial face that is easy to read with clear numbers. A gauge with a range of 0 to 30 inches of mercury (inHg) suits most small engines. Choose a sturdy gauge to handle engine vibrations and heat.
Reading Vacuum Levels
Start the engine and connect the gauge to the vacuum port. Watch the needle on the dial carefully. A steady reading between 17 and 22 inHg shows good engine health. Fluctuating or low readings may indicate carburetor or valve problems. Use the gauge reading to guide your carburetor adjustments step by step.
Preparing For Adjustment
Preparing your carburetor for adjustment with a vacuum gauge is crucial. Proper preparation ensures accurate results and protects your engine. Take time to gather the right tools and understand safety steps. A well-prepared engine will respond better to fine-tuning.
Tools And Safety Gear
Gather all necessary tools before starting. A reliable vacuum gauge is essential for accurate readings. Include screwdrivers, wrenches, and a flashlight for better visibility. Safety gear protects you during the adjustment process.
- Wear safety glasses to protect your eyes from debris.
- Use gloves to avoid burns or cuts.
- Keep a fire extinguisher nearby in case of fuel spills.
- Ensure proper ventilation to avoid inhaling fumes.
Having these tools and safety items ready saves time and prevents accidents.
Engine Warm-up Tips
Warm the engine before adjusting the carburetor. A cold engine gives inaccurate vacuum readings. Run the engine until it reaches normal operating temperature. This usually takes about 5 to 10 minutes.
Keep the engine idle speed steady during warm-up. Avoid revving the engine or sudden throttle changes. Warm engine parts expand and operate more smoothly. This creates the best environment for carburetor tuning.

Credit: www.youtube.com
Step-by-step Adjustment
Adjusting a carburetor with a vacuum gauge requires patience and attention to detail. Each adjustment affects engine performance, so making precise changes is key. Let’s break down the process into clear, manageable tasks to help you get the best results from your engine.
Connecting The Vacuum Gauge
Start by locating the vacuum port on your carburetor, usually a small nipple or hose fitting. Attach the vacuum gauge hose securely to this port without causing any air leaks. Make sure your engine is off before connecting the gauge to avoid any sudden movements or damage.
Once connected, start your engine and let it warm up to its normal operating temperature. You’ll want a steady reading on the gauge before making any adjustments. If the needle fluctuates wildly, check for leaks or loose connections.
Setting Idle Speed
Idle speed controls how fast your engine runs when it’s not under load. Use the idle speed screw on your carburetor to adjust this. Turn it slowly while watching the tachometer or listening to the engine sound until the idle feels smooth and steady.
Keep an eye on the vacuum gauge as you adjust idle speed. The ideal vacuum reading varies, but a stable, higher reading often means better engine efficiency at idle. Ask yourself: is the engine running smoothly, or does it stumble as you adjust?
Tweaking Mixture Screws
Mixture screws control the ratio of air to fuel entering the engine. Turn the screws slowly clockwise to lean the mixture or counterclockwise to enrich it. Adjust until the vacuum gauge shows the highest steady reading, indicating the best mixture balance.
Don’t rush this part—small changes can make a big difference. If your mixture is too lean, the engine may hesitate or stall; too rich, and you’ll waste fuel and create excess emissions. How does your engine respond as you tweak these screws?
Common Issues And Fixes
Adjusting a carburetor with a vacuum gauge can solve many engine problems. Common issues often cause poor engine performance and lower fuel efficiency. Identifying these problems quickly helps keep your engine running smoothly. Understanding the symptoms and fixes makes adjustment easier and more effective.
Erratic Vacuum Readings
Erratic vacuum readings show unstable engine performance. It may happen due to vacuum leaks or a dirty carburetor. Check all vacuum hoses for cracks or loose connections. Clean the carburetor jets and passages to remove any dirt or debris. Tighten any loose fittings to ensure a proper seal. These steps stabilize vacuum readings and improve engine idle.
Engine Hesitation
Engine hesitation feels like a delay when you press the gas pedal. It often results from incorrect carburetor adjustment or clogged fuel lines. Use the vacuum gauge to fine-tune the air-fuel mixture. Make small adjustments until the engine runs smoothly. Inspect fuel filters and lines for blockages and replace if needed. Proper adjustment reduces hesitation and enhances acceleration.
Fuel Efficiency Problems
Low fuel efficiency can waste money and cause more pollution. This problem may occur if the carburetor runs too rich or too lean. Use the vacuum gauge to set the correct fuel mixture. Check the float level inside the carburetor to avoid flooding or fuel starvation. Regular maintenance keeps fuel consumption low and engine performance high.
Credit: www.vintage-mustang.com
Maintenance Tips
Keeping your carburetor in top shape is key to smooth engine performance. Regular maintenance not only extends the life of your engine but also helps you avoid unexpected breakdowns. Let’s look at some practical tips that make maintaining your carburetor straightforward and effective.
Regular Inspection
Make it a habit to check your carburetor frequently. Look for signs of wear, cracks, or loose connections. Even a small leak can affect your engine’s performance and fuel efficiency.
Pay attention to how your engine runs after adjustments. Does it idle smoothly or stall? This quick test often reveals if further tuning is needed.
Have you noticed any unusual smells or black smoke from the exhaust? These are clues that your carburetor might need attention before serious damage occurs.
Cleaning The Carburetor
Dirt and grime can clog jets and passages, causing poor fuel flow. Use a carburetor cleaner spray to dissolve deposits gently. Avoid harsh scrubbing that might damage delicate parts.
Remove and soak small components in the cleaner for better results. While doing this, inspect each piece closely for wear or damage that might require replacement.
After cleaning, reassemble carefully and check for any leftover debris. A clean carburetor can drastically improve your engine’s response and fuel economy.
Frequently Asked Questions
What Is The Purpose Of Using A Vacuum Gauge On Carburetors?
A vacuum gauge measures engine vacuum to help fine-tune carburetor settings. It ensures optimal air-fuel mixture for smooth engine performance and fuel efficiency.
How Do You Connect A Vacuum Gauge To A Carburetor?
Connect the vacuum gauge hose to a vacuum port on the intake manifold or carburetor base. Ensure a tight seal to get accurate readings.
When Should I Adjust My Carburetor With A Vacuum Gauge?
Adjust your carburetor when the engine idles rough, stalls, or fuel consumption rises. Regular checks maintain engine efficiency and prolong carburetor life.
What Is The Ideal Vacuum Reading For Carburetor Adjustment?
An ideal vacuum reading is typically between 17-21 inches of mercury at idle. Stable readings indicate proper carburetor tuning and smooth engine operation.
Conclusion
Adjusting a carburetor with a vacuum gauge takes patience and care. Follow each step slowly and watch the gauge closely. Small changes can make a big difference in engine performance. Keep your engine running smoothly by checking the settings often.
This simple tool helps you find the right balance for fuel and air. Practice makes perfect, so don’t rush the process. With time, adjusting your carburetor will become easier and more natural. Keep your engine healthy and enjoy better fuel efficiency every time you tune it.