If you want to improve your fishing game, knowing how to attach a sinker to your fishing line is a must. A properly attached sinker helps your bait reach the right depth and stay steady in the water.
But if it’s done wrong, you could lose fish or even your tackle. In this guide, you’ll learn simple, step-by-step methods to secure your sinker quickly and confidently. Keep reading, and you’ll be ready to fish smarter and catch more.
Choosing The Right Sinker
Sinkers help your bait reach the right depth in the water. Picking the right sinker improves your fishing experience.
Consider the type, fishing conditions, and line strength when choosing a sinker. These factors affect how well the sinker works.
Types Of Sinkers
There are many sinker types. Each type works best in different fishing situations.
- Split Shot: Small and round, easy to attach and remove.
- Egg Sinkers: Oval-shaped, reduce line twisting.
- Bank Sinkers: Heavier with flat sides, good for strong currents.
- Pyramid Sinkers: Pointed shape, holds well in sandy bottoms.
- Bullet Sinkers: Streamlined, used for fishing in cover or weeds.
Selecting Based On Fishing Conditions
Fishing conditions like water depth and current affect your sinker choice. Match the sinker to these conditions for better results.
Use heavier sinkers in deep water or strong currents. Lighter sinkers work well in calm, shallow water.
- Calm water: Light sinkers for natural bait movement.
- Fast currents: Heavy sinkers to hold your bait.
- Sandy bottoms: Pyramid sinkers prevent slipping.
- Rocky areas: Bank sinkers stay stable.
Matching Sinkers To Line Strength
Your fishing line strength limits how heavy your sinker can be. A heavy sinker can break a weak line.
Choose sinkers that match your line’s test weight. This helps avoid snapping and loss of tackle.
- Light line (2-6 lbs): Use small, light sinkers.
- Medium line (6-12 lbs): Use medium-weight sinkers.
- Heavy line (12+ lbs): Use large, heavy sinkers.

Credit: www.amazon.com
Preparing Your Fishing Line
Attaching a sinker to your fishing line needs care. Proper preparation helps your fishing work better.
Getting your line ready means cutting it right, checking for damage, and picking the best spot to attach the sinker.
Cutting The Line Properly
Cut your fishing line cleanly using sharp scissors or a line cutter. A rough cut can cause the line to fray.
Make sure the cut end is straight. This helps the sinker attach firmly and keeps the line strong.
- Use sharp scissors or a line cutter
- Cut the line straight and clean
- Avoid crushing the line while cutting
Checking For Line Damage
Look closely at your fishing line before attaching the sinker. Check for cracks, frays, or weak spots.
Damaged line can break easily and cause you to lose your sinker or catch. Replace any damaged sections.
- Run your fingers along the line to feel for rough spots
- Look for discoloration or broken fibers
- Cut out damaged sections before use
Choosing The Attachment Point
Pick a spot on your line where the sinker can attach without slipping. Usually, this is a few inches above the hook.
Make sure the spot is free of knots or damage. This keeps the sinker secure and helps your bait sit right in the water.
- Attach sinker 6-12 inches above the hook
- Avoid spots with knots or wear
- Ensure the line is strong and smooth there
Attaching Slip Sinkers
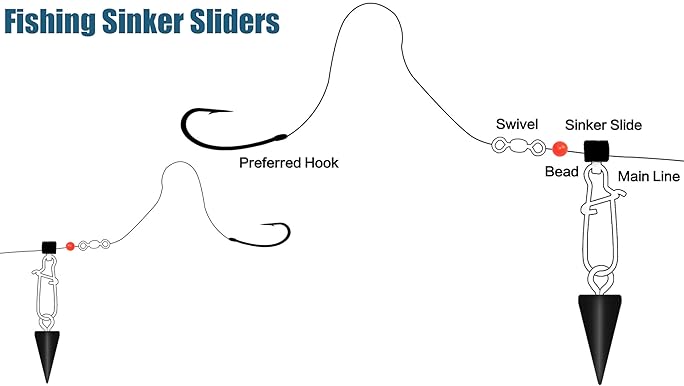
Slip sinkers help your bait sink faster and stay near the bottom. They slide on the fishing line, letting fish take the bait without feeling the weight.
To attach a slip sinker, you need to thread it correctly. Adding a bead and securing with a swivel keeps everything in place and protects your knot.
Threading The Sinker
Start by threading your fishing line through the hole in the slip sinker. The sinker should move freely along the line.
Make sure the sinker is the right size for your line to slide smoothly without too much play.
Adding A Bead
After the slip sinker, slide a small plastic or glass bead onto the line. The bead protects the knot from the sinker’s impact.
The bead also makes a clicking sound that can attract fish near the bait.
Securing With A Swivel
Attach a swivel to the end of the line after the bead. The swivel stops the sinker and bead from sliding off.
The swivel also prevents your line from twisting as the bait moves in the water.

Credit: m.youtube.com
Attaching Egg Or Bell Sinkers
Egg and bell sinkers are popular for fishing because they slide easily in water. Attaching them correctly helps your bait sink well and stay in place.
Use simple tools and knots to fix these sinkers to your fishing line. This guide shows easy steps for a secure setup.
Using The Sinker Hole
Egg and bell sinkers have a hole in the center. Thread your fishing line through this hole first. This keeps the sinker in the right spot on the line.
Make sure the line moves smoothly through the hole. This helps the sinker slide when needed and stay tight when fishing.
Tying With The Palomar Knot
The Palomar knot is strong and easy to tie. It works well to attach sinkers because it holds tight and does not slip.
Double the line, pass it through the sinker hole, then tie a loose overhand knot. Pass the loop over the sinker and pull tight.
- Double about 6 inches of line
- Thread loop through sinker hole
- Tie an overhand knot with the doubled line
- Pass the sinker through the loop
- Pull the knot tight against the sinker
Ensuring A Tight Fit
After tying, pull the line firmly to secure the sinker. Check the knot to make sure it is snug and will not slip.
If the sinker moves too freely, tighten the knot more or try tying again. A tight fit helps with better casting and fishing control.
Using Split Shot Sinkers
Split shot sinkers are small, round weights used to add weight to a fishing line. They help your bait sink faster and stay in place. Attaching them correctly is important for good fishing results.
This guide shows how to use split shot sinkers safely and effectively.
Pinching Technique
Hold the split shot sinker with pliers. Pinch it gently but firmly around the fishing line. The sinker should close tightly without crushing the line.
- Place the sinker over the line.
- Use pliers to squeeze the sinker shut.
- Check that the sinker does not slide on the line.
- Adjust tightness if needed.
Positioning On The Line
Put the split shot sinker at the right spot on your fishing line. Usually, place it a few inches above the hook. This helps the bait move naturally in water.
| Position | Effect |
| Close to hook | Bait sinks quickly |
| Far from hook | Bait moves more freely |
| Multiple sinkers | Control depth and balance |
Avoiding Line Damage
Split shot sinkers can harm your fishing line if used carelessly. Protect your line by following these tips:
- Use pliers to pinch sinkers gently.
- Do not squeeze too hard.
- Check the line for frays after attaching.
- Replace damaged line parts immediately.

Credit: www.amazon.com
Testing The Setup
After attaching a sinker to your fishing line, it is important to test the setup. Testing helps ensure the sinker works well with your line and bait.
Proper testing improves your fishing chances by making sure the sinker stays in place and balances the rig correctly.
Checking Sinker Movement
Check how the sinker moves on the line. It should slide smoothly if it is a sliding sinker or stay fixed if it is tied on.
If the sinker does not move as expected, adjust the knots or change the sinker type to fit your fishing style.
Adjusting For Balance
Balance the sinker with your bait and hook weight. This balance helps the line stay steady in the water.
- Make sure the sinker weight is not too heavy for the line.
- Use lighter sinkers for small baits.
- Choose heavier sinkers for deep or fast water.
- Adjust the sinker position to keep the bait at the right depth.
Performing A Cast Test
Try casting your line to see how the sinker affects the cast. The cast should be smooth and accurate.
| Test Aspect | Good Result | Problem Indication |
| Sinker Stability | Sinker stays in place | Sinker slides too much or falls off |
| Cast Distance | Line reaches target area | Line falls short or tangles |
| Bait Position | Bait stays at correct depth | Bait floats too high or sinks too low |
Tips For Success
Attaching a sinker to a fishing line is important for better casting and bait control. Doing it right helps you catch more fish and enjoy your time on the water.
Use simple steps and good habits to keep your fishing line strong and tangle-free. Follow these tips to improve your fishing experience.
Preventing Line Twists
Line twists make fishing harder and can cause knots or breaks. Avoid twists by attaching your sinker properly and handling the line carefully.
Use swivel connectors between the sinker and the line to reduce twisting. Always let the line fall freely without forcing it.
- Attach a swivel to your line before the sinker
- Check that the sinker moves freely on the line
- Reel in your line slowly to avoid twists
Maintaining Equipment
Keep your fishing gear clean and in good shape. Regular maintenance helps your sinker and line last longer and work better.
Rinse your sinker and line with fresh water after fishing in saltwater. Check for damage and replace worn parts to avoid problems.
- Clean sinkers and lines after each use
- Inspect for cracks or rust on sinkers
- Replace damaged line sections immediately
Adapting To Different Fishing Spots
Different fishing spots need different sinker setups. Adjust your weight and line length to match the water and fish type.
Use heavier sinkers in deep or fast water. Choose lighter weights for calm, shallow areas to keep your bait natural.
- Use heavier sinkers in strong currents
- Pick lighter sinkers for shallow waters
- Adjust line length based on fishing depth
Frequently Asked Questions
What Is A Sinker In Fishing?
A sinker is a weight used in fishing to help the bait sink deeper into the water. It stabilizes the fishing line and keeps the bait at the desired depth. Using a sinker increases your chances of catching fish by placing the bait in the fish’s natural habitat.
How Do You Choose The Right Sinker?
Choosing the right sinker depends on water conditions and target fish. Heavier sinkers are ideal for fast currents and deep waters. Lighter sinkers work well in calm and shallow areas. Consider the fish species and environment to ensure you select an appropriate sinker for your fishing needs.
Why Attach A Sinker To A Fishing Line?
Attaching a sinker helps maintain the bait’s position and reach deeper waters. It provides stability to the line and increases casting distance. Sinkers are essential for controlling bait movement, ensuring it stays in the strike zone, making it more attractive to fish.
What Types Of Sinkers Are Available?
Common sinker types include split shot, egg, bullet, and pyramid sinkers. Split shot sinkers are small and versatile, ideal for light fishing. Egg sinkers are used for slip rigs, while bullet sinkers suit Texas rigs. Pyramid sinkers work best in strong currents and sandy bottoms.
Conclusion
Attaching a sinker to a fishing line is simple and important. Use the right knot to keep the sinker secure. Check your line often to avoid losing your sinker. Practice tying knots to get faster and more confident. This small skill helps you fish better every time.
Try different sinkers to find what works best. Keep your gear ready and enjoy your fishing trips more. With patience, you will improve and catch more fish.