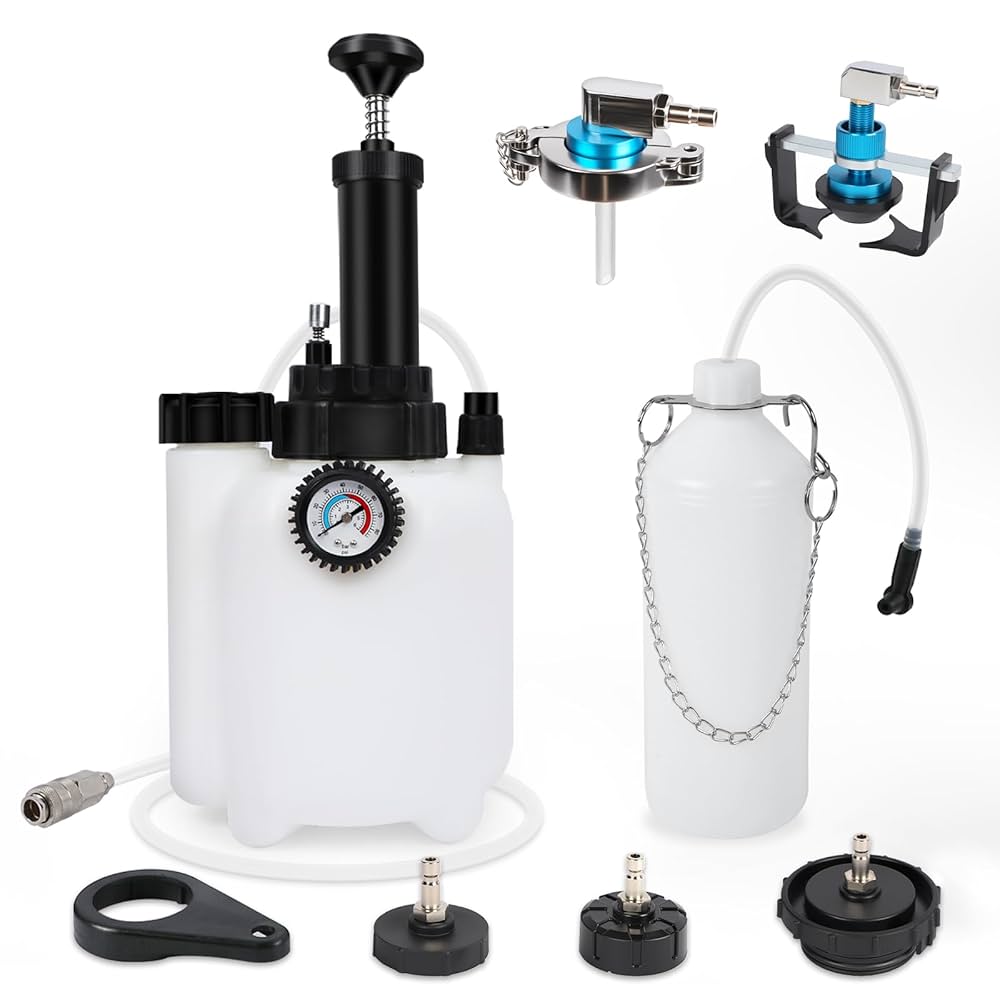
Are your brakes feeling a bit spongy or less responsive than usual? This could be a sign that air has made its way into your brake lines.
Bleeding your brakes is essential to maintain optimal braking performance and ensure your safety on the road. But don’t worry, you don’t need to be a car expert to get this done. With a vacuum pump, you can efficiently and effectively bleed your brakes at home.
Imagine driving with the confidence that your brakes will respond instantly, just as they should. In this guide, we’ll walk you through each step of the process, making it easy for you to tackle this task. Say goodbye to that uneasy feeling and hello to smooth and reliable braking. Ready to take control of your car’s braking system? Let’s get started!

Credit: www.amazon.ca
Preparing Your Vehicle
Preparing your vehicle is the first key step in bleeding brakes using a vacuum pump. Proper preparation makes the process smoother and safer. Taking time to set up correctly helps avoid mistakes and damage.
Start by organizing everything you need. Know exactly where each brake bleeder valve is located. Safety is crucial throughout the job. Follow basic precautions to protect yourself and your car.
Gathering Necessary Tools
Collect all tools before you begin. You will need:
- Vacuum pump with hose
- Clear tubing to fit over bleeder valves
- Brake fluid matching your vehicle’s specifications
- Wrenches or sockets for the bleeder valves
- Clean rags or paper towels
- Safety gloves and goggles
- A container to catch old brake fluid
Having everything ready saves time and keeps the workspace organized.
Locating The Brake Bleeder Valves
Identify the bleeder valves on each brake caliper or wheel cylinder. Usually, they are small screws near the brake pads or drums. Check your vehicle manual for exact locations.
Clean around each valve to prevent dirt from entering the brake system. Use a wire brush or rag if needed. This step prevents contamination during bleeding.
Ensuring Safety Precautions
Wear gloves and goggles to protect your skin and eyes. Brake fluid is corrosive and can cause irritation. Work in a well-ventilated area to avoid inhaling fumes.
Keep the vehicle on a flat surface and secure it with wheel chocks. Use jack stands if you lift the car. Never rely on a jack alone for support.
Dispose of old brake fluid properly. Avoid spills on painted surfaces, as fluid can damage the paint.

Credit: www.amazon.ca
Setting Up The Vacuum Pump
Setting up the vacuum pump is a key part of bleeding brakes safely and efficiently. Proper setup helps remove air from brake lines, ensuring firm and responsive brakes. This process starts with connecting the pump to the brake system, followed by checking the seal, and adjusting the vacuum pressure correctly.
Connecting The Pump To The Brake System
Attach the vacuum pump hose to the brake bleeder valve. Make sure the connection fits snugly to avoid leaks. Use the right adapter if needed for your vehicle’s valve size. Keep the brake fluid reservoir open during this process to allow air to escape.
Checking For Proper Seal
Check the hose connection for any air leaks by listening or feeling for air escaping. A tight seal is crucial for effective vacuum pressure. If air leaks appear, reposition the hose or use a different adapter. Confirm the pump’s gauge shows vacuum buildup, signaling a good seal.
Adjusting Vacuum Pressure
Turn on the vacuum pump and slowly build pressure. Watch the gauge to keep pressure steady and avoid too high or low levels. Maintain a constant vacuum to draw air bubbles out of the brake fluid. Adjust pressure as needed to ensure smooth brake fluid flow.
Bleeding The Brakes
Bleeding the brakes is a crucial process to ensure your vehicle’s braking system works safely and effectively. Using a vacuum pump makes this task cleaner and more efficient by drawing out air bubbles trapped in the brake lines. Getting the sequence right and paying close attention to fluid flow can save you time and avoid frustration.
Starting With The Furthest Wheel
Begin bleeding at the wheel farthest from the master cylinder, usually the rear passenger side. This approach helps push air out of the entire brake system systematically. If you start too close, trapped air might remain in the lines further away, reducing brake performance.
Opening The Bleeder Valve
Use the vacuum pump to gently open the bleeder valve on the caliper or wheel cylinder. Don’t rush this step—slow and steady suction pulls air and fluid without causing spills. Keep a close eye on the valve to prevent dirt or debris from entering the system.
Monitoring Fluid Flow
Watch the brake fluid closely as it flows through the clear hose attached to the vacuum pump. You want to see a steady stream of fluid without bubbles. If bubbles appear, continue pumping until the fluid runs clean; this is your sign that air is fully removed.
Closing The Valve And Repeating
Once the fluid runs clear, close the bleeder valve tightly to prevent air from re-entering. Move on to the next wheel, following the same pattern, always working from the farthest to the nearest. Have you ever noticed a difference in brake feel after a careful bleeding? That smooth, firm pedal is exactly what this process aims to restore.
Checking Brake Fluid Levels
Checking your brake fluid levels is a crucial step before you start bleeding brakes with a vacuum pump. If the fluid level is too low, air can enter the system, causing a spongy brake pedal and reducing braking efficiency. Keeping an eye on the fluid ensures the bleeding process goes smoothly and your brakes perform safely.
Refilling The Master Cylinder
Always check the master cylinder reservoir before you begin. If the fluid is below the recommended level, add the correct type of brake fluid specified for your vehicle. Do this slowly to avoid spills and overfilling.
Keep the reservoir cap tightly closed while adding fluid to prevent contamination. You don’t want dirt or moisture entering the system, as this can lead to brake failure later on.
Avoiding Air Intake
As you bleed the brakes, watch the fluid level in the master cylinder closely. If it drops too low, air will get sucked into the lines, undoing your work. This is a common mistake even experienced DIYers make.
Top off the fluid regularly during the bleeding process. This simple step saves you time and frustration by keeping air out of the brake system entirely.
Maintaining Fluid Cleanliness
Brake fluid absorbs moisture over time, which can reduce its effectiveness. Use fresh fluid from a sealed container to keep the system clean and reliable.
Clean the area around the reservoir cap before opening it to prevent dirt from falling in. Contaminated fluid can cause corrosion and damage to brake components.
Testing Brake Performance
Testing brake performance after bleeding is essential to ensure safety. This step checks if the brakes respond correctly and feel firm. Proper testing helps detect any remaining air in the brake lines. It also confirms that the vacuum pump bleeding was successful.
Pressing The Brake Pedal
Start by pressing the brake pedal slowly and firmly. The pedal should feel solid and resist deep pushing. A firm pedal shows that the brake fluid moved properly. If the pedal sinks to the floor, air may still be inside.
Identifying Spongy Feel
Notice if the pedal feels soft or spongy underfoot. A spongy feel means air bubbles remain in the brake system. This can reduce brake effectiveness and increase stopping distance. Take note of any unusual softness or delays in pedal response.
Repeating Bleeding If Needed
If the brake pedal does not feel firm, repeat the bleeding process. Use the vacuum pump to remove trapped air again. Continue until the pedal feels solid and consistent each time. Don’t rush this step, as full brake performance is critical.
Cleaning Up And Final Steps
After successfully bleeding your brakes using a vacuum pump, the work isn’t quite over yet. Cleaning up properly and taking final checks are just as important to ensure your brake system is safe and ready to go. Let’s look at what you should do next to wrap up the job efficiently and safely.
Removing Equipment
Start by carefully detaching the vacuum pump and any hoses connected to the brake bleeder valves. Avoid spilling brake fluid, as it can damage paint and other surfaces. Use a clean rag or paper towels to wipe off any drips immediately.
Store your tools and pump in a clean, dry place to keep them ready for next time. Leaving brake fluid residue on equipment can cause corrosion or clogging later on.
Disposing Of Old Brake Fluid
Old brake fluid is hazardous waste and shouldn’t be poured down drains or thrown in the trash. Collect the used fluid in a sealed container right after bleeding.
Check with your local waste disposal center about how to safely dispose of automotive fluids. Many places offer specific drop-off points for brake fluid and other chemicals.
Inspecting For Leaks
Once everything is cleaned up, it’s crucial to inspect your brake lines, calipers, and bleeder screws for leaks. Press the brake pedal several times and watch for any fluid seepage around the connections.
If you spot a leak, don’t ignore it. Tighten fittings gently or replace faulty parts before driving. Would you trust your brakes if you skipped this final check?

Credit: www.reddit.com
Frequently Asked Questions
What Is The Purpose Of Bleeding Brakes With A Vacuum Pump?
Bleeding brakes with a vacuum pump removes air bubbles from brake lines. This ensures consistent brake pressure and improves braking performance. It is a quicker, cleaner method than traditional bleeding. Proper bleeding avoids brake failure and enhances vehicle safety.
How Do You Use A Vacuum Pump To Bleed Brakes?
Connect the vacuum pump to the brake bleeder valve. Apply vacuum to draw brake fluid and air out of the system. Keep the brake fluid reservoir topped up. Continue until no air bubbles appear in the fluid. Then close the valve securely.
Can A Vacuum Pump Bleed All Types Of Brake Systems?
Yes, a vacuum pump works on most hydraulic brake systems. It is effective for disc and drum brakes. However, always check your vehicle’s manual for specific recommendations. Some ABS systems may require special procedures.
How Often Should You Bleed Your Brakes Using A Vacuum Pump?
Brake bleeding frequency depends on vehicle usage and brake condition. Generally, bleed brakes every 1-2 years or when brake feel is spongy. Regular bleeding maintains optimal brake performance and safety. Always inspect brakes during routine maintenance.
Conclusion
Bleeding brakes with a vacuum pump is simple and effective. It helps remove air from brake lines quickly. Clean brake fluid flows better and improves safety. Always check for leaks and keep your tools ready. Take your time and follow each step carefully.
This method saves effort and gives you better brake control. Remember, good brakes mean safer driving. Practice this process to feel more confident working on your car.