Have you ever dreamed of catching the perfect fish with a rod made just for you? Building your own custom fishing rod gives you that unique edge.
It’s not only satisfying but also lets you tailor every part to match your style and needs. In this guide, you’ll discover simple steps that turn raw materials into a fishing rod that feels like an extension of your own arm.
Ready to create something truly yours? Keep reading and unlock the secrets to crafting a custom fishing rod that will change your fishing game forever.
Credit: erinmills.ca
Choosing The Right Materials
Building a custom fishing rod needs careful material choices. The right parts make the rod strong and easy to use.
This guide helps you pick the best materials for your rod. Each part affects the rod’s performance and feel.
Selecting The Rod Blank
The rod blank is the main body. It needs to be strong but light. Common materials are graphite and fiberglass. Graphite is stiff and sensitive. Fiberglass is flexible and tough.
Picking The Handle Material
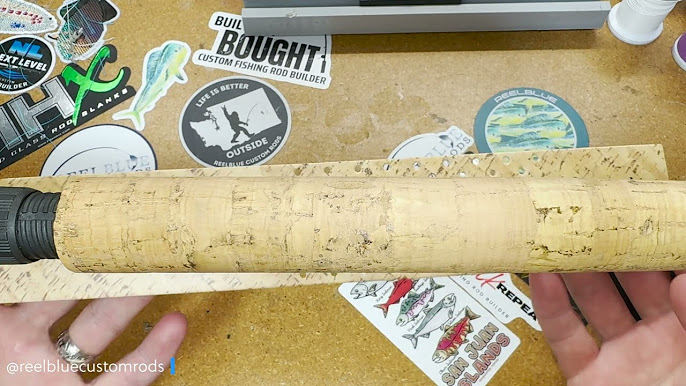
Handles must feel good in your hand and resist water. Cork and EVA foam are popular. Cork is comfortable and looks nice. EVA foam is soft and lasts long.
Choosing The Reel Seat
The reel seat holds the reel tightly. It must be strong and corrosion-resistant. Materials like graphite, aluminum, and stainless steel work well. Choose one that fits your reel size and fishing style.
Selecting Guides And Tips
- Guides reduce line friction and keep it on track.
- Choose guides made of ceramic or stainless steel for durability.
- Tip tops protect the rod’s end and guide the line smoothly.
- Match guide size to your line weight for better casting.
Credit: lakeladyrods.com
Tools You Will Need
Building a custom fishing rod requires some basic tools to get started. These tools help you shape, assemble, and finish your rod properly.
Besides the basic tools, some specialized tools can improve your work. These are optional but useful for specific tasks.
Basic Tools List
These tools are essential for building your fishing rod from scratch. You will use them for cutting, measuring, and assembling parts.
- Measuring tape or ruler for precise length
- Sharp scissors or hobby knife for cutting thread and tape
- Epoxy resin and mixing cups for gluing parts
- Brushes to apply epoxy evenly
- Sandpaper for smoothing rod blanks and guides
- Rod drying rack or stand to hold the rod during epoxy curing
- Marker or pencil to mark guide positions
Optional Specialized Tools
These tools help improve accuracy and ease in certain steps. They are not required but recommended for better results.
| Tool | Use |
| Rod wrapping jig | Keeps thread tight and consistent on guides |
| Heat gun | Speeds up epoxy drying process |
| Thread tensioner | Controls thread tightness while wrapping guides |
| Guide alignment tool | Ensures guides are straight and properly spaced |
| Calipers | Measure guide foot size and rod diameter |
Preparing The Rod Blank
Preparing the rod blank is the first important step in building a custom fishing rod. It sets the foundation for a strong and well-balanced rod.
This stage includes measuring, marking, and cutting the blank to the right size. Careful work here saves time later.
Measuring And Marking
Measure the rod blank carefully using a tape measure. Decide the length based on your fishing needs.
Mark the cutting points clearly with a pencil or masking tape. Make sure your marks are straight and easy to see.
- Use a flat surface to measure the blank.
- Mark the length from the handle end.
- Double-check measurements before marking.
- Use tape to protect areas near the cut.
Cutting The Blank To Size
Use a fine-toothed saw or rod blank cutter to cut at the marked spot. Cut slowly to avoid splintering the blank.
After cutting, lightly sand the cut edge to smooth it. This helps when fitting other parts to the blank.
- Secure the blank firmly before cutting.
- Cut in one smooth motion without forcing the saw.
- Sand the edge with fine-grit sandpaper.
- Check the length again after cutting.
Installing The Handle And Reel Seat
Building a custom fishing rod starts with adding the handle and reel seat. These parts give you control and comfort while fishing.
Proper installation helps the rod feel balanced and strong. Take your time to fit each part correctly.
Shaping The Handle
Start by selecting the handle material, like cork or foam. Shape it to fit your hand comfortably.
Use sandpaper to smooth the handle. Make sure it has no rough spots or sharp edges.
- Cut the handle blank to the right length
- Sand it with medium then fine grit paper
- Check the fit by holding the handle
- Shape for good grip and comfort
Securing The Reel Seat
Choose a reel seat that matches your rod size. Slide it onto the blank where the handle ends.
Use epoxy or rod-building glue to hold the reel seat in place. Avoid using too much glue to keep it neat.
- Apply glue inside the reel seat
- Slide the reel seat onto the rod blank
- Align the reel seat with the guides
- Wipe off excess glue quickly
- Let the glue dry fully before use
Attaching Guides And Tips
Attaching guides and tips to your custom fishing rod is a key step. It affects how the rod performs and lasts.
This guide explains how to place guides correctly and wrap them securely.
Guide Placement Strategy
Place guides carefully to balance line flow and rod strength. The first guide sits close to the rod tip. Space others evenly along the rod.
- Start with a tip-top guide at the end of the rod.
- Place the second guide about 6 inches from the tip.
- Space remaining guides evenly, getting wider toward the handle.
- Ensure all guides line up along the rod’s spine.
- Use more guides on longer rods for better line control.
Wrapping And Securing Guides
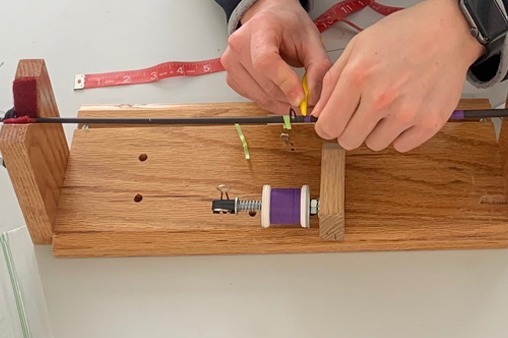
Wrap the guides tightly with strong thread to keep them stable. Apply epoxy finish to protect the wrap and add strength.
| Step | Action | Tip |
| 1 | Place guide on the rod | Align guides along the rod’s spine |
| 2 | Start wrapping thread at the guide foot | Keep wraps tight and even |
| 3 | Cover entire guide foot with thread | Overlap threads slightly for strength |
| 4 | Tie off the thread securely | Use a half hitch knot for better hold |
| 5 | Apply epoxy over the wrap | Use thin coats and let dry fully |
Finishing Touches
Finishing touches make your fishing rod look great and last longer. These steps protect and decorate your rod.
Take your time with these final steps to get the best results. Small details can make a big difference.
Applying Epoxy Coating
Epoxy coating protects the rod from water and damage. It also gives a shiny, smooth finish.
Use a brush to apply a thin, even layer of epoxy over the rod. Avoid thick spots or drips.
- Mix epoxy according to the instructions
- Apply in a well-ventilated area
- Brush slowly to avoid bubbles
- Let the epoxy dry completely before handling
- Apply a second coat for extra protection
Adding Decorative Elements
Decorations make your rod unique and personal. You can use wraps, decals, or paint for style.
Keep decorations simple to avoid weakening the rod. Make sure everything is secure before use.
- Use colored thread wraps near guides
- Add stickers or decals under epoxy
- Paint small designs with waterproof paint
- Seal decorations with clear epoxy
Testing Your Custom Rod
After building your custom fishing rod, testing it is important. This step ensures your rod works well in real fishing situations.
Testing helps you find any problems and make the rod better. Focus on balance, flexibility, and making adjustments as needed.
Checking Balance And Flexibility
Check the rod’s balance by holding it where the handle meets the rod. The rod should feel steady and not tip too much forward or backward.
Test the flexibility by gently bending the rod. It should bend smoothly without feeling too stiff or too weak.
- Hold the rod in your hand and feel if it is comfortable
- Try bending the rod slowly to see how it flexes
- Make sure the rod returns to its original shape easily
Making Adjustments
If the rod feels off balance, adjust the weight of the handle or add wraps to the guides. Small changes can improve how the rod feels.
For flexibility issues, you may need to change the type of blank or adjust the guide placement. These changes affect how the rod bends and performs.
- Add or remove wraps on the rod guides
- Adjust the handle weight by adding cork or tape
- Change guide spacing to improve rod action

Credit: anglersresource.net
Maintenance Tips
Keeping your custom fishing rod in good shape helps it last longer. Regular care avoids big problems and keeps it ready for your next trip.
Simple maintenance tasks like cleaning and fixing small damages make a big difference. Learn easy ways to care for your rod below.
Cleaning And Storage
Cleaning your fishing rod after each use removes dirt and salt. Proper storage stops damage and keeps the rod straight.
- Rinse the rod with fresh water to remove salt and dirt.
- Use a soft cloth to wipe the rod dry.
- Check guides and reel seat for debris and clean carefully.
- Store the rod in a cool, dry place away from direct sunlight.
- Keep the rod in a protective case or rack to avoid bending.
Repairing Minor Damages
Small cracks or loose guides can get worse if left alone. Fixing these early keeps your rod strong and safe to use.
| Damage Type | Repair Method | Materials Needed |
| Loose guide | Re-glue with epoxy | Epoxy glue, cleaning cloth |
| Small crack on blank | Wrap with thread and epoxy | Thread, epoxy, sandpaper |
| Worn handle grip | Replace or rewrap grip | Grip tape or new handle |
Frequently Asked Questions
What Materials Are Needed For A Custom Fishing Rod?
To build a custom fishing rod, you’ll need a rod blank, guides, reel seat, cork or EVA handles, thread, and epoxy. These materials are essential for constructing a durable and functional fishing rod. Ensure you choose high-quality components to enhance your fishing experience and the rod’s longevity.
How Long Does It Take To Build A Rod?
Building a custom fishing rod typically takes around 10 to 15 hours. This time frame includes preparing materials, assembling components, and allowing the epoxy to cure. Patience and attention to detail are important for achieving a well-crafted rod that performs optimally on your fishing trips.
Can Beginners Build Custom Fishing Rods?
Yes, beginners can build custom fishing rods with the right guidance and tools. Start with a basic kit and follow detailed instructions or online tutorials. With practice, you’ll gain confidence and improve your skills, enabling you to create more complex and personalized fishing rods.
What Tools Are Required For Rod Building?
Essential tools for rod building include a rod wrapper, drying motor, heat gun, and measuring tape. You’ll also need a razor blade, brush for epoxy application, and a reamer. These tools help in precise assembly and finishing, ensuring your custom fishing rod is built to your specifications.
Conclusion
Building a custom fishing rod can be fun and rewarding. You choose each part to fit your style. This way, your rod works just right. Take your time and enjoy the process. Each step helps you learn and improve. Soon, you will have a rod made by you.
Ready for many fishing trips ahead. Keep practicing and trying new ideas. Your fishing experience will become more personal and fun.