Have you ever wanted to catch fish with a rod you built yourself? Building your own fishing rod is easier than you think, and it gives you a unique tool tailored just for you.
Imagine the pride and satisfaction of casting a line with a rod you made from scratch. In this guide, you’ll learn simple steps to create a fishing rod that feels just right in your hands and helps you land more fish.
Ready to get started? Let’s dive in and make your perfect fishing rod together.

Credit: www.youtube.com
Choosing The Right Materials
Building a fishing rod starts with picking the right materials. The choices affect how the rod feels and works.
Good materials help you catch more fish and enjoy fishing longer. Learn what to look for in each part.
Selecting The Rod Blank
The rod blank is the main shaft. It needs to be strong but light. Most blanks are made from graphite, fiberglass, or composite materials.
Graphite blanks are stiff and sensitive. Fiberglass is flexible and durable. Composite offers a balance of both.
Picking The Reel Seat
The reel seat holds your fishing reel in place. It should fit your reel tightly and feel comfortable in your hand.
- Plastic reel seats are light and affordable.
- Metal reel seats offer strength and durability.
- Graphite reel seats provide a good mix of lightness and strength.
Choosing Guides And Tip Tops
Guides and tip tops guide the fishing line along the rod. They reduce friction and prevent line wear.
| Material | Benefit |
| Stainless Steel | Strong and corrosion-resistant |
| Ceramic Inserts | Low friction for smooth casting |
| Aluminum Oxide | Durable and lightweight |
Selecting The Handle Material
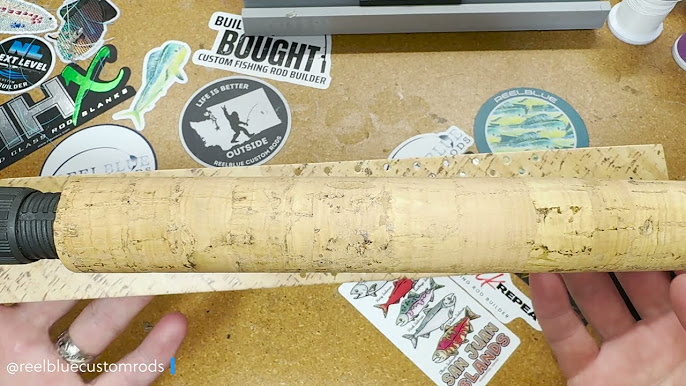
The handle affects comfort and grip. Common materials include cork and EVA foam.
Cork feels natural and is lightweight. EVA foam is soft and resists water and wear.
Gathering Essential Tools
Building a fishing rod starts with having the right tools. Proper tools make the process easier and more precise.
Collecting essential tools before you begin saves time and helps you work smoothly.
Necessary Wrapping Tools
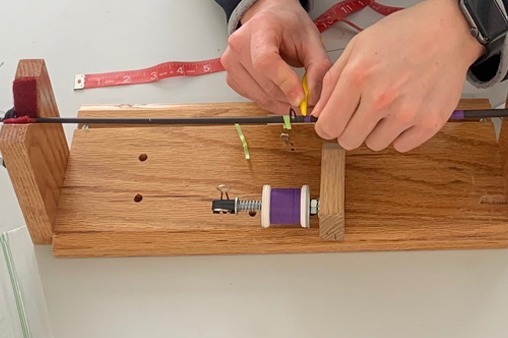
You need wrapping tools to secure guides and thread on the rod blank. These tools help you make neat wraps.
- Thread bobbin to hold and apply thread
- Rod wrapping jig to hold the rod steady
- Small scissors to trim thread ends
- Brushes for applying glue on thread wraps
Epoxy And Finishing Supplies
Epoxy protects your thread wraps and gives the rod a smooth finish. Finishing supplies help polish and seal your work.
| Supply | Purpose |
| Two-part epoxy | Coats and seals thread wraps |
| Mixing cups | Combine epoxy parts evenly |
| Finishing motor | Dries epoxy evenly |
| Sandpaper | Smooths dried epoxy surface |
Measuring And Cutting Tools
Accurate measuring and cutting tools help you get the right lengths. These tools keep your work precise.
- Measuring tape for length checks
- Ruler with fine markings
- Sharp hobby knife for cutting thread and tape
- Cutting mat to protect surfaces
Preparing The Rod Blank
Building a fishing rod begins with preparing the rod blank. This is the main part of your rod. It is crucial to start with this before adding other components.
Proper preparation ensures your rod is strong and performs well. Pay attention to detail and take your time during this stage.
Marking Guide Positions
Guides help your fishing line stay in place. Marking their positions is important for balance. Decide where each guide will go on the rod blank.
Use a pen or marker to make small dots where each guide will sit. Ensure the spacing is even for smooth casting and reeling.
- Start marking from the tip of the rod
- Keep guides evenly spaced along the blank
- Check alignment with a straight edge
Sanding And Cleaning
Sanding the rod blank makes it smooth. This helps the rod look nice and feel good in your hands. Use fine sandpaper for the best results.
After sanding, clean the rod blank. Remove all dust and debris. A clean surface is essential for applying finishes later.
- Sand in a circular motion for even texture
- Wipe with a damp cloth to remove dust
- Ensure the blank is completely dry before proceeding
Installing The Reel Seat And Handle
Building a fishing rod needs careful work. Installing the reel seat and handle is key. These parts hold the reel and give grip.
Follow simple steps to fit these parts well. A good installation helps your rod last longer and feel better to use.
Fitting The Reel Seat
Start by choosing the right reel seat for your rod. It should fit the rod’s blank snugly. Check the size before fitting.
Slide the reel seat onto the rod. Make sure it lines up straight with the guides. Adjust it until it sits firmly.
- Check the reel seat size matches the rod blank
- Slide the seat carefully onto the blank
- Align it with the rod guides for balance
- Make sure it fits tightly without gaps
Attaching The Handle
Choose a handle that feels comfortable in your hand. It should fit the rod and reel seat well. Handles come in cork or foam.
Slide the handle onto the rod blank below the reel seat. Push it gently until it fits snugly. Adjust for comfort and balance.
- Pick a handle material you like
- Slide the handle onto the rod blank
- Fit it just below the reel seat
- Make sure it feels good in your hand
Securing With Epoxy
Use epoxy to keep the reel seat and handle in place. Mix the epoxy well before use. Apply it evenly on the parts.
Slide the reel seat and handle back onto the rod after applying epoxy. Wipe off any extra glue. Let it dry fully before use.
- Mix epoxy according to instructions
- Apply a thin layer on reel seat and handle
- Slide parts onto rod and align properly
- Remove extra epoxy with a cloth
- Let the rod dry for several hours
Attaching The Guides
Attaching guides to a fishing rod is a key step. Guides help control the fishing line and improve casting.
Place each guide carefully along the rod. The guides must be secure and straight for best performance.
Wrapping Techniques
Use thread to wrap the guide feet tightly to the rod. Keep the wraps close and neat for strength.
Start wrapping a few inches before the guide foot. Wrap forward, then back to lock the thread in place.
- Use a thin, strong thread like nylon or polyester
- Keep tension steady while wrapping
- Overlap wraps slightly for full coverage
- Trim loose thread ends carefully
Applying Epoxy For Durability
Apply epoxy over the thread wraps to protect and secure them. Epoxy makes the wraps strong and smooth.
Use a small brush to spread epoxy evenly. Avoid bubbles by applying slowly and carefully.
- Choose a clear, fast-drying epoxy made for rods
- Mix epoxy according to instructions
- Apply thin coats for best results
- Let epoxy dry fully before handling the rod

Credit: anglersresource.net
Finishing Touches
Finishing your fishing rod takes care and patience. The last steps make your rod strong and ready to use.
Follow these final steps to cure the epoxy and check your rod for any problems before fishing.
Curing The Epoxy
After wrapping the guides, you must let the epoxy dry. This process is called curing. It helps the coating become hard and clear.
- Keep the rod in a warm place, around 70°F (21°C).
- Turn the rod slowly every 10 minutes for the first hour.
- Let it cure for 24 hours without touching.
- Avoid dust and dirt during curing.
- Do not rush or try to use the rod too soon.
Inspecting And Testing The Rod
Check the rod carefully after curing. Testing it ensures it works well and is safe for fishing.
| Inspection | What to Check | Action |
| Guide Alignment | All guides in a straight line | Adjust or re-wrap if needed |
| Epoxy Surface | No bubbles or cracks | Apply another epoxy coat if flaws appear |
| Rod Flexibility | Rod bends smoothly without breaking | Use caution if there is stiffness or breaks |
| Handle Comfort | Grip feels secure and smooth | Sand or add grip tape if uncomfortable |
Tips For Customization
Building your own fishing rod lets you add personal touches. Customizing the rod helps match your style and improve comfort. Small changes make a big difference in how your rod looks and feels.
Focus on two main areas for customization: adding personal designs and choosing colors and patterns. Both let you express yourself and create a unique fishing tool.
Adding Personal Designs
Personal designs make your fishing rod stand out. You can add initials, logos, or symbols to the handle or blank. Use paint pens, decals, or engraving tools for this. Protect your design with a clear coat to keep it safe from water and wear.
- Use waterproof paint pens for drawing or writing
- Apply custom decals on the rod blank or handle
- Try engraving tools for a permanent design
- Seal designs with a clear protective finish
- Consider adding grip tape with patterns or textures
Choosing Colors And Patterns
Pick colors and patterns that reflect your taste. Bright colors help find your rod quickly. Subtle tones give a classic look. You can mix and match colors for guides, wraps, and handles. Patterns add style and make your rod unique.
| Part | Color Options | Pattern Ideas |
| Rod Blank | Black, White, Blue | Striped, Marbled |
| Guides | Silver, Gold, Black | Plain, Textured |
| Handle | Natural Wood, Cork, Colored | Speckled, Smooth |
| Wraps | Red, Green, Yellow | Chevron, Spiral |
Common Mistakes To Avoid
Building a fishing rod can be fun and rewarding. Avoiding common mistakes helps make a strong rod.
Many beginners face issues that can weaken the rod or reduce its performance. Learning what to avoid saves time.
Incorrect Guide Placement
Placing the guides in the wrong spots affects casting and line flow. Guides must align well along the rod.
If guides are too close or too far apart, the line can tangle or wear out faster. This lowers the rod’s strength.
- Place guides evenly from handle to tip
- Make sure guides line up in a straight path
- Use more guides on longer rods for better support
Poor Wrapping Techniques
Wrapping guides poorly can cause them to come loose or break. Tight, even wraps hold the guides firmly in place.
Loose or uneven wraps may damage the rod and reduce its lifespan. Use smooth, consistent tension when wrapping.
- Start wraps tightly near the guide foot
- Keep wraps close together without gaps
- Finish with a strong coating to protect the wraps
Using Inappropriate Materials
Choosing the wrong materials can weaken your fishing rod. Use parts designed for rod building to ensure durability.
Cheap or unsuitable materials may break easily or not fit well. This causes problems during fishing and repairs.
- Select guides made for fishing rods, not general hardware
- Use strong thread designed for rod wrapping
- Choose rod blanks that match your fishing style
Credit: lakeladyrods.com
Frequently Asked Questions
What Materials Are Needed To Build A Fishing Rod?
You need a blank rod, reel seat, guides, handle, epoxy, and thread wraps. Quality materials ensure durability and performance.
How Do You Attach Guides On A Fishing Rod?
Align guides evenly along the rod blank. Secure them with thread wraps and coat with epoxy for strength.
What Is The Best Type Of Rod Blank For Beginners?
Graphite blanks are lightweight and sensitive, ideal for beginners. They offer good strength and flexibility for various fishing styles.
How Long Does It Take To Build A Fishing Rod?
Building a rod usually takes 3 to 6 hours. Time varies depending on experience and drying time for epoxy.
Conclusion
Building a fishing rod takes patience and care. Choose the right materials and follow steps clearly. Each part matters for a strong, balanced rod. Practice tying knots and attaching guides well. Enjoy the process as you create something useful. Soon, you will have a rod ready to fish with.
Keep learning and improving your skills. Fishing becomes more fun with a rod you made yourself. Give it a try and see the results. Simple tools and effort bring great rewards.