
Have you ever found yourself needing shelter but forgot your tent? Learning how to build a tent with a tarp can save you in those moments.
It’s simple, quick, and uses gear you probably already have. Imagine staying dry and cozy, even when the weather turns against you. In this guide, you’ll discover easy steps and tips to create a reliable shelter with just a tarp.
By the end, you’ll feel confident to handle any unexpected outdoor situation. Ready to master this essential skill? Keep reading and make your next adventure safer and more comfortable.
Choosing The Right Tarp
Building a tent with a tarp needs the right tarp choice. The right tarp keeps you dry and safe.
Look at material, size, waterproof features, durability, and weight before buying a tarp.
Material And Size
Tarp materials affect strength and water resistance. Common materials include polyethylene, nylon, and polyester.
- Polyethylene:Cheap and waterproof but heavier.
- Nylon:Lightweight and strong but needs waterproof coating.
- Polyester:Durable and resists stretching when wet.
Size depends on how many people you want to shelter. Bigger tarps cover more area but weigh more.
Waterproof Features
Waterproofing keeps you dry in rain. Look for these features:
| Feature | Description |
| Coating | Polyurethane or silicone layers add water resistance. |
| Sealed Seams | Prevent water from entering through stitching. |
| Hydrostatic Head | Measures water resistance; higher means better protection. |
Durability And Weight
Durability affects how long the tarp lasts. Weight matters for carrying on trips.
Balance durability and weight by checking:
- Fabric thickness (measured in denier or mil)
- Reinforced corners and grommets
- Resistance to tears and UV damage

Credit: www.youtube.com
Essential Gear And Tools
Building a tent with a tarp is a useful skill for campers. You need the right tools and gear to make a sturdy shelter.
Here is a guide to the essential items you will need to create a reliable tent using a tarp.
Ropes And Paracord
Ropes and paracord are crucial for securing your tarp. They help in creating tension and stability.
- Choose durable ropes that can withstand weather conditions.
- Paracord is versatile and can be used for multiple purposes.
- Avoid using ropes that fray easily.
Stakes And Pegs
Stakes and pegs keep your tarp anchored to the ground. They prevent the wind from lifting it.
| Type | Material | Best Use |
| Plastic | Lightweight | Soft ground |
| Metal | Heavy-duty | Hard ground |
| Wooden | Eco-friendly | Temporary use |
Poles And Support Options
Poles are vital for elevating your tarp. They form the structure of your tent.
Selecting A Campsite
Choosing the right campsite helps you stay safe and comfortable. It affects how well your tarp tent protects you.
Look for places that keep you dry, shield you from wind, and avoid dangers. This guide explains what to check before setting up.
Flat And Dry Ground
Pick a spot with flat ground to keep your tarp steady. Dry soil helps avoid water pooling under your tent when it rains.
- Look for areas without slopes or dips
- Avoid low spots where water can collect
- Clear away sharp rocks and sticks
- Check soil moisture by pressing your finger into the ground
Natural Windbreaks
Use trees, bushes, or large rocks to block wind. Natural windbreaks reduce wind chill and keep your tarp stable.
| Windbreak Type | Benefits |
| Trees | Block strong winds and provide shade |
| Bushes | Reduce wind speed near the ground |
| Rocks | Shield from gusts and add shelter |
Avoiding Hazards
Stay away from dangers like dead branches, flood zones, and animal trails. These can harm you or damage your gear.
- Do not camp under dead or loose tree branches
- Avoid dry riverbeds that may flood
- Keep clear of animal paths and nests
- Watch for insect nests or poison plants
Basic Tarp Tent Designs
Tarp tents are simple shelters made with a tarp and some ropes. They protect you from rain and wind during camping.
There are many ways to set up a tarp tent. This guide covers three basic styles: A-Frame, Lean-To, and Pyramid.
A-frame Setup
The A-Frame shelter looks like the letter “A.” It uses a ridge line and two anchor points to hold the tarp up.
- Find two trees about 6 to 10 feet apart.
- Tie a rope between the trees as a ridge line.
- Drape the tarp over the rope evenly.
- Secure the tarp corners to the ground with stakes.
- Adjust the tarp tightness to keep it stable.
Lean-to Shelter
The Lean-To uses one anchor line and leans the tarp against the ground or objects. It is quick to set up and good for wind protection.
| Item | Description |
| Anchor Line | Tie one edge of the tarp to a tree or pole. |
| Ground Stakes | Secure the opposite side of the tarp to the ground. |
| Angle | Set the tarp at an angle to block wind and rain. |
| Open Side | Face the open side away from the wind. |
Pyramid Style
The Pyramid shelter stands tall with a single center pole or stick. It uses the tarp’s shape for full coverage.
To build a Pyramid tarp tent:
- Place a pole or sturdy stick in the center of the tarp.
- Lift the pole to raise the tarp’s center point.
- Secure all four corners of the tarp to the ground.
- Adjust the stakes to make the tarp tight and stable.
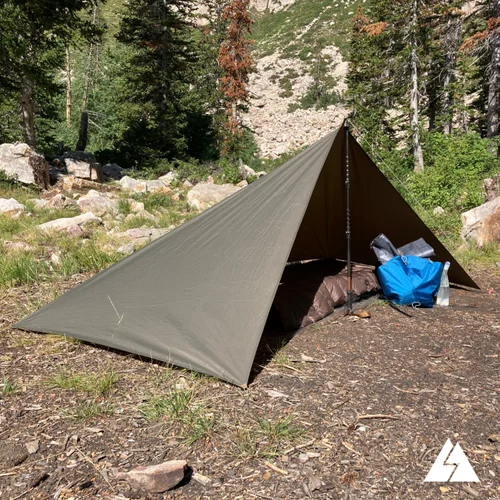
Step-by-step Tarp Setup
Using a tarp to build a tent is a simple way to create shelter outdoors. It protects you from rain, wind, and sun.
This guide shows easy steps to set up your tarp tent. Follow each section carefully to get the best shelter.
Laying Out The Tarp
Choose a flat spot clear of sharp objects. Spread your tarp fully on the ground. Make sure the tarp is facing the right direction for wind protection.
Check the tarp for any holes or damage before setting up.
Securing The Ridgeline
The ridgeline is the main support for your tarp tent. Tie a rope or cord tightly between two sturdy trees or poles. The ridgeline should be high enough to stand under but low enough to keep shelter.
- Find two trees about 10 feet apart.
- Use a strong rope for the ridgeline.
- Tie the rope with secure knots on both trees.
- Make sure the line is tight and does not sag.
- Adjust height to suit your needs.
Anchoring The Corners
Properly anchoring corners keeps your tarp stable and safe. Use stakes or heavy objects to hold the tarp corners to the ground.
| Anchor Type | Best Use | Tips |
|---|---|---|
| Metal Stakes | Soft soil | Drive deep for firm hold |
| Rocks | Hard or rocky ground | Use large, heavy rocks |
| Deadfall or Logs | Loose dirt or sand | Place on tarp edges and tie |
| Snow Anchors | Snowy terrain | Bury anchors for stability |
Credit: www.stitchbackgear.com
Tips For Stability And Weatherproofing
Building a tent with a tarp requires smart techniques to keep it stable and dry. Proper setup helps protect you from wind and rain.
This guide covers ways to tension the tarp, keep rain out, and resist strong winds. Follow these tips for a safer shelter.
Tensioning The Tarp
Tightening the tarp well keeps it from sagging or flapping in the wind. Use ropes or cords to pull the tarp firm at all corners and sides.
- Secure each corner with strong knots
- Pull the tarp evenly to avoid weak spots
- Use adjustable tensioners or bungee cords for easy tightening
- Check and adjust tension after strong winds or rain
Rain Protection Techniques
To keep rain out, angle the tarp so water runs off quickly. Make sure the tarp covers enough area around your shelter.
| Rain Protection Tip | Description |
| Steep Angle | Set tarp at a sharp slope to drain water fast |
| Overlap Edges | Let tarp edges extend beyond the shelter base |
| Use Groundsheet | Place waterproof groundsheet under tarp for extra dryness |
| Seal Seams | Apply waterproof tape or seam sealer on tarp joins |
Wind Resistance Strategies
Strong winds can damage your tarp shelter. Use sturdy anchor points and low profiles to reduce wind impact.
- Attach the tarp to heavy trees or rocks
- Stake all corners deeply into the ground
- Keep the tarp low and close to the ground
- Add extra guy lines for support
- Face the narrow side of the tarp into the wind
Adding Comfort Inside The Shelter
Building a tent with a tarp can protect you from weather. Making the inside comfortable helps you rest well. Small changes improve your shelter a lot.
Focus on keeping the floor dry and warm, allowing fresh air, and keeping your items neat. This guide helps you add comfort inside your tarp shelter.
Ground Insulation
Ground insulation stops cold and dampness from reaching you. Use materials that block moisture and cold air under your sleeping area.
- Place a plastic sheet or tarp on the ground first.
- Add foam pads or sleeping mats on top.
- Use dry leaves or pine needles for extra cushioning.
- Avoid direct contact with wet or cold soil.
Ventilation And Airflow
Good airflow prevents moisture buildup and keeps air fresh. Arrange your tarp to let air move inside without letting rain in.
| Ventilation Tip | Purpose |
| Leave gaps at the sides | Allow fresh air to enter |
| Raise one side slightly | Help warm air escape |
| Use mesh doors | Keep bugs out but air in |
| Avoid sealing tarp tightly | Reduce moisture inside |
Organizing Your Space
A tidy shelter feels more comfortable. Keep your gear and sleeping area separate and easy to reach.
- Use small bags or containers for items.
- Keep food away from your sleeping spot.
- Hang wet clothes on a line or branch outside.
- Clear a small area for cooking or storing gear.
Maintenance And Care For Your Tarp
Taking care of your tarp helps it last longer and work better. Simple steps can keep it clean and strong.
Learn how to clean, store, and repair your tarp to keep it ready for your next trip.
Cleaning Tips
Clean your tarp after every trip. Use mild soap and water. Avoid harsh chemicals that can damage the material.
- Shake off dirt and leaves before washing
- Use a soft brush or cloth to scrub gently
- Rinse well to remove all soap
- Let the tarp air dry completely before storing
Storage Suggestions
Store your tarp in a dry, cool place. Avoid folding it the same way each time to prevent wear along the creases.
| Storage Tip | Why It Helps |
| Keep tarp dry | Prevents mold and mildew growth |
| Store away from sunlight | Stops material from fading and weakening |
| Loosely fold or roll | Reduces stress on fabric |
| Use a breathable bag | Allows air flow to avoid moisture buildup |
Repairing Tears And Holes
Fix small tears quickly to keep your tarp waterproof. Use repair tape or patch kits designed for tarp material.
- Clean the area around the tear before repairing
- Cut a patch slightly larger than the hole
- Apply adhesive or tape smoothly to avoid air bubbles
- Press firmly and let it dry completely before use

Credit: www.youtube.com
Frequently Asked Questions
What Materials Do I Need To Build A Tarp Tent?
You need a durable tarp, sturdy ropes, tent stakes, and poles or trees. These materials provide a stable, weather-resistant shelter.
How Do I Secure A Tarp Tent To The Ground?
Use tent stakes to anchor the tarp’s corners firmly. Tighten ropes to keep the tarp taut and stable in wind.
What Are The Best Tarp Tent Shapes For Camping?
A-frame, lean-to, and diamond shapes offer good rain runoff and wind resistance. Choose based on your environment and tarp size.
Can I Build A Tarp Tent Without Poles?
Yes, you can tie the tarp between trees using ropes. This method creates a simple lean-to shelter with minimal gear.
Conclusion
Building a tent with a tarp is simple and practical. It keeps you dry and sheltered outdoors. Use basic tools and follow clear steps. Practice makes setting up faster and easier. Experiment with different shapes to find what works best.
A tarp tent is light and easy to carry. Perfect for camping, hiking, or emergencies. Try it on your next trip for a cozy shelter. Stay safe and enjoy the outdoors with this skill.