
Are you tired of staring at that outdated cooktop in your kitchen? Perhaps it’s no longer functioning as it should, or maybe you’re ready for an upgrade to suit your cooking needs.
Whatever your reason, knowing how to change a cooktop can seem like a daunting task. But don’t worry, you’ve come to the right place. In this guide, we’ll walk you through the process step by step, making it as simple and stress-free as possible.
Imagine the satisfaction of having a sleek, new cooktop that not only enhances your kitchen’s aesthetics but also elevates your cooking experience. Ready to transform your cooking space? Let’s dive in and get started!
Choosing The Right Cooktop
Choosing the right cooktop is a crucial step in upgrading your kitchen. It affects not only your cooking experience but also the overall look and functionality of your space. Understanding your options and what fits your needs will save you time and frustration later.
Types Of Cooktops
There are several types of cooktops to consider, each with distinct benefits:
- Electric Cooktops:Easy to clean and often more affordable. They provide steady heat but can take longer to adjust temperature.
- Gas Cooktops:Preferred by many chefs for precise heat control and instant response. They require a gas line connection.
- Induction Cooktops:Use electromagnetic energy to heat pots directly, making them very efficient and safe. However, they need compatible cookware.
Think about which type matches your cooking style. Do you value speed, precision, or ease of cleaning?
Size And Fit Considerations
Measure the space where your cooktop will go before buying. Cooktops come in various widths, typically ranging from 24 to 36 inches.
Also, check the countertop thickness and cutout dimensions to ensure a perfect fit. A cooktop that doesn’t fit well can cause installation headaches and affect safety.
Have you checked your kitchen layout recently? Sometimes small changes can open up options for a larger or more versatile cooktop.
Fuel Options
Your choice of fuel impacts both cost and convenience. Gas offers instant heat and is often cheaper over time but requires a gas line and ventilation.
Electric cooktops plug into your home’s electrical system and are easier to install, especially in apartments or homes without gas lines.
Induction cooktops, while electric, use a different heating method and can save energy but may limit your cookware choices. What fuel source is most accessible and practical for you?

Credit: www.youtube.com
Gathering Tools And Materials
Gathering the right tools and materials is vital before changing your cooktop. Having everything ready saves time and prevents interruptions. It also ensures a smooth and safe installation process. Prepare your workspace and check all items carefully. This step helps avoid last-minute trips to the store.
Essential Tools
- Screwdrivers (flathead and Phillips)
- Adjustable wrench
- Voltage tester
- Putty knife
- Measuring tape
- Utility knife
- Socket set
- Flashlight
Safety Gear
- Insulated gloves for electrical safety
- Safety goggles to protect your eyes
- Dust mask to avoid inhaling debris
- Non-slip shoes for stable footing
Replacement Parts
- New cooktop unit matching your countertop size
- Electrical connectors or wire nuts
- Sealant or caulk for a secure fit
- Mounting brackets or screws supplied with the cooktop
Preparing Your Kitchen
Preparing your kitchen before changing the cooktop makes the task safer and easier. It helps avoid accidents and protects your kitchen from damage. Spend time organizing and securing the space. A well-prepared area speeds up the installation process and keeps tools handy.
Clearing The Area
Remove all items around the cooktop. Clear countertops, nearby shelves, and under-cabinet spaces. This creates room to work and prevents items from falling. Keep cleaning supplies and towels nearby for quick spills. Clear space also reduces distractions during the job.
Turning Off Power And Gas
Safety is key when changing a cooktop. Turn off the electrical power at the breaker box. Locate the gas valve and shut it off carefully. Confirm power and gas are off using a tester or by checking the cooktop functions. Never skip this step to avoid accidents or injury.
Protecting Surrounding Surfaces
Cover nearby countertops and cabinets with old towels or protective sheets. Use painter’s tape to secure coverings in place. This shields surfaces from scratches, dust, and spills. Place a drop cloth on the floor under the cooktop area. Protecting surfaces keeps your kitchen clean and damage-free.
Credit: www.searspartsdirect.com
Removing The Old Cooktop
Removing the old cooktop is the first and crucial step in upgrading your kitchen. It might seem straightforward, but it requires careful attention to safety and detail. Handling the cooktop properly ensures you avoid damage and prepare the space for the new installation.
Disconnecting Power And Gas Lines
Before doing anything else, make sure to turn off the power supply to your cooktop at the breaker box. This prevents any risk of electrical shock.
If you have a gas cooktop, you must also turn off the gas supply valve. Carefully disconnect the gas line using a wrench, but be prepared to handle minor gas leaks by having a soapy water solution ready to check for bubbles.
Have you checked if your tools are suitable for electrical and gas disconnections? Using the wrong tools can complicate the process or cause damage.
Unscrewing And Lifting Out
Locate the screws or brackets holding the cooktop in place. They are often beneath the countertop or around the edges.
Use the appropriate screwdriver to remove these screws carefully. Avoid forcing them out; if they feel stuck, applying a penetrating oil can help loosen rusted or tight screws.
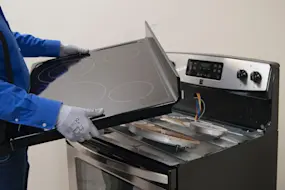
Once unscrewed, gently lift the cooktop straight up. If it resists, double-check for hidden fasteners or wiring still attached.
Handling Common Issues
Sometimes, the cooktop might be sealed with caulk or adhesive that makes removal tricky. Use a putty knife or a plastic scraper to loosen these seals without damaging the countertop.
Older cooktops may have corroded parts or stuck connectors. Patience is key—apply penetrating oil and let it sit to ease removal.
Have you encountered unexpected resistance during removal? It’s often a sign to pause and reassess rather than force damage on your countertop or cooktop.
Installing The New Cooktop
Installing the new cooktop is a crucial part of the kitchen upgrade. It needs careful handling to fit perfectly and work safely. Following clear steps helps avoid damage and ensures smooth operation.
Positioning The Cooktop
Place the cooktop gently into the countertop opening. Check that it fits snugly without forcing it. Align the edges so the cooktop sits level and flush with the surface. Measure twice to confirm it is centered properly.
Connecting Power And Gas
Turn off the main power and gas supply before starting connections. Connect the electrical wires according to the cooktop’s manual. Use wire nuts and secure them tightly. For gas cooktops, attach the gas line using a flexible connector. Apply pipe sealant to prevent leaks. Double-check all connections for safety.
Securing The Unit
Use the mounting brackets or clips included with the cooktop. Fix them firmly to hold the cooktop in place. Tighten screws evenly to avoid tilting. Make sure the cooktop does not move or wiggle. This keeps the unit stable during cooking.
Testing And Final Adjustments
After installing your new cooktop, testing and making final adjustments is crucial. This step ensures everything works safely and smoothly before you start cooking. Skipping this can lead to poor performance or even hazards in your kitchen.
Checking Connections
Start by double-checking all electrical and gas connections. Make sure wires are firmly attached and gas lines are tight without leaks. Loose connections can cause sparks or gas leaks, so take your time here.
Use a gas leak detector spray or soapy water on gas joints to spot bubbles indicating leaks. For electrical connections, gently tug wires to confirm they’re secure but avoid pulling too hard. Have a fire extinguisher nearby just in case.
Testing Burners And Controls
Turn on each burner one by one to see if they ignite properly and produce a steady flame. Watch for uneven flames or delayed ignition, which can signal clogging or faulty parts. Adjust the knobs to check if the flame changes smoothly from low to high.
Pay attention to the burner’s sound; a steady blue flame with a quiet hiss means good combustion. If you hear popping or see yellow flames, clean the burners or consult the manual for troubleshooting. Don’t rush this—small issues now save you big headaches later.
Sealing And Finishing Touches
Once testing is done, seal around the cooktop edges with a heat-resistant sealant to prevent spills from leaking underneath. Wipe away any excess sealant before it dries for a clean finish. This step not only looks better but protects your countertop over time.
Finally, reattach any trim or screws you removed during installation. Clean the cooktop surface thoroughly before use to remove dust or debris. How often do you think you’d skip these small finishing steps if you knew they could extend your cooktop’s life?
Maintenance Tips For Longevity
Proper maintenance extends the life of your cooktop. Simple habits keep it working well. Regular care prevents costly repairs and safety issues. Follow these tips to maintain your cooktop’s performance and safety.
Regular Cleaning
Clean spills and stains after each use. Use a soft cloth and mild detergent. Avoid abrasive cleaners that can scratch surfaces. For glass cooktops, use special cleaning creams. Keep burners free of food debris for even heating.
Inspecting Connections
Check gas or electrical connections regularly. Look for loose wires or gas leaks. Tighten any loose fittings carefully. Ensure vents and hoses are clear and intact. Proper connections help avoid hazards and keep the cooktop efficient.
When To Call A Professional
Call a technician if you notice unusual smells or sparks. Do not try fixing gas leaks or electrical faults yourself. If burners fail to ignite or heat unevenly, get professional help. Regular inspections by experts prevent major damage and keep your kitchen safe.
Credit: www.searspartsdirect.com
Frequently Asked Questions
How Do I Safely Remove An Old Cooktop?
Turn off the power supply before starting. Disconnect all electrical and gas connections carefully. Remove mounting screws and lift the cooktop gently.
What Tools Are Needed To Change A Cooktop?
Common tools include a screwdriver, adjustable wrench, and voltage tester. You may also need plumber’s tape for gas connections.
Can I Replace A Cooktop Myself?
Yes, if you have basic DIY skills. Always follow safety guidelines and local codes. Consider hiring a professional for gas cooktops.
How To Measure For A New Cooktop?
Measure the width, depth, and cutout size of your current cooktop. Ensure the new cooktop matches these dimensions for a perfect fit.
Conclusion
Changing a cooktop can seem hard at first. Step-by-step, it becomes easier to handle. Always turn off the power before you start. Measure carefully to fit the new cooktop right. Take your time and check each connection. Safety matters most during this process.
With patience, you will finish the job well. Enjoy your updated kitchen with a fresh cooktop. Simple steps lead to great results. Keep this guide handy for your next kitchen project.