You rely on your car’s brakes every time you hit the road, trusting them to keep you safe. But what if there’s an unseen issue lurking under the hood?
A brake booster vacuum leak might be compromising your vehicle’s stopping power without you even realizing it. This hidden problem can lead to longer stopping distances and even a spongy brake pedal. Imagine the peace of mind you’d feel knowing how to check for a brake booster vacuum leak yourself.
In this guide, we’ll walk you through the simple steps to ensure your brakes are in top condition, giving you the confidence and control you deserve. Ready to take charge of your safety? Let’s dive in!
Signs Of A Vacuum Leak
Detecting a vacuum leak in the brake booster is important for vehicle safety. The brake booster relies on vacuum pressure to help reduce the effort needed to press the brake pedal. Signs of a vacuum leak often appear before the problem worsens. Knowing these signs helps you identify issues early and avoid brake failure.
Common Symptoms
- A hard brake pedal that feels stiff and difficult to press.
- Engine running rough or stalling when the brakes are applied.
- Hissing sound coming from the brake pedal area.
- Longer stopping distances than usual.
- Brake warning light on the dashboard may turn on.
Impact On Brake Performance
A vacuum leak reduces the brake booster’s ability to assist braking. This means you must press the brake pedal harder to slow down or stop. The brakes may feel less responsive or slow to react. In severe cases, the vehicle might take more time to stop, increasing accident risk. Proper braking force is crucial for safe driving. A vacuum leak compromises this force and can lead to dangerous situations.
Tools Needed For Inspection
Checking for a brake booster vacuum leak requires the right tools to ensure you get accurate results and stay safe during the inspection. Having the correct equipment on hand can save you time and prevent unnecessary frustration. Let’s break down what you need before you start the process.
Basic Equipment
You’ll need a few essential tools to identify a vacuum leak effectively. A vacuum gauge is crucial; it measures the vacuum pressure in the brake booster and helps pinpoint leaks. You should also have a hand-held vacuum pump to create suction and test the booster’s ability to hold vacuum.
Additionally, a spray bottle filled with soapy water can be a simple yet effective tool. Spraying soapy water on vacuum lines and connections will help you spot leaks by looking for bubbles forming. Don’t forget a flashlight—many vacuum lines are tucked away in hard-to-see spots.
Safety Gear
Safety should never be an afterthought when working on your car’s brake system. Wearing gloves protects your hands from sharp edges and harmful chemicals. Eye protection is just as important; brake systems may contain brake fluid or other fluids that can cause irritation or injury if splashed.
Work in a well-ventilated area to avoid inhaling any fumes released during the inspection. Are you ready to protect yourself while you troubleshoot? Being properly equipped boosts your confidence and keeps the job stress-free.
Locating The Brake Booster
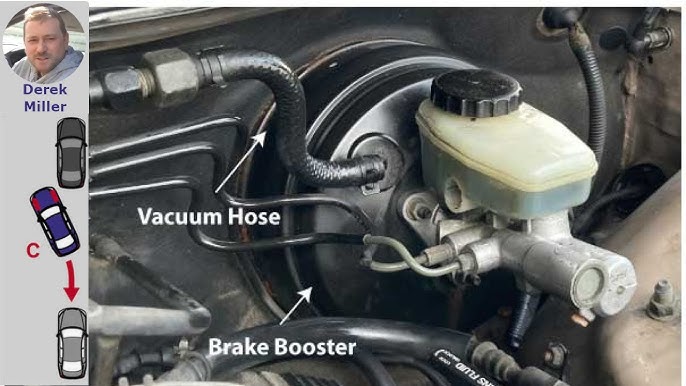
Locating the brake booster is the first step to check for a vacuum leak. It sits in a specific spot inside the engine bay. Knowing its position helps you inspect it safely and efficiently. This part works by using vacuum pressure to assist your braking. Finding the vacuum lines connected to it is key to spotting leaks.
Position In The Vehicle
The brake booster is usually mounted on the driver’s side of the engine bay. It sits between the brake pedal and the master cylinder. You can find it near the firewall, the wall separating the engine from the cabin. It looks like a round, black metal or plastic drum. Its size is about the diameter of a dinner plate.
Identifying Vacuum Lines
Vacuum lines are thin rubber or plastic hoses attached to the brake booster. These lines connect the booster to the engine’s intake manifold. Their job is to supply vacuum pressure to help the booster work. Look for a hose that runs from the booster to the engine. Check for cracks, splits, or loose connections that may cause leaks.
Visual Inspection Steps
Visual inspection is your first line of defense when checking for a brake booster vacuum leak. It helps you spot obvious signs of wear or damage that could be causing performance issues. Taking the time to carefully examine your brake booster and its components can save you a lot of guesswork and unnecessary repairs.
Checking Hoses And Connections
Start by tracing the vacuum hose from the brake booster to the engine. Look for any loose or disconnected hoses—these are common culprits behind vacuum leaks.
Feel the hoses for any softness or brittleness, which indicates aging rubber that might crack under pressure. Ensure all clamps and connectors are tight and properly seated. Have you ever noticed a hose that looks fine but actually had a tiny crack? That small flaw can lead to big problems.
Looking For Cracks Or Damage
Next, inspect the brake booster itself for any visible cracks or dents. Even small damage can cause the unit to fail or leak vacuum.
Use a flashlight to look closely around the booster’s body and mounting points. Pay special attention to rubber grommets or seals that might be dry or cracked. Spotting these early can prevent a sudden loss of braking power when you least expect it.
Performing A Vacuum Test
Performing a vacuum test helps find leaks in the brake booster system. It measures the vacuum level inside the booster. This test shows if air is escaping and causing brake problems.
Using A Vacuum Gauge
Connect a vacuum gauge to the brake booster’s vacuum hose. Start the engine and let it idle. Watch the gauge needle closely.
The needle should rise steadily and hold a constant level. If the needle drops or fluctuates, a vacuum leak may be present. Use the gauge to check for leaks along the hose and booster.
Interpreting Results
A steady vacuum reading between 15 to 22 inches of mercury (inHg) is normal. Readings below this range suggest a leak or booster failure. Rapid needle drop means the booster is not holding vacuum.
Listen for hissing sounds near the booster. This can confirm a vacuum leak. Low vacuum causes weak brake assist and harder pedal feel. Replace faulty parts based on test results.

Credit: www.youtube.com
Listening For Leak Sounds
Listening for leak sounds is one of the most straightforward ways to identify a brake booster vacuum leak. Your ears can often catch subtle hints of trouble before any gauges or warning lights do. Paying close attention to unusual noises under the hood can save you time and money on repairs.
Using A Stethoscope Or Hose
A mechanic’s stethoscope is a great tool to pinpoint where the leak might be hiding. If you don’t have one, a simple length of garden hose works just as well. Place one end near your ear and move the other end around the brake booster and vacuum lines while the engine is running.
As you slide the hose or stethoscope along, focus on areas where connections and hoses meet. Leaks often occur at joints or damaged sections of the vacuum line. This technique helps isolate the exact spot making the noise without guesswork.
Detecting Hissing Noises
Hissing sounds are the classic indicator of a vacuum leak. They might be faint at first but tend to get louder as the engine revs up. If you hear a steady or intermittent hiss near the brake booster, it’s a strong sign that air is escaping where it shouldn’t.
Try revving the engine gently while listening carefully. Does the hissing change? If it does, it confirms the leak is related to the vacuum system. You might be surprised how often a simple listen can reveal the problem before you even touch a wrench.
Testing With Soapy Water
Testing for a brake booster vacuum leak with soapy water is a simple and effective way to find small air leaks. This method uses a mixture of soap and water to spot escaping air by showing bubbles on the leak site. It does not require special tools and can help identify problems quickly.
Make a soapy water solution by mixing water with a few drops of dish soap. Use a spray bottle or a brush to apply the solution. Focus on areas where the vacuum hose connects to the brake booster and the vacuum pump. These spots are common places for leaks.
Applying Solution To Suspect Areas
Spray or brush the soapy water on vacuum hose joints and connections. Cover the entire surface of the hose and around clamps. Don’t forget to check the brake booster itself near the vacuum line. Make sure the engine is running to create vacuum pressure. This will help spot leaks more easily.
Spotting Bubbles
Look closely for bubbles forming on the soapy water. Bubbles mean air is escaping from that spot. Even small bubbles can show a leak. Check the area carefully for any steady or popping bubbles. If you see bubbles, mark the spot for repair. Clean the area and repeat the test to confirm.

Credit: m.youtube.com
Addressing Common Leak Points
Addressing common leak points is crucial when you suspect a brake booster vacuum leak. These leaks often occur in specific areas that wear out or fail over time. Identifying and fixing these weak spots can restore your brake system’s responsiveness and safety quickly.
Replacing Worn Hoses
Hoses connected to the brake booster handle vacuum pressure constantly, making them prone to cracks and brittleness. If you notice any visible damage or feel a hissing sound near the hoses, it’s time to inspect them closely. Swapping out worn hoses with new ones is a simple fix that can prevent air leaks and improve brake performance immediately.
Make sure to check both ends of the hose where they connect to the booster and the engine manifold. Sometimes, the hose might look fine in the middle but could be loose or cracked at these junctions. Have you ever felt a soft brake pedal and found a tiny tear in the hose? That small damage can cause big problems.
Checking The Check Valve
The check valve is a small but vital part that keeps vacuum pressure from escaping the booster. If it fails, you might experience a hard brake pedal or delayed brake response. You can test the valve by removing it and blowing air through it; air should flow in one direction only.
Replacing a faulty check valve is usually inexpensive and easy. Don’t overlook this component—it’s often the silent culprit behind vacuum leaks. Have you considered that a tiny valve might be why your brakes don’t feel right? Checking it could save you from more costly repairs down the road.
When To Consult A Professional
Knowing when to call a professional for a brake booster vacuum leak can save you time, money, and most importantly, keep you safe. While some signs might seem straightforward, others can be tricky to diagnose. Recognizing these moments helps you avoid causing further damage or risking your safety on the road.
Complex Symptoms
Brake booster vacuum leaks don’t always present simple symptoms. You might notice a hissing sound, a hard brake pedal, or even engine stalling, but these can also point to other issues. If you experience multiple symptoms at once or the problem changes over time, it’s a sign to seek expert help.
Some leaks are subtle and require specialized tools to detect accurately. Trying to fix these without the right knowledge can lead to misdiagnosis. Have you ever tried troubleshooting only to realize the problem was deeper than expected? Professionals have the experience and equipment to pinpoint issues efficiently.
Safety Concerns
Your brakes are the most critical safety feature in your vehicle. A vacuum leak can reduce braking power, making it harder to stop quickly. If you notice reduced braking performance, don’t wait to get it checked.
Driving with compromised brakes puts you and others at risk. Even if you think you can manage the symptoms temporarily, you shouldn’t. Consulting a professional ensures your brakes work properly and keeps your driving experience safe and reliable.

Credit: redlinelandcruisers.com
Frequently Asked Questions
How Do I Identify A Brake Booster Vacuum Leak?
Listen for a hissing sound near the brake pedal. Check for hard brake pedal feel or engine rough idling. Inspect vacuum hose connections for cracks or damage. These signs often indicate a brake booster vacuum leak.
What Tools Are Needed To Check For Vacuum Leaks?
You will need a vacuum gauge, a smoke machine, or a carburetor cleaner spray. These tools help detect leaks by measuring vacuum pressure or revealing escaping air. Using the right tool ensures accurate diagnosis.
Can A Vacuum Leak Affect Brake Performance?
Yes, a vacuum leak reduces brake booster efficiency. It makes the brake pedal harder to press and increases stopping distance. This can compromise vehicle safety, so prompt detection and repair are essential.
How Often Should I Inspect The Brake Booster System?
Inspect the brake booster system during regular vehicle maintenance or if you notice brake issues. Early checks prevent bigger problems and ensure safe braking performance. Routine inspections are key for vehicle safety.
Conclusion
Checking for a brake booster vacuum leak is easier than it seems. Start by listening for hissing sounds near the brake booster. Use simple tools like a vacuum gauge or spray soapy water on hoses. Catching leaks early keeps your brakes strong and safe.
Regular checks help avoid costly repairs and accidents. Stay alert to changes in brake feel or engine idle. Taking small steps protects you and your passengers on the road. Keep your vehicle in good shape with these easy tips.