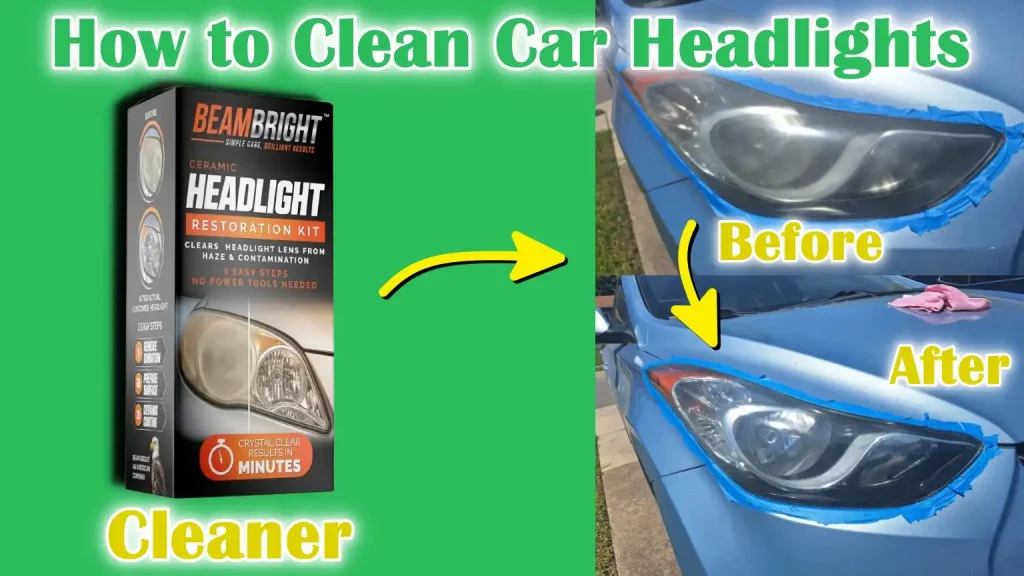
Are your car headlights looking dull or foggy? This can make night driving dangerous and even affect how your car looks.
But don’t worry—you can fix this yourself. Cleaning your car headlight lenses is easier than you think, and it can improve your visibility instantly. You’ll discover simple, effective ways to bring back the shine to your headlights. Keep reading, and you’ll learn tips that save you time, money, and keep you safer on the road.
Causes Of Headlight Lens Cloudiness
Cloudy headlights reduce your ability to see at night. They also make your car look old and worn out. Understanding what causes this cloudiness helps you keep headlights clear.
Several factors cause the lens to become foggy or yellow. These include natural wear and damage from the environment. Let’s look at the main reasons for headlight lens cloudiness.
Uv Damage And Oxidation
Sunlight contains ultraviolet (UV) rays that break down the plastic on headlight lenses. This damage causes the surface to become rough and dull. Over time, oxidation forms, making the lens look yellow and cloudy.
- UV rays break down plastic polymers
- Oxidation causes yellowing and haze
- Surface becomes rough and less clear
Road Debris And Dirt
Driving exposes headlights to dust, dirt, and small rocks. These tiny particles scratch and wear the lens surface. Dirt buildup also sticks to the lens, reducing light output and causing cloudiness.
| Type | Effect on Headlight Lens |
|---|---|
| Dust | Creates a thin film that dims light |
| Small rocks | Cause scratches and chips |
| Dirt and mud | Build up and block light |
Moisture And Condensation
Water can get inside the headlight if seals fail or cracks form. This causes condensation on the inside of the lens. Moisture leads to foggy lenses and can damage the light bulb or wiring.
- Failed seals let water inside
- Condensation fogs the lens from inside
- Moisture can cause electrical problems
Tools And Materials Needed
Cleaning car headlight lenses helps improve visibility and car appearance. Using the right tools makes the job easier and safer.
This guide explains the main tools and materials needed for cleaning headlight lenses effectively.
Cleaning Solutions
Cleaning solutions remove dirt, grime, and oxidation from headlight lenses. Some solutions are homemade, while others are store-bought.
Common cleaning solutions include mild soap, vinegar, and specialized headlight cleaners.
- Mild soap mixed with water
- White vinegar diluted with water
- Commercial headlight cleaning liquids
Sandpaper And Polishing Kits
Sandpaper helps remove the outer layer of yellowing and scratches on the lens. Use different grits for best results.
Polishing kits include compounds and pads to restore clarity and shine after sanding.
- Wet/dry sandpaper with grits from 400 to 2000
- Polishing compound to smooth the surface
- Buffing pads or cloths for polishing
Protective Gear
Wear protective gear to keep yourself safe during cleaning. Some materials can irritate skin or eyes.
Gloves and eye protection prevent contact with chemicals and dust.
- Rubber or latex gloves
- Safety goggles or glasses
- Face mask to avoid dust inhalation
Preparation Before Cleaning
Cleaning your car’s headlight lens helps improve visibility. Proper preparation ensures a safe and effective process.
Gather all needed materials and clear the area before you start cleaning.
Safety Precautions
Wear protective gloves to keep your hands safe from chemicals. Use safety glasses to protect your eyes from splashes.
Work in a well-ventilated area. Avoid breathing in fumes from cleaning products.
- Wear gloves and safety glasses
- Work outside or in a ventilated space
- Keep cleaning products away from children and pets
Protecting Surrounding Areas
Cover the car’s paint and trim around the headlights with tape. This prevents damage from cleaning agents or rubbing.
Use plastic sheets or paper to shield larger areas. This keeps dirt and debris off the car’s surface.
- Apply painter’s tape around the headlights
- Cover nearby areas with plastic or paper
- Remove coverings carefully after cleaning
Initial Cleaning
Rinse the headlights with water to remove loose dirt. Use a soft cloth or sponge to wipe away grime gently.
Do not use strong brushes or abrasive materials at this stage. This prevents scratches on the lens.
- Rinse headlights with clean water
- Wipe gently with a soft cloth or sponge
- Avoid abrasive brushes or pads

Credit: www.youtube.com
Step-by-step Cleaning Process
Car headlights can get cloudy and dirty over time. Cleaning them improves light and car appearance.
This guide shows easy steps to clean your headlight lenses safely and effectively.
Washing The Headlight
Start by washing the headlight with soap and water. This removes surface dirt and grime.
Use a soft cloth or sponge to clean the lens gently without scratching it.
- Mix mild soap with water in a bucket
- Dip a cloth or sponge and scrub the lens
- Rinse with clean water
- Dry with a soft towel
Sanding For Severe Cloudiness
For very cloudy headlights, sanding helps remove the yellow layer and scratches.
Use wet sandpaper with different grits to smooth the lens surface carefully.
- Start with 1000 grit wet sandpaper
- Sand the lens in horizontal strokes
- Switch to 2000 grit for vertical strokes
- Finish with 3000 grit for a smooth surface
- Keep the lens wet while sanding
Polishing The Lens
Polishing removes fine scratches and restores clarity to the headlight lens.
Use a plastic polish and a soft cloth or polishing pad for best results.
- Apply a small amount of polish to the lens
- Rub in circular motions with a cloth or pad
- Keep polishing until the lens looks clear
- Wipe off excess polish with a clean cloth
Applying Uv Sealant
UV sealant protects the lens from future yellowing and damage from the sun.
Apply the sealant evenly and let it dry completely for long-lasting protection.
- Choose a UV-resistant sealant made for headlights
- Apply a thin, even layer on the lens surface
- Allow the sealant to dry as per product instructions
- Repeat application if needed for extra protection
Alternative Diy Methods
Dirty or cloudy headlights reduce how well you see at night. Cleaning them can improve safety. You do not need to buy expensive tools.
Try these simple DIY ways to clean your car’s headlight lenses. Use items you can find at home or buy easily.
Using Toothpaste
Toothpaste has mild abrasives that clean the lens surface. It removes dirt and light fogging from headlights.
Apply toothpaste with a soft cloth. Rub in small circles for a few minutes. Rinse with water and dry with a clean cloth.
- Use plain white toothpaste, not gel
- Apply enough toothpaste to cover the lens
- Rinse off all toothpaste to avoid residue
Baking Soda And Vinegar
Baking soda and vinegar work well together to clean headlights. Baking soda scrubs while vinegar dissolves grime.
Make a paste with baking soda and vinegar. Spread it on the lens and scrub gently. Wash with water and dry afterward.
- Mix 2 parts baking soda with 1 part vinegar
- Use a soft brush or cloth to scrub the lens
- Rinse well to remove all paste
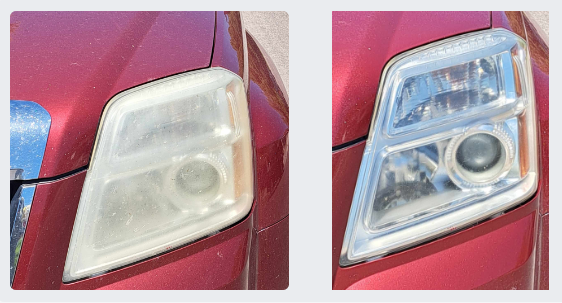
Commercial Headlight Restoration Kits
These kits come with all materials needed to clean headlights. They usually include sandpaper, polish, and sealant.
Follow the instructions carefully. Kits can give good results but cost more than home remedies.
- Sand the lens to remove the top layer
- Apply polish to smooth the surface
- Use sealant to protect from future damage
Credit: www.wd40.com
Maintenance Tips For Clear Headlights
Clear headlights improve your night driving safety. Dirt and grime reduce light output and visibility.
Regular care keeps your headlights bright and helps your car look well maintained.
Regular Cleaning Routine
Clean your headlights often to remove dirt, bugs, and road grime. Use mild soap and water with a soft cloth.
Avoid harsh chemicals that can damage the lens surface. Dry the headlights completely after washing.
- Wash headlights every 2 weeks
- Use a soft sponge or microfiber cloth
- Rinse thoroughly to avoid soap residue
- Dry with a clean, soft towel
Parking In Shade
Sunlight causes headlights to fade and yellow over time. Park your car in shade to protect the lenses.
Shade helps keep headlights clearer and extends their lifespan. Use covered parking when possible.
- Park under trees or awnings
- Use a car cover if no shade is available
- Avoid long-term parking in direct sun
Applying Protective Coatings
Protective coatings help prevent yellowing and scratches on headlights. They add a clear layer to the lens.
Choose coatings designed for automotive headlights. Reapply coatings every few months for best results.
- Use UV-resistant headlight sealants
- Apply coatings on clean, dry lenses
- Follow product instructions carefully
- Reapply every 3 to 6 months
When To Seek Professional Help
Cleaning car headlight lenses is usually easy to do at home. Sometimes, the damage is too bad for simple cleaning. Knowing when to get expert help can save time and money.
Professionals have tools and skills to fix issues that home cleaning cannot. They can restore headlights safely and better than DIY methods.
Severe Damage Or Cracks
Cracks or deep scratches on the headlight lens need professional care. These damages can let water inside and harm the light’s function.
Experts can replace or repair lenses correctly. This prevents bigger problems like electrical issues or poor road visibility.
- Large cracks or breaks in the lens
- Deep scratches that affect light clarity
- Water or moisture trapped inside the lens
- Damage to the light housing or seal
Persistent Fogging Issues
If fogging inside the headlight does not clear after cleaning, it may need professional help. Fog inside shows a seal problem or trapped moisture.
Special tools and techniques are needed to open, dry, and reseal the headlight. Professionals ensure long-lasting results to keep your lights clear.
- Fog or condensation returns quickly after cleaning
- Visible moisture inside the headlight lens
- Seal damage causing air and water leaks
- Reduced light output due to fogging

Credit: www.meguiars.com
Frequently Asked Questions
How Do I Clean Foggy Headlights?
To clean foggy headlights, use a mixture of toothpaste and water. Apply it to the lens and scrub gently with a soft cloth. Rinse with water and dry with a clean towel. This method helps remove oxidation, improving visibility and appearance.
For stubborn fog, consider using a headlight restoration kit.
What Household Items Can Clean Headlights?
Household items like toothpaste, baking soda, and vinegar can clean headlights. Toothpaste and baking soda act as mild abrasives that remove oxidation. Mix baking soda with vinegar to form a paste and apply it to the lens. Scrub gently, rinse, and dry for clearer headlights.
Can I Use Vinegar To Clean Headlights?
Yes, vinegar can be used to clean headlights. Mix it with baking soda to form a paste. Apply the paste on the headlight lens and scrub gently with a cloth. Rinse with water and dry with a towel. This method helps remove dirt and grime effectively.
Do Diy Headlight Cleaning Methods Work?
DIY headlight cleaning methods can be effective for minor oxidation. Using toothpaste, baking soda, or vinegar can help improve lens clarity. However, for severely oxidized headlights, consider using a professional restoration kit. Regular maintenance ensures better visibility and prolongs headlight life.
Conclusion
Cleaning your car headlight lens improves visibility and safety. Clear lenses help your lights shine brighter at night. Regular cleaning prevents yellowing and damage over time. You can use simple household items to clean them. Taking a few minutes today saves you money later.
Clean headlights make driving safer for you and others. Keep your car looking fresh and well-maintained. Try these easy steps and see the difference yourself. Your headlights will thank you with better light and style.