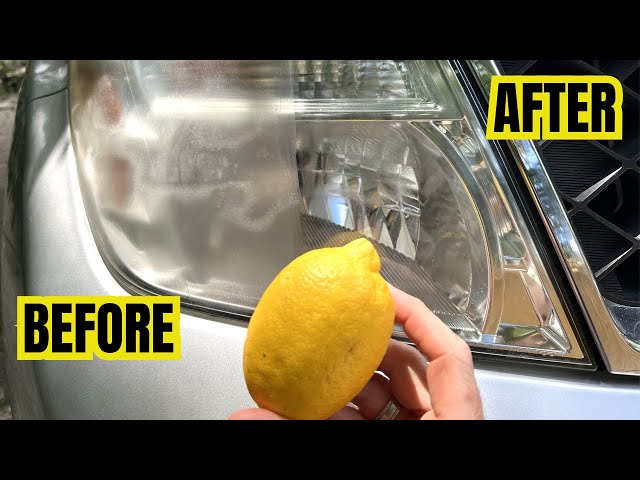
Are your car headlights looking dull or foggy? This can make driving at night harder and less safe.
But don’t worry—you can fix this yourself quickly and easily. Cleaning your headlights will not only improve how your car looks but also make sure you see clearly on the road. Keep reading, and you’ll learn simple steps to bring back that bright, clear shine to your headlights.
Your safety and your car’s appearance depend on it!

Credit: www.carsales.com.au
Signs Of Cloudy Headlights
Cloudy headlights reduce how well you see at night. They also make your car look old and worn out.
Knowing the signs of cloudy headlights helps you fix them early. This keeps your lights bright and safe.
Yellow Or Hazy Appearance
When headlights look yellow or hazy, they are cloudy. This happens because of sun damage or dirt buildup.
The plastic lens loses its clear shine and looks dull. This reduces the light that passes through.
Reduced Light Brightness
Cloudy headlights make your lights dimmer. You may notice it is harder to see the road at night.
The light does not shine as far or as clear. This can be dangerous while driving in dark areas.
Scratches Or Surface Damage
Look closely at your headlights for scratches or cracks. These marks can cause cloudiness and blur the light.
- Small scratches collect dirt and moisture
- Cracks let in water that fogs the lens
- Damaged surface reduces light clarity
Foggy Or Moisture Inside Headlights
If you see fog or water inside the headlight lens, it means a seal is broken. Moisture causes cloudiness.
This fog makes the light scatter and lowers visibility. It also can damage the bulb over time.
Uneven Or Patchy Cloudiness
Sometimes the cloudiness is not all over the headlight. You might see spots or patches that look foggy.
This uneven cloudiness can cause strange light patterns on the road. It shows the headlight needs cleaning or repair.
Tools Needed For Cleaning
Cleaning car headlights makes them clear and bright. Using the right tools helps you do the job well. This guide lists the tools you need for cleaning headlights.
Some tools are easy to find at home. Others you can buy at a store. Get them ready before you start cleaning.
Cleaning Cloths
Soft cloths work best for cleaning headlights. Microfiber towels are gentle and do not scratch the surface. Avoid rough fabrics that can cause damage.
Cleaning Solutions
Use mild cleaning solutions to remove dirt and grime. Soap mixed with water works well. You can also use special headlight cleaners from stores.
Sandpaper And Polishing Tools
Sanding helps remove tough yellow stains and scratches. Use fine-grit sandpaper with water to sand the headlights smoothly. After sanding, polishing pads or compounds restore the shine.
Additional Tools
- Masking tape to protect car paint near headlights
- A spray bottle to wet surfaces during sanding
- Gloves to protect your hands from chemicals
- A bucket for mixing cleaning solutions
| Tool | Purpose |
| Microfiber Cloth | Wipe and polish headlights |
| Soap and Water | Remove dirt and dust |
| Fine-Grit Sandpaper | Remove stains and scratches |
| Polishing Compound | Restore shine after sanding |
| Masking Tape | Protect car paint |
| Spray Bottle | Keep surface wet while sanding |
| Gloves | Protect skin from chemicals |
Preparing Your Car
Cleaning your car’s headlights starts with proper preparation. A clean surface helps you see better results.
Prepare your car in a shaded area. This stops cleaning materials from drying too fast on the headlights.
Wash The Headlights
Use soap and water to wash the headlights. This removes dirt and grime on the surface.
Use a soft cloth or sponge to avoid scratching the lens. Clean gently in small circles.
- Mix car soap with water in a bucket
- Dip the sponge or cloth into the soapy water
- Wipe the headlight lens carefully
- Rinse with clean water to remove soap
Drying The Surface
Dry the headlights completely before cleaning. Moisture can block cleaning products from working well.
Use a clean, dry microfiber cloth. Pat the surface gently to avoid scratches.
- Choose a soft microfiber cloth
- Wipe the headlight lens in one direction
- Make sure no water spots remain
Cleaning Methods
Dirty headlights reduce visibility while driving at night. Cleaning them improves safety and car appearance. There are simple ways to clean headlights at home.
This guide covers four common cleaning methods you can try with household items or products.
Using Toothpaste
Toothpaste contains mild abrasives that help remove dirt and haze from headlights. Use a regular white toothpaste without gel.
- Apply a small amount of toothpaste to a soft cloth.
- Rub the headlight in circular motions for a few minutes.
- Rinse with water and wipe dry with a clean cloth.
- Repeat if needed for better results.
Applying Baking Soda Paste
Baking soda is a natural cleaner that can remove stains and oxidation. Mix it with water to form a thick paste.
- Mix two parts baking soda with one part water.
- Spread the paste on the headlight surface.
- Scrub gently with a soft cloth or sponge.
- Rinse thoroughly with clean water.
- Dry the headlight with a microfiber towel.
Commercial Headlight Cleaners
Many stores sell cleaners designed for headlights. These products often contain special chemicals for better cleaning and protection.
| Product Type | Features | Usage |
| Spray Cleaners | Quick application, easy to use | Spray on, wipe with cloth |
| Polishing Kits | Includes sandpaper and polish | Sand and polish headlights carefully |
| Protective Coatings | Adds layer to prevent fogging | Apply after cleaning and drying |
Wet Sanding Technique
Wet sanding is a more advanced method to remove heavy oxidation. It requires sandpaper and water to smooth the headlight surface.
- Start with coarse wet sandpaper (around 1000 grit).
- Keep the headlight wet while sanding in circular motions.
- Move to finer grit sandpapers (1500 then 2000 grit) for smoother finish.
- Rinse the headlight and dry it.
- Apply polish to restore shine and protect the surface.
Step-by-step Cleaning Process
Cleaning your car’s headlights improves how well you see at night. It also makes your car look newer and safer.
This guide will show you how to clean headlights with easy steps. You need simple supplies and a little time.
Apply Cleaner
First, use a headlight cleaner or a mixture of soap and water. Apply the cleaner evenly on the headlight surface.
Make sure to cover all areas with the cleaning solution. This will help remove dirt and grime.
Scrub Gently
Use a soft cloth or sponge to scrub the headlights. Move in small, circular motions to avoid scratches.
- Do not use hard brushes or rough materials
- Focus on cloudy or yellowed areas
- Be patient and gentle during scrubbing
Rinse Thoroughly
After scrubbing, rinse the headlights with clean water. Remove all soap and cleaner residues.
Check if the headlights look clearer. If not, repeat the cleaning and scrubbing steps.
Dry Completely
Use a soft, dry cloth to wipe the headlights. Make sure no water spots remain on the surface.
Drying prevents streaks and prepares the headlights for better visibility.
Protecting Headlights After Cleaning
Cleaning your car’s headlights makes them clear and bright again. Protecting them after cleaning keeps them looking good longer.
Shielding headlights from dirt and sun damage helps avoid yellowing and fading. Use simple steps to protect your headlights after cleaning.
Apply Uv Sealant
UV sealant protects headlights from sun damage. It stops the plastic from turning yellow or cloudy over time.
After cleaning, apply a thin layer of UV sealant. Let it dry fully before driving your car.
- Choose a sealant made for headlights
- Use a soft cloth to spread the sealant evenly
- Apply 2-3 coats for better protection
- Allow each coat to dry before applying the next
Regular Maintenance Tips
Keep headlights clean with regular care. This prevents dirt buildup and damage from the sun.
Use gentle cleaning and check headlights often. Small actions can stop big problems.
- Wash headlights with soap and water monthly
- Use a microfiber cloth to avoid scratches
- Apply UV sealant every few months
- Park in shade to reduce sun exposure
- Inspect headlights for cracks or damage regularly
When To Replace Headlights
Headlights are important for safe driving at night. They help you see the road and other drivers see you.
Sometimes cleaning your headlights is enough. Other times, you must replace them to keep driving safely.
When Headlights Are Dim Or Flickering
If your headlights look dim or flicker while driving, it may be time to replace them. This can happen from old bulbs or wiring problems.
Dim lights reduce your ability to see the road clearly. Flickering lights can distract other drivers and cause accidents.
When Headlight Lenses Are Cracked Or Broken
Cracked or broken headlight lenses let moisture inside. This can damage the bulb and reduce light output.
Replace headlights if the lens is badly damaged. Damaged lenses also make your car look old and unsafe.
When Headlights Stay Foggy After Cleaning
Cleaning can remove dirt and yellowing on headlights. If fogginess returns quickly, the plastic may be too worn.
Replace headlights if they stay cloudy even after cleaning. Clear lenses improve your night vision and car appearance.
When Headlights Fail Safety Inspections
Some states require headlights to meet brightness and condition rules. Failing an inspection means you must replace or fix them.
Replacing headlights keeps you legal and safe on the road. Check your local rules to know when to replace.

Credit: www.carsales.com.au

Credit: www.youtube.com
Frequently Asked Questions
How Often Should I Clean My Car Headlights?
Clean your headlights every 3 to 6 months. Regular cleaning prevents buildup of dirt and oxidation. This keeps headlights bright and improves night visibility, ensuring safer driving.
What Household Items Can Clean Foggy Headlights?
Use toothpaste or baking soda as effective cleaners. Apply gently with a soft cloth, then rinse and dry. These items remove grime and restore headlight clarity cheaply and easily.
Can I Use Commercial Headlight Restoration Kits?
Yes, commercial kits work well to restore clarity. They include sandpaper, polish, and sealant for thorough cleaning. Follow instructions carefully for best, long-lasting results.
Is It Safe To Use Abrasive Materials On Headlights?
Avoid harsh abrasives that can scratch lenses. Use mild abrasives or polish designed for headlights. This protects the plastic and maintains clear, damage-free surfaces.
Conclusion
Cleaning car headlights is simple and rewarding. Clear headlights improve visibility. This boosts safety during night driving. Regular maintenance prevents foggy lights. Use basic supplies like toothpaste or vinegar. They work wonders. Scrubbing gently removes dirt and grime. Rinse and dry thoroughly for best results.
Consider protective sealants for long-lasting clarity. Remember, clean headlights enhance your car’s look. A few minutes can make a big difference. Keep your headlights bright and clear. Drive safely on the road. Enjoy your journey with confidence. Happy driving!