Are you struggling to keep your fishing line secure and strong? Knowing how to crimp fishing line properly can make all the difference in your catch.
Whether you’re a beginner or just want to improve your technique, mastering this simple skill will boost your confidence and help you fish like a pro. In this guide, you’ll discover easy steps and expert tips that anyone can follow.
Keep reading—you’re just moments away from making your fishing setup more reliable and ready for action.
Credit: www.360tuna.com
Choosing The Right Crimp Sleeve
Crimp sleeves hold fishing lines securely. Picking the right one helps keep your line strong.
Different sleeves fit different lines. Knowing which to use makes your fishing safer and easier.
Materials And Sizes
Crimp sleeves come in metal types like aluminum and copper. Each has its own strength and weight.
Sizes match the thickness of your fishing line. Too big or too small sleeves can cause problems.
- Aluminum sleeves are light and rust-resistant
- Copper sleeves are stronger but heavier
- Sleeves must fit the line diameter closely
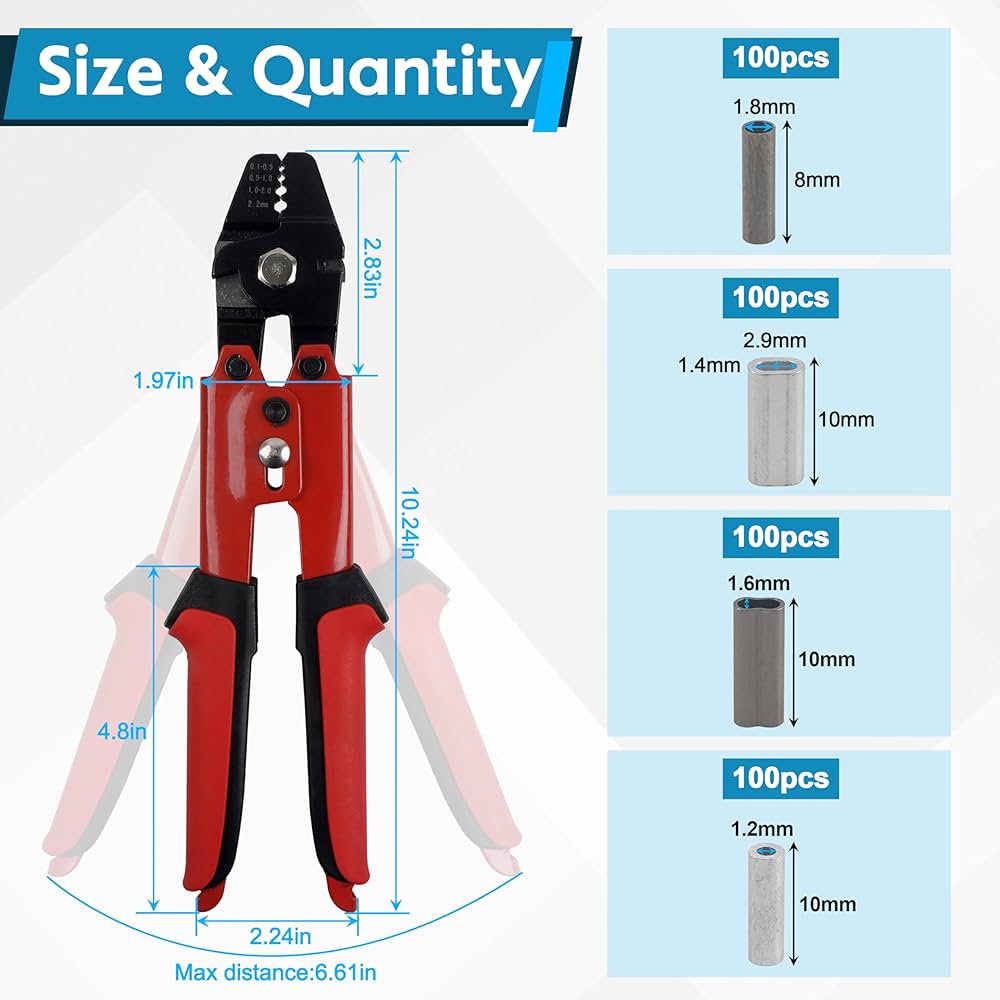
- Common sleeve sizes range from 1mm to 4mm
Matching Line Type
Monofilament, fluorocarbon, and braided lines need different sleeves. Use sleeves designed for your line.
Using the right sleeve keeps the line from slipping or breaking at the crimp.
- Monofilament lines work well with aluminum sleeves
- Fluorocarbon lines need sleeves that grip tightly
- Braided lines require larger sleeves or special sleeves
- Check package labels for sleeve and line compatibility
Essential Tools For Crimping
Crimping fishing line is vital for secure connections. Proper tools make the process easy and effective.
Knowing the essential tools helps achieve strong and reliable crimps for your fishing adventures.
Types Of Crimping Pliers
Crimping pliers are crucial for compressing the crimp sleeves. They come in different types suited for various tasks.
- Single-action pliers offer basic crimping.
- Double-action pliers provide extra leverage.
- Hydraulic pliers are for heavy-duty crimping.
Additional Accessories
Along with pliers, other accessories ensure a secure crimp. These tools complement the crimping process.
| Accessory | Function |
| Crimp sleeves | Secures the line |
| Line cutter | Trims excess line |
| Measuring tape | Ensures accurate lengths |
Preparing The Fishing Line
Preparing the fishing line is important before crimping. It helps make a strong and secure connection.
Taking time to prepare the line properly will improve your fishing setup and prevent line failure.
Cutting And Measuring
Cut the fishing line to the right length for your setup. Measure carefully to avoid waste.
Use sharp scissors or line cutters. Make a clean, straight cut to ensure the crimp holds well.
- Measure the line twice before cutting
- Leave extra length for tying knots or attaching components
- Cut straight across the line without fraying
Cleaning The Line
Clean the fishing line to remove dirt, oil, or moisture. This helps the crimp grip the line better.
Wipe the line with a dry cloth or a small amount of rubbing alcohol for best results.
- Use a lint-free cloth to avoid leaving fibers
- Apply rubbing alcohol sparingly to prevent damage
- Allow the line to dry completely before crimping

Credit: slhkaren.en.made-in-china.com
Step-by-step Crimping Process
Crimping fishing line ensures a strong and secure connection. This guide walks you through the key steps. Follow these instructions to make a reliable loop using a crimp sleeve.
Use the right tools and materials for the best results. A proper crimp prevents line slippage and strengthens your rig.
Threading The Sleeve
Start by sliding the crimp sleeve onto the fishing line. Make sure the sleeve fits the line size. Leave enough line at the end to form a loop after threading through your hook or swivel.
Positioning The Loop
Next, pass the line end through the eye of the hook or swivel. Then, bring the line back through the crimp sleeve to create a loop. Adjust the loop size as needed before crimping.
- Check loop size for your rig needs
- Make sure the line lies straight inside the sleeve
- Avoid twists or kinks in the loop
- Leave a small tag end beyond the sleeve
Applying The Crimp
Place the crimp sleeve in the jaws of your crimping tool. Squeeze firmly to compress the sleeve onto the line. Use steady pressure for an even crimp. Avoid over-crimping to prevent line damage.
| Tool Type | Crimping Force | Effect |
| Standard Crimper | Moderate | Good for most sleeves |
| Heavy-Duty Crimper | High | For thick sleeves or heavy line |
| Precision Crimper | Controlled | Best for delicate lines |
Checking The Connection
After crimping, test the loop for strength. Pull the line firmly to check if the sleeve holds. Inspect the crimp for cracks or uneven compression.
- Ensure the crimp does not slide along the line
- Look for any frayed or damaged line sections
- Trim excess tag end close to the crimp
- Replace sleeve if any defects appear
Testing Crimp Strength
Crimping fishing line is important for strong connections. Testing crimp strength ensures safety and reliability.
By checking the crimp, you can avoid losing fish or gear. This guide explains how to test crimp strength well.
Pull Test Techniques
Pull tests help check if the crimp holds under pressure. Use steady force to avoid sudden breaks.
Hold the line and pull slowly but firmly. Notice if the crimp slips or stays tight during the test.
- Grip the line close to the crimp with one hand
- Pull the line with the other hand slowly
- Keep steady pressure for several seconds
- Watch for any movement or looseness in the crimp
- If possible, use a scale to measure the force applied
Signs Of Weakness
Look for signs that show the crimp is weak or failing. These signs help you fix problems early.
Weak crimps can cause fishing line to break or slip. Watch closely for these warning signs.
- The crimp moves or slides on the line
- The line pulls out of the crimp easily
- You see visible cracks or deformation in the crimp
- The crimp feels loose or uneven when pressed
- Line fibers are crushed or damaged near the crimp
Common Crimping Mistakes
Crimping fishing line is a key skill for anglers. Mistakes during crimping can weaken the line. This guide covers common errors to avoid. Knowing these helps keep your fishing setup strong and safe.
Two main problems happen when crimping: over-crimping and under-crimping. Both cause issues with the fishing line’s strength. Read on to learn what to watch for and how to fix these mistakes.
Over-crimping Issues
Over-crimping happens when you squeeze the crimp too hard. This can damage the fishing line and reduce its strength. It may also break the line or cause it to slip out of the crimp.
- Crimp becomes too tight and deforms the line
- Line fibers get crushed and weakened
- Crimp may crack, losing grip on the line
- Line can slip or break under pressure
Under-crimping Risks
Under-crimping means not squeezing the crimp enough. This makes the crimp loose and weak. The fishing line can slip out, causing you to lose your catch.
| Risk | Result |
| Loose crimp | Line slips through easily |
| Weak grip | Connection breaks under tension |
| Unsafe rig | May cause lost fish or gear |
Maintaining Crimped Connections
Crimped connections keep your fishing line strong and secure. Proper care helps avoid failures during fishing.
Regular checks and timely replacement ensure the best performance from your crimps.
Regular Inspections
Look over your crimps often. Check for cracks, corrosion, or any signs of wear on the metal sleeves.
- Feel for any loose or sharp edges around the crimp.
- Make sure the fishing line does not slip or move inside the crimp.
- Inspect the line near the crimp for fraying or damage.
- Clean the crimps to remove salt or dirt that can cause rust.
When To Replace
Replacing crimps at the right time stops line breaks and lost catches.
| Condition | Action Needed |
| Corrosion or rust on crimp | Replace immediately |
| Line slipping through crimp | Recrimp or replace |
| Visible cracks or dents | Replace crimp |
| Frayed line near crimp | Cut and re-crimp |
| Old or worn crimps after long use | Replace periodically |
Advanced Crimping Tips
Crimping fishing line is a key skill for anglers. Using the right techniques ensures strong, reliable connections. This guide shares advanced tips to improve your crimping results.
Focus on the details to avoid weak spots. Proper tools and methods make your fishing setup last longer and perform better.
Using Double Sleeves
Double sleeves add extra strength to your fishing line connections. They reduce slippage and spread pressure more evenly along the line.
- Thread the line through both sleeves before looping it back.
- Position sleeves close together but not touching.
- Crimp the first sleeve firmly to lock the loop.
- Crimp the second sleeve to add extra security.
- Check the crimp with a pull test to ensure tightness.
Crimping For Different Fishing Styles
Different fishing styles require specific crimping approaches. Match the crimp to the type of line and target species for best results.
| Fishing Style | Recommended Crimp Type | Tip |
|---|---|---|
| Saltwater Big Game | Heavy-duty double sleeves | Use larger sleeves for thick lines |
| Freshwater Bass | Single sleeve with light crimp | Avoid over-crimping to keep line strength |
| Fly Fishing | Small sleeves for thin leader | Use precise crimping tools for neat finish |
| Ice Fishing | Corrosion-resistant sleeves | Apply extra pressure to prevent slipping |

Credit: soilssolutions.com
Frequently Asked Questions
What Tools Do I Need To Crimp Fishing Line?
You need crimping sleeves, a crimping tool, fishing line, and cutters. These tools ensure a secure and professional crimp. Using the right tools prevents line damage and enhances durability. Always choose quality materials for the best results.
How Do I Properly Position The Crimp Sleeve?
Slide the sleeve onto the fishing line first. Loop the line through your hook or swivel, then back through the sleeve. Position the sleeve about 1/8 inch from the loop. Proper positioning ensures a strong, reliable crimp connection.
Can I Crimp Any Type Of Fishing Line?
Crimping works best with braided and wire lines. Monofilament lines are less suitable because they can be damaged. Always check your line type before crimping. Using the right line improves your fishing rig’s strength.
How Many Crimps Should I Make On A Sleeve?
One properly placed crimp is usually enough. Some anglers prefer two for extra security. Avoid over-crimping, which can weaken the line. Focus on a tight, even crimp for the best hold.
Conclusion
Crimping fishing line keeps your tackle strong and secure. Use the right tools for best results. Practice makes your crimps tight and reliable. Always check your work before fishing. This simple skill helps catch more fish safely. Keep your gear ready and enjoy time on water.
Try crimping today and feel the difference.