
Are you ready to tackle your next project with FRP wall boards but unsure how to cut them cleanly and safely? Cutting FRP wall boards might seem tricky at first, but with the right tools and techniques, you can achieve perfect results every time.
In this guide, you’ll discover simple steps that save you time, prevent damage, and give your walls a professional finish. Keep reading, and you’ll gain the confidence to handle your FRP boards like a pro.
Tools Needed
Cutting FRP wall board requires specific tools to ensure clean and precise cuts. Using the right tools makes the job easier and safer.
Before starting, gather all tools and safety gear. This helps you work smoothly without interruptions.
Essential Cutting Tools
You need sharp and reliable cutting tools to handle FRP wall boards. Here are the most common tools used for cutting:
- Utility knife with a sharp blade
- Fine-toothed handsaw or jigsaw
- Measuring tape to mark cut lines
- Straight edge or metal ruler for guidance
- Clamps to hold the board steady
Safety Gear
Wear safety gear to protect yourself from dust and sharp edges during cutting. Safety is very important.
| Safety Item | Purpose |
| Safety goggles | Protect eyes from dust and debris |
| Gloves | Protect hands from cuts and splinters |
| Dust mask | Prevent inhaling dust particles |
| Ear protection | Shield ears from loud tool noise |
Credit: www.duramaxpvcpanels.com
Preparing The Work Area
Cutting an FRP wall board needs a clean and safe workspace. Preparing the area helps you work faster and avoid mistakes.
Gather all tools before you start. Make sure the space is well-lit and free of clutter.
Clearing And Measuring
Clear the work surface of dust and tools. A flat area helps keep the board steady while cutting.
Use a tape measure to check the board’s size. Measure twice to avoid errors.
- Clear a large, flat table or floor space
- Remove any obstacles or debris
- Use a metal tape measure for accuracy
- Double-check measurements before cutting
Marking The Cut Lines
Mark the cutting lines clearly using a pencil or marker. Straight lines guide your saw and improve accuracy.
Use a straight edge or ruler to draw the lines. Make sure the lines are visible on the FRP surface.
- Choose a fine pencil or permanent marker
- Place a ruler along the measurement points
- Draw straight, clear cut lines
- Check lines from different angles for visibility
Cutting Techniques
Cutting FRP wall boards requires care and the right tools. Use proper methods to get clean cuts.
This guide covers straight cuts, curved cuts, and handling edges safely and effectively.
Straight Cuts
For straight cuts, use a fine-toothed saw or circular saw with a blade for plastics. Mark the line clearly before cutting.
- Measure and mark the cutting line with a pencil and straight edge.
- Secure the board firmly to prevent movement.
- Use slow, steady strokes to cut along the line.
- Wear safety goggles and gloves to protect yourself.
- Sand the cut edges to smooth any roughness.
Curved Cuts
Curved cuts need a jigsaw or a scroll saw with a fine blade. Make sure the board is clamped tight.
- Draw the curve shape clearly on the board.
- Cut slowly, following the curve line closely.
- Use small blade teeth to avoid chipping.
- Finish by sanding the edges smooth.
Handling Edges
Edges of FRP boards can be sharp and rough. Proper edge finishing improves safety and appearance.
| Edge Type | Recommended Tool | Finishing Method |
|---|---|---|
| Straight Edge | Sandpaper or sanding block | Light sanding to smooth edges |
| Curved Edge | Detail sander or fine file | Careful sanding to match curves |
| Cut Edge | Deburring tool | Remove sharp burrs for safety |

Credit: www.youtube.com
Avoiding Common Mistakes
Cutting FRP wall boards can be tricky if you do not follow the right steps. Mistakes can cause cracks, chips, and rough edges.
Learning how to avoid these errors will save time and keep your boards looking good. Below are key tips to help you.
Preventing Cracks And Chips
FRP boards can crack or chip if you use the wrong tools or cut too fast. Use a sharp blade made for plastic or composite materials.
Cut slowly and apply even pressure. Support the board on both sides of the cut to stop bending or breaking.
- Use a fine-toothed saw blade or utility knife
- Make shallow passes instead of deep cuts
- Clamp the board firmly before cutting
- Wear safety goggles to protect your eyes
Maintaining Clean Cuts
Clean cuts help the boards fit well and look professional. Use masking tape on the cut line to reduce splintering.
After cutting, smooth the edges with sandpaper or a file. This removes rough spots and prevents injury.
- Mark the cut line clearly with a pencil
- Apply painter’s tape along the cut
- Cut slowly to follow the line accurately
- Sand edges gently to remove burrs
Post-cut Finishing
After cutting FRP wall boards, the edges need proper finishing. This step helps to improve the board’s look and durability.
Well-finished edges prevent moisture damage and make installation easier. Two key steps are sanding and sealing.
Sanding And Smoothing
Sanding smooths out rough edges left by cutting tools. Use fine-grit sandpaper for best results.
Sand gently to avoid damaging the surface. Smooth edges reduce the chance of cracks and chips.
- Wear safety goggles and a dust mask
- Use 120 to 220 grit sandpaper
- Sand in a circular motion for even smoothing
- Check edges often to avoid over-sanding
Sealing The Edges
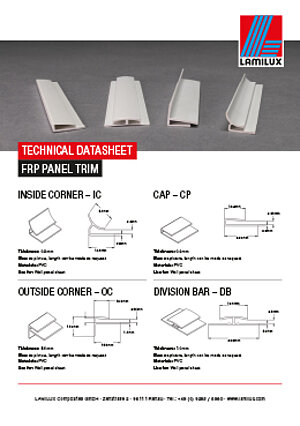
Sealing protects the cut edges from water and dirt. Use a waterproof sealant or edge trim to cover the sides.
Apply sealant evenly and let it dry completely. This step helps keep the board strong over time.
- Choose a sealant made for plastic or FRP
- Apply a thin, even coat along the edges
- Allow sealant to dry before handling
- Reapply if the edges will face heavy moisture
Credit: www.lamilux.com
Maintenance Tips
Proper care helps keep your FRP wall boards in good shape. Simple maintenance prevents damage and extends their life.
After cutting FRP boards, pay attention to the cut edges and leftover pieces. Follow easy steps to keep everything clean and ready for use.
Cleaning The Cut Areas
Clean the cut edges to remove dust and debris. This keeps the board looking neat and stops moisture from causing damage.
- Use a soft brush to remove loose particles.
- Wipe edges with a damp cloth to remove fine dust.
- Dry the area completely before installation.
- Apply a sealant if the cut edge will be exposed to water.
Storing Leftover Boards
Store leftover FRP boards carefully to avoid warping or damage. Keep them flat and dry until you need them again.
| Storage Tip | Reason |
| Keep boards flat on a level surface | Prevents bending or warping |
| Cover with a plastic sheet | Protects from dust and moisture |
| Store indoors or in a dry place | Prevents water damage and mold |
| Keep away from direct sunlight | Avoids fading and heat damage |
Frequently Asked Questions
What Tools Are Needed To Cut Frp Wall Board?
You will need a utility knife, a straight edge, and safety goggles. For precise cuts, a circular saw with a carbide blade is ideal. Always prioritize safety by using the appropriate personal protective equipment.
How Do You Measure Frp Wall Board For Cutting?
Measure the area where the FRP board will be installed. Use a tape measure to mark dimensions on the board. Double-check your measurements to ensure accuracy before making any cuts.
Can You Cut Frp Wall Board With A Utility Knife?
Yes, you can cut FRP wall board with a utility knife. Score the board multiple times along a straight edge until it cuts through. This method is suitable for thinner boards.
What Safety Precautions Should Be Taken?
Always wear safety goggles and gloves when cutting FRP wall board. Ensure your workspace is well-ventilated to avoid inhaling any dust particles. Use tools according to the manufacturer’s instructions.
Conclusion
Cutting FRP wall boards is simple with the right tools. Measure carefully before you start. Use a fine-tooth saw or utility knife for clean cuts. Take your time to avoid mistakes. Always wear safety gear to protect yourself. Clean the edges after cutting for a smooth finish.
Practice on scrap pieces if you can. This helps build confidence and skill. With patience, you can achieve great results. Enjoy your project and the new look of your walls!