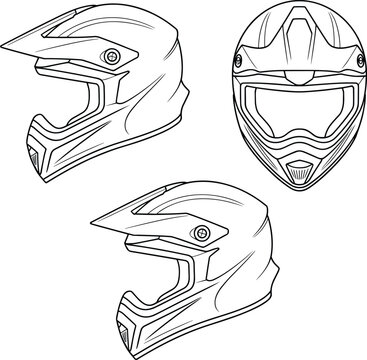
If you’ve ever wanted to capture the thrill of dirt biking on paper, starting with the helmet is a perfect choice. Drawing a dirt bike helmet might seem tricky, but with the right steps, you can create a cool, detailed sketch that looks real.
In this guide, you’ll discover simple tips and clear instructions that make the process easy and fun. Whether you’re a beginner or just want to improve your skills, you’ll find everything you need to bring your drawing to life. Ready to create your own dirt bike helmet masterpiece?
Let’s dive in!

Credit: www.freepik.com
Materials Needed
Drawing a dirt bike helmet requires a few basic materials. These tools help you create clean and detailed artwork.
Using the right materials makes the drawing process easier and more enjoyable. Gather all items before you start.
Pencils
Pencils are essential for sketching the helmet’s shape and details. Use different pencil types for shading and outlines.
- HB pencil for light sketching
- 2B or 4B pencil for shading
- Mechanical pencil for fine details
Eraser
An eraser helps correct mistakes and clean up your drawing. Choose a soft eraser to avoid paper damage.
- Kneaded eraser for light corrections
- Rubber eraser for strong removal
Paper
Good paper supports your drawing tools and prevents smudging. Use smooth or medium-textured paper for best results.
- Sketchbook paper (medium weight)
- Drawing paper with smooth surface
- A4 or larger size for enough space
Ruler And Compass
Use a ruler and compass to draw straight lines and perfect circles. These tools help with the helmet’s shape and proportions.
- Ruler for straight edges
- Compass for curves and circles
Colored Pencils Or Markers
Add color to your dirt bike helmet with colored pencils or markers. They bring your drawing to life and add depth.
- Colored pencils for blending and shading
- Markers for bold, solid colors
Basic Helmet Shape
Drawing a dirt bike helmet starts with the basic shape. This shape forms the base for your entire helmet design.
The helmet should look round but a bit elongated to fit a rider’s head. Keep your lines smooth and simple.
Drawing The Outline
Begin by sketching an oval or egg shape for the helmet’s main part. This will be the shell that covers the head.
Add a chin guard by drawing a small curve extending from the bottom front of the oval. It should look sturdy and protective.
- Start with a light oval for the helmet shell
- Draw a curve at the front bottom for the chin guard
- Keep the lines smooth and round
- Check proportions to match a real helmet
Adding The Visor
The visor sits above the eyes and helps shield the rider from dirt and sun. Draw it as a flat or slightly curved shape.
Attach the visor to the top front of the helmet. Make sure it extends outward a little for a realistic look.
- Sketch a small horizontal rectangle or trapezoid on top front
- Make the edges slightly angled or curved
- Connect the visor smoothly to the helmet shape
Detailing The Helmet
Drawing a dirt bike helmet means adding small parts that make it look real. Details like vents and chin guards show the helmet’s shape well.
These features also help show how the helmet works. Let’s look closely at the helmet ventilation and chin guard parts.
Helmet Ventilation
Helmet vents keep air moving to keep the rider cool. When drawing, add small openings on the helmet’s surface. These vents often have a mesh or grille look inside.
- Draw vents on the top and sides of the helmet.
- Use thin lines to show vent edges.
- Shade inside vents to show depth.
- Add small holes or mesh texture inside vents.
Chin Guard Features
The chin guard protects the face and adds to the helmet’s shape. It usually has vents and padding. Show the guard’s curve and any clips or fasteners on it.
| Feature | Description | Drawing Tip |
| Shape | Rounded or angular chin guard | Use smooth or sharp lines to match |
| Vents | Small openings for air flow | Draw vents as small rectangles or ovals |
| Padding | Soft inside lining | Shade lightly inside the guard |
| Fasteners | Clips or straps to hold guard | Draw tiny circles or rectangles |

Credit: www.freepik.com
Adding Texture And Patterns
Adding texture and patterns makes your dirt bike helmet look real. It gives your drawing more detail and interest.
Use different lines and shapes to create the feel of the helmet’s surface. This helps your drawing stand out.
Helmet Surface Details
Start by drawing small lines to show the helmet’s material. Use short, curved strokes for a smooth look.
Add tiny dots or scratches to show wear and tear. These small marks make the helmet look used and real.
- Draw thin lines along the helmet’s shape
- Use small dots to add rough spots
- Include light scratches for texture
- Shade areas to show curves and depth
Custom Designs
Create patterns like stripes, flames, or logos to add personality. Use bold shapes to make the design clear.
Keep your patterns simple to avoid clutter. Repeat shapes or colors to build a strong style.
- Draw stripes using straight or curved lines
- Use flame shapes for a dynamic look
- Add logos with simple shapes or letters
- Repeat colors to tie the design together
Shading And Highlights
Shading and highlights bring your dirt bike helmet drawing to life. They add depth and make the helmet look real.
Using light and shadow helps show the helmet’s shape and materials clearly.
Understanding Light Source
Decide where the light hits the helmet. This spot will have the brightest highlights. The opposite side will have the darkest shadows.
Adding Shadows
Shadows create the illusion of depth. Use soft shading on curved parts and sharp shadows near edges. This shows the helmet’s round shape.
- Shade under the visor and chin guard
- Darken areas near the helmet’s base
- Use gradual shading on curved surfaces
- Keep shadows consistent with the light source
Creating Highlights
Highlights show where light reflects off the helmet’s surface. Bright spots make the helmet look shiny and smooth.
| Type | Highlight Effect |
| Glossy Surface | Bright and small spots |
| Matte Surface | Soft and spread-out light |
| Metal Parts | Sharp and bright reflections |
Blending Techniques
Blend shading and highlights smoothly for a natural look. Use a light touch to avoid harsh lines. This helps the helmet look three-dimensional.
Final Touches
Adding final touches makes your dirt bike helmet drawing look complete. These steps help improve details and colors.
Focus on cleaning lines and choosing colors that bring the helmet to life. This makes your drawing more realistic.
Refining Lines
Check your helmet drawing for rough or uneven lines. Use a fine tip pen or digital brush to clean these lines.
Smooth and clear lines make the helmet look sharp. Erase any extra marks or sketch lines that are not needed.
- Trace over the main outlines carefully
- Use steady, confident strokes
- Remove any stray pencil marks
- Make sure the visor and vents have clear edges
Coloring Tips
Choose colors that match real dirt bike helmets. Use bright colors for highlights and darker shades for shadows.
Apply colors evenly. Blend colors softly where the light hits to add depth and roundness to the helmet.
- Start with base colors
- Add shadows near edges and under the visor
- Use highlights on curved parts for shine
- Keep colors clean and avoid mixing too much

Credit: www.shutterstock.com
Frequently Asked Questions
How Do You Start Drawing A Dirt Bike Helmet?
Begin by sketching the basic shape of the helmet. Use simple geometric shapes like circles and ovals to outline the helmet’s structure. This initial step helps establish the helmet’s proportions and layout.
What Tools Are Best For Helmet Drawing?
For drawing a dirt bike helmet, use pencils for outlining and erasers for corrections. Fine-tip pens or markers are ideal for adding details. Colored pencils or digital tools can enhance the final look with vibrant colors.
How To Add Details To A Helmet Sketch?
Focus on the helmet’s unique features like vents, visor, and graphics. Use fine lines and shading to bring out details. Pay attention to symmetry and perspective for a realistic appearance.
Can Beginners Draw A Dirt Bike Helmet?
Yes, beginners can draw a dirt bike helmet by following step-by-step guidelines. Start with basic shapes and gradually add details. Practice regularly to improve skills and confidence in drawing complex designs.
Conclusion
Drawing a dirt bike helmet can be simple and fun. Start with basic shapes and add details step by step. Take your time to practice each part carefully. Use colors to make your drawing stand out. Keep trying, and your skills will improve fast.
Remember, anyone can draw with patience and practice. Enjoy the process and share your art with friends. This guide helps you create a cool dirt bike helmet drawing easily. Keep drawing and see how much you grow!