Wearing a bike helmet can save your life, but only if it fits correctly. Have you ever felt your helmet slipping or sitting uncomfortably on your head?
That means it’s not doing its job. You deserve to ride with confidence and safety. In this guide, you’ll learn simple steps to make sure your helmet fits perfectly. Keep reading, and you’ll discover how to protect yourself without any hassle or discomfort.
Your next ride will feel safer and more enjoyable than ever before.
Choosing The Right Helmet
Wearing a bike helmet protects your head during falls or accidents. Picking the right helmet is key for safety and comfort. This guide helps you find the best helmet for your needs.
Look at helmet types, sizes, and safety marks before buying. Each factor helps you choose a helmet that fits well and keeps you safe.
Helmet Types And Styles
Helmets come in different styles for various bike activities. Knowing the types helps you pick one made for your ride.
- Road Helmets:Lightweight with good ventilation, made for speed and long rides.
- Mountain Helmets:Stronger with extra coverage and visors for rough trails.
- Commuter Helmets:Designed for city riding, often with added reflectors and comfort features.
- Full-Face Helmets:Offer full head and face protection, used in downhill biking.
Sizing Your Helmet
Helmet size is important for a secure fit. A helmet that is too loose or too tight will not protect well. Measure your head before choosing a size.
| Head Circumference (inches) | Helmet Size |
| 20.5 – 21.25 | Small |
| 21.25 – 22.25 | Medium |
| 22.25 – 23.25 | Large |
| 23.25 – 24 | Extra Large |
Try on the helmet and adjust the straps. The helmet should sit level on your head. It must not move when you shake your head.
Safety Certifications To Look For
Certified helmets meet safety standards. These marks show the helmet passed tests for impact and strength.
- CPSC:Required in the United States for bike helmets.
- CE EN 1078:Common certification in Europe.
- ASTM F1447:Standard for many recreational bike helmets.
- Snell B90/B95:Voluntary certifications for extra safety.

Credit: www.safetyandhealthmagazine.com
Preparing For The Fit
Fitting a bike helmet well is important for safety and comfort. Before you wear it, prepare carefully.
This guide helps you prepare your head and helmet for the best fit.
Measuring Your Head
Use a soft tape measure to find your head size. Measure around your head above your eyebrows.
Keep the tape level and snug, but not tight. Write down the measurement in centimeters or inches.
- Place tape 1 inch above eyebrows
- Keep tape level around the head
- Measure snugly without squeezing
- Record the number for helmet size
Adjusting Helmet Padding
Helmet padding affects comfort and fit. Add or remove pads inside the helmet to match your head shape.
Try different padding thicknesses to fill gaps and keep the helmet snug without pressure points.
- Check existing pads for wear or damage
- Add thicker pads if helmet feels loose
- Remove pads if helmet feels tight
- Balance padding around the head evenly
Positioning The Helmet Correctly
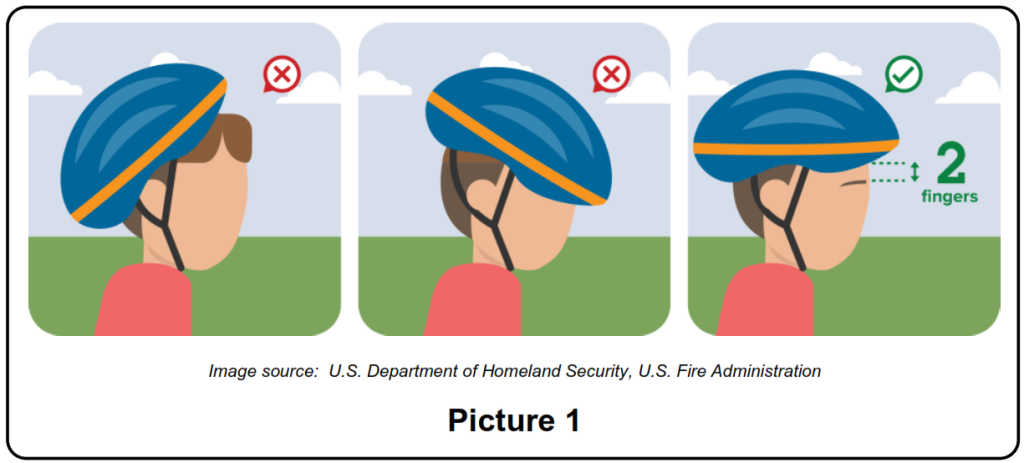
Place the helmet level on your head. The front edge should sit just above your eyebrows.
Make sure the helmet covers the top of your forehead and does not tilt backward or forward.
- Helmet front 1 inch above eyebrows
- Helmet sits level, not tilted
- Straps form a “V” under each ear
- Chin strap fits snugly with one finger space
Adjusting Straps And Buckles
Fitting a bike helmet properly is important for safety. You need to adjust the straps and buckles to ensure a snug fit.
Below are steps on how to adjust the side straps, secure the chin strap, and check the strap tightness.
Setting Side Straps
The side straps should form a “Y” shape under your ears. This helps keep the helmet in place during a ride.
- Locate the side straps on both sides of the helmet.
- Adjust each strap so they form a “Y” under your earlobes.
- Ensure the sliders are just below your ears.
Securing The Chin Strap
The chin strap is essential to keeping the helmet secure. Make sure it is fastened correctly.
Fasten the chin buckle until you hear a click. You should be able to fit only one finger between your chin and the strap. This ensures it’s not too tight or too loose.
Checking Strap Tightness
Once the straps are set, check their tightness. This is crucial for the helmet to stay in place.
| Check | Description |
| Side Straps | Form a “Y” under the ears |
| Chin Strap | One finger space under the chin |
| Helmet Movement | Should not move back and forth |

Credit: www.portland.gov
Testing The Fit
Fitting a bike helmet correctly is very important for safety. After placing the helmet on your head, test the fit to make sure it stays secure.
This section explains how to check the helmet fit by testing its stability and comfort. Follow these tips to keep your helmet safe and snug.
Performing The Shake Test
Put your helmet on and fasten the straps tightly. Next, shake your head gently from side to side and up and down.
The helmet should not move much during this test. If it slides easily, the fit is too loose and needs adjustment.
Ensuring Helmet Stability
Helmet stability means it stays in place during your ride. Check the fit by pressing the helmet from front to back and side to side.
If the helmet shifts easily, tighten the straps or try a smaller size. The helmet must stay stable for proper protection.
Comfort Vs. Security Balance
Your helmet should feel comfortable but still fit tightly. A helmet that is too tight can cause pain, while a loose one is unsafe.
Adjust the straps and padding to find a good balance. Make sure you can wear the helmet for long rides without discomfort.
Maintaining Your Helmet
Keeping your bike helmet in good shape is important for safety. Regular care helps your helmet last longer.
Check your helmet often and clean it properly. Replace it when needed to stay protected.
Regular Inspection Tips
Look over your helmet every few weeks. Check for cracks, dents, or loose parts that may weaken it.
- Inspect the outer shell for cracks or deep scratches
- Check the straps and buckles for damage or wear
- Make sure the padding is not torn or worn out
- Test the fit system to ensure it adjusts properly
Cleaning And Care
Clean your helmet regularly to remove dirt and sweat. Use gentle soap and water only.
Avoid strong chemicals or solvents that can damage the helmet materials.
- Remove the padding and wash it by hand
- Use a soft cloth or sponge for the helmet shell
- Air dry the helmet and padding before reassembling
- Store the helmet in a cool, dry place away from sunlight
When To Replace Your Helmet
Replace your helmet after a crash or if it shows damage. Old helmets may not protect well.
Most helmets last about five years. Check the manufacturer’s guidelines for exact advice.
- Replace after any impact, even if no damage is visible
- Replace if straps or buckles break or do not work
- Replace if the foam inside is crushed or cracked
- Replace after five years or as recommended by the maker
Common Mistakes To Avoid
Wearing a bike helmet correctly keeps you safe. Many people make simple mistakes that reduce protection. Avoid these common errors to get the best fit.
This guide covers mistakes to avoid when fitting your helmet. Fix these to stay secure on your bike.
Wearing A Loose Helmet
A loose helmet can move during a fall. It won’t protect your head well. Make sure the helmet fits snugly on your head.
Check the fit by shaking your head gently. The helmet should stay in place and not slide around.
- Choose the right helmet size for your head
- Adjust padding inside to reduce gaps
- Snug fit feels firm but not painful
- A loose helmet can cause injury in crashes
Ignoring Strap Adjustments
Straps hold the helmet in place. Loose or twisted straps lower safety. Always adjust the straps properly before riding.
The straps should form a “V” shape under each ear. Buckle the chin strap tight enough so only two fingers fit.
- Check that straps are not twisted
- Adjust side straps to sit just below ears
- Fasten chin strap tightly but comfortably
- Test strap tightness by trying to pull helmet off
Using Damaged Helmets
Helmets protect by absorbing impact. Cracks or dents mean the helmet can fail. Do not use helmets that are damaged.
Replace your helmet after any crash or if it shows damage. Old helmets may also lose protection over time.
- Inspect helmet regularly for cracks or dents
- Replace helmet after any major impact
- Follow manufacturer’s guidelines for helmet lifespan
- Do not share helmets as fit and safety vary

Credit: ibikesafe.org
Frequently Asked Questions
How Do I Measure My Head For A Bike Helmet?
Use a soft tape measure around your head, about an inch above your eyebrows. Note the circumference in centimeters or inches. This helps select the correct helmet size for a comfortable and secure fit.
What Is The Correct Helmet Position On My Head?
Place the helmet level on your head, covering the forehead without tilting back. It should sit about two finger-widths above your eyebrows for optimal protection and comfort.
How Tight Should Bike Helmet Straps Be?
Adjust the straps so they fit snugly under your chin without causing discomfort. You should be able to fit one or two fingers between the strap and your chin.
When Should I Replace My Bike Helmet?
Replace your helmet every 3 to 5 years or after any crash. Helmets lose effectiveness over time and after impacts, even if no damage is visible.
Conclusion
A properly fitted bike helmet keeps you safe on every ride. Check the fit by adjusting straps and pads for comfort. Make sure the helmet sits level on your head, not tilted. Tighten it so it stays snug but not too tight.
Always fasten the buckle securely before you start cycling. Regularly inspect your helmet for damage or wear. A good fit helps protect your head in accidents. Stay safe, ride smart, and enjoy your bike rides more confidently.