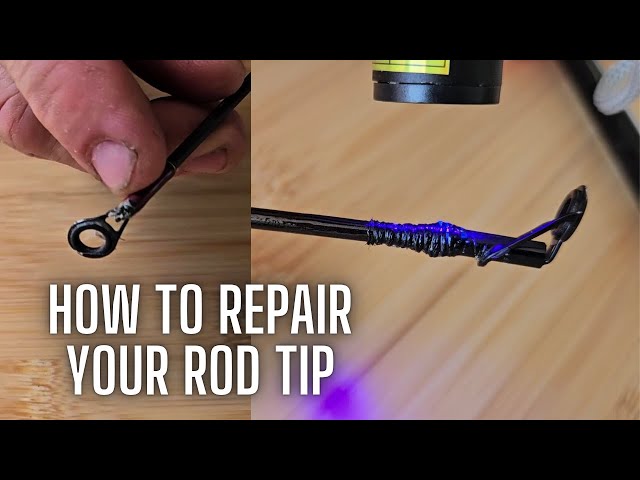
Have you ever been out fishing, only to have your rod tip snap right when the big catch is on the line? It’s frustrating, but don’t worry—you don’t need to buy a whole new rod.
Fixing a broken fishing rod tip is easier than you might think. In this guide, you’ll learn simple, step-by-step methods to get your rod back in action quickly. Keep reading, and you’ll be ready to reel in your next big catch without missing a beat.
Identify The Damage
Fixing a broken fishing rod tip starts with finding the exact problem. You need to look closely to see where the damage is.
Checking the rod carefully helps you decide the best way to repair it. Small cracks and breaks need different fixes.
Check The Tip And Guide
The tip is the most common place to break on a fishing rod. Look at the tip and the guide ring closely.
Check if the tip is bent, cracked, or missing. Also, see if the guide ring is loose or broken.
- Look for cracks or splits in the tip
- Check if the guide ring moves or is damaged
- See if the tip fits tightly on the rod
Assess The Rod Material
Fishing rods come in different materials like graphite, fiberglass, or composite. Each material needs a different repair approach.
Graphite rods are light but can break easily. Fiberglass rods are tougher but heavier. Knowing the material helps you pick the right glue or replacement parts.
- Graphite rods need careful handling for cracks
- Fiberglass rods can handle stronger repairs
- Composite rods may need mixed repair methods

Credit: www.youtube.com
Gather Repair Tools
Fixing a broken fishing rod tip needs the right tools. Gathering these tools before you start makes the repair easier.
Some tools are essential, while others help you get better results. This guide explains both types.
Essential Supplies
You need a few basic supplies to repair your fishing rod tip. These items help you remove the broken tip and attach a new one.
- Replacement rod tip of the correct size
- Heat source like a lighter or heat gun
- Sandpaper or a fine file
- Strong adhesive or rod tip glue
- Clean cloth to wipe the rod
Having these supplies ready helps you fix the rod tip safely and firmly.
Optional Tools For Better Results
Some extra tools make the repair easier or stronger. They are not required but can improve your work.
- Fine tweezers to handle small parts
- Masking tape to hold the tip in place
- Ruler or caliper to measure tip size accurately
- Small brush to apply adhesive neatly
- Heat shrink tubing for added support
Using these tools can help you get a cleaner, longer-lasting repair.
Remove The Broken Tip
Fixing a broken fishing rod tip starts by removing the damaged piece. This makes it easier to attach a new tip.
Be careful when removing the broken tip to avoid further damage. Use simple tools and gentle steps.
Soften The Adhesive
The broken tip is usually glued in place. Soften the glue before trying to remove it.
You can use heat to soften the adhesive. A hairdryer works well for this task.
- Turn on a hairdryer to medium heat
- Hold it close to the broken tip for 1-2 minutes
- Check if the adhesive feels softer by gently pressing
- Repeat if the glue is still hard
Gently Twist Off The Tip
After softening the glue, try to remove the broken tip by twisting it slowly.
Do not force it. Use a cloth for better grip and protect your hands.
- Hold the rod firmly with one hand
- Use the other hand to twist the broken tip gently
- Stop if you feel too much resistance
- Apply more heat if needed and try again
Choose A Replacement Tip
Fixing a broken fishing rod tip is easy. The first step is choosing the right replacement tip. A good match ensures your rod works well again.
Look for a tip that fits your rod’s size and style. This makes fishing more enjoyable and effective.
Match Size And Style
Size and style are important when picking a replacement tip. The tip should match your rod’s original design for best performance.
Check the diameter of your rod’s end. Use a caliper or ruler to measure it accurately.
- Measure the rod tip diameter before buying
- Choose a tip style that matches your fishing needs
- Consider the material of the replacement tip
Where To Buy Tips
Replacement tips are available in many places. You can buy them online or at local stores.
Online shopping offers more choices and convenience. Local stores allow you to see the tips in person.
- Visit local fishing gear shops for expert advice
- Explore online marketplaces for a wide selection
- Check brand websites for specific replacement tips
Attach The New Tip
Fixing a broken fishing rod tip means attaching a new tip properly. This step is important to make your rod work well again.
Follow clear steps to attach the new tip so it stays strong and straight.
Apply Adhesive Correctly
Use the right glue to hold the new tip on the rod. Apply the adhesive evenly inside the tip’s tube.
Too much glue can cause a mess. Too little glue makes the tip loose. Use a small brush or toothpick to spread it well.
- Choose waterproof adhesive for fishing rods
- Put glue inside the tip’s hollow part
- Spread glue evenly to cover all surfaces
- Avoid excess glue spilling outside the tip
Align And Secure The Tip
Slide the new tip onto the rod’s end carefully. Make sure it lines up with the other guides on the rod.
Hold the tip steady until the glue dries. Use tape or a cloth to keep the tip in place if needed.
- Match the new tip’s guide with the rod’s guides
- Push the tip firmly but gently onto the rod
- Hold the tip steady for several minutes
- Use tape to secure the tip while drying
- Let the adhesive cure as per instructions

Credit: anglersresource.net
Allow Proper Drying Time
Fixing a broken fishing rod tip takes care and patience. Letting the repaired part dry fully is very important. This helps the glue or epoxy set strong.
Rushing the drying process can weaken the repair. It might cause the tip to break again during use. Follow these tips to allow proper drying time.
Recommended Drying Duration
Drying time depends on the glue or epoxy used. Most adhesives need between 12 to 24 hours. Some quick-setting glues dry faster but still need time to cure fully.
- Check the product label for drying instructions.
- Keep the rod tip still and away from dust.
- Allow at least 24 hours for strong bonds with epoxy.
- Do not test the repair too soon.
Avoiding Common Mistakes
Many anglers make errors that weaken the repair. Avoid these mistakes to keep your rod tip strong after fixing it.
| Common Mistake | Why It Hurts | How to Avoid |
|---|---|---|
| Touching the glued tip too soon | Weakens bond and causes cracks | Wait full drying time before handling |
| Exposing to moisture during drying | Slows curing and weakens glue | Dry in a dry, shaded place |
| Using too much glue | Creates lumps and mess | Apply a thin, even layer |
| Not securing the tip properly | Causes misalignment or gaps | Hold tip steady with tape or clamps |
Test Your Repair
After fixing a broken fishing rod tip, it is important to test the repair. Testing helps ensure the tip works properly and is safe to use.
Careful testing can prevent further damage and improve your fishing experience.
Check Alignment And Strength
Look closely at the repaired tip to see if it lines up with the rest of the rod. The tip should be straight and not bent.
Gently bend the tip to test its strength. It should feel firm but not too stiff or weak.
- Make sure the tip matches the rod’s angle.
- Check for any wobbling or loose parts.
- Apply light pressure to confirm strength.
- Fix any misalignment before fishing.
Tips For Safe Casting
After repair, use slow and smooth casting motions. Avoid hard or fast casts that could break the tip again.
Practice casting in an open area to build confidence and protect your rod tip.
- Start with light casts to test the tip’s response.
- Keep your wrist steady to reduce stress on the tip.
- Watch the tip during casting for any cracks or movement.
- Stop using the rod if you feel any unusual resistance.
Prevent Future Breaks
Fixing a broken fishing rod tip takes effort. You want to avoid this problem again. Taking care of your rod helps it last longer.
Small steps can stop breaks before they happen. Learn how to handle and maintain your fishing rod properly.
Handle With Care
Always carry your fishing rod carefully. Avoid dropping or banging it against hard surfaces. Rough handling can cause cracks or breaks.
Use rod covers or cases when you transport your fishing gear. These protect the tip and other parts from damage.
- Hold the rod firmly but gently
- Do not lean the rod against sharp edges
- Keep rod away from heavy objects
- Use padded cases for storage and travel
Regular Maintenance Tips
Clean your fishing rod after each use. Dirt and salt can wear down the rod tip and guides. Use fresh water and a soft cloth.
Check the rod tip and guides often. Look for cracks, loose parts, or wear. Fix problems early to prevent breaks during fishing.
- Rinse rod with clean water after fishing
- Dry the rod completely before storing
- Inspect tip for any damage or looseness
- Tighten loose parts carefully
- Store rod in a cool, dry place away from sunlight

Credit: www.reddit.com
Frequently Asked Questions
How Can I Repair A Broken Fishing Rod Tip?
To repair a broken fishing rod tip, first remove the damaged tip. Clean the area and slide a new tip over the end. Secure it with strong adhesive or rod tip glue. Let it dry completely before using the rod again.
What Materials Are Needed To Fix A Fishing Rod Tip?
You need a replacement rod tip, adhesive or rod tip glue, sandpaper, and a sharp knife or cutter. Some anglers also use thread for extra support. These materials ensure a secure and durable repair for your broken fishing rod tip.
How Long Does It Take To Fix A Broken Fishing Rod Tip?
Fixing a broken fishing rod tip usually takes about 30 to 60 minutes. This includes cleaning, applying adhesive, and drying time. Drying time may vary based on the glue used, so always follow manufacturer instructions for best results.
Can I Fix A Fishing Rod Tip Without Professional Help?
Yes, you can fix a fishing rod tip yourself with basic tools and materials. Many anglers successfully repair tips at home by following simple steps. DIY repairs save money and extend your rod’s lifespan when done carefully.
Conclusion
Fixing a broken fishing rod tip is easier than it seems. Small steps lead to big results. Use the right tools and take your time. A repaired tip can last many fishing trips. Keep your rod in good shape to enjoy fishing longer.
Try the fix yourself and save money. Don’t let a broken tip stop your fun. Practice these tips and get back to fishing soon. Simple repairs keep your gear ready and strong. Fishing is more enjoyable with a working rod.