A cut garden hose can turn a simple watering task into a frustrating mess. If you’ve ever faced water spraying everywhere or a hose that just won’t deliver, you know how annoying it can be.
But don’t worry—fixing a cut garden hose is easier than you think. In this guide, you’ll discover quick and effective ways to repair your hose, saving you time, money, and the hassle of buying a new one. Keep reading, and you’ll have your garden hose working like new in no time.

Credit: www.reddit.com
Tools And Materials Needed
Fixing a cut garden hose requires some simple tools and materials. Getting these ready will help you complete the repair quickly.
Most of the items are easy to find at hardware stores or online. Prepare them before you start fixing the hose.
Garden Hose Repair Kit
A repair kit usually contains connectors and clamps to join the cut parts. It fits most standard hoses and makes the repair tight and leak-free.
Utility Knife Or Scissors
You need a sharp utility knife or scissors to cut the hose cleanly. A straight cut helps the connectors fit better and stops leaks.
Screwdriver Or Wrench
These tools help tighten hose clamps or connectors. A screwdriver works for clamps with screws, while a wrench fits some connectors.
Replacement Hose Connector
If you do not have a repair kit, use a replacement hose connector. It joins two hose ends and seals the cut.
Waterproof Tape Or Hose Mender Tape
Waterproof tape can cover small cuts or hold parts in place. Hose mender tape is stronger and designed for garden hoses.
Gloves
Wear gloves to protect your hands while cutting and handling connectors. They keep you safe from sharp edges and dirt.
List Of Tools And Materials
- Garden hose repair kit
- Utility knife or scissors
- Screwdriver or wrench
- Replacement hose connector
- Waterproof tape or hose mender tape
- Protective gloves
Assessing The Damage
Before you fix a cut garden hose, you need to check the extent of the damage. A quick assessment helps you decide the best repair method.
Look for visible cuts and leaks. This step ensures you have all the needed tools ready for a successful repair.
Identifying The Location Of The Cut
Locate the exact spot where the hose is cut. Turn the water on to see where it leaks. This makes it easier to pinpoint the problem area.
Checking The Severity Of The Damage
Examine the size and depth of the cut. A small puncture may require different tools than a large tear. Understanding this helps you prepare the right materials.
- Minor cuts might need just a sealant.
- Medium cuts could require a hose repair kit.
- Severe damages might mean replacing the hose section.
Assessing The Age And Condition Of The Hose
Determine the age of your hose. An older hose may have more wear and tear. If it’s brittle or cracked in other areas, consider replacing it.
| Hose Age | Condition | Action |
| 1-2 years | Good | Repair |
| 3-5 years | Moderate wear | Repair or replace |
| 5+ years | Worn out | Replace |
Basic Repair Methods
Fixing a cut garden hose can save water and money. You do not need to buy a new hose if you repair the damaged part.
This guide shows two simple ways to fix a cut garden hose. Both methods are easy and need few tools.
Using Hose Repair Kits
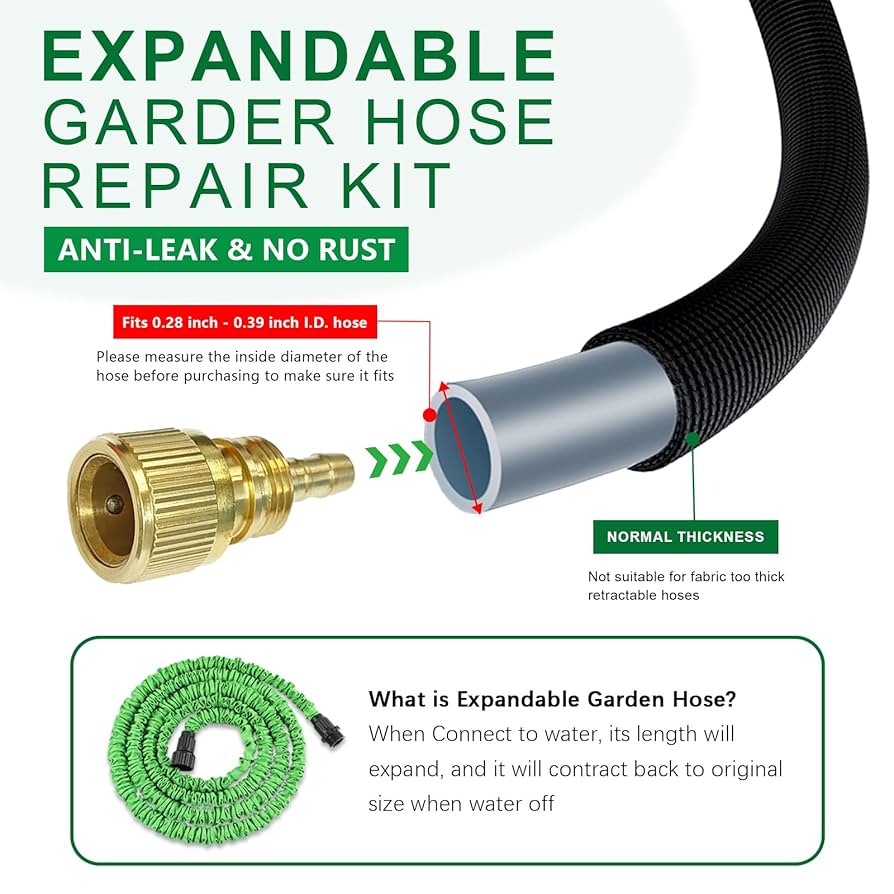
Hose repair kits have all parts needed to fix a cut hose. These kits usually include a connector and clamps.
- Cut the hose cleanly on both sides of the cut.
- Insert the connector piece into each end of the hose.
- Tighten the clamps around the hose to hold the connector in place.
- Test the hose by turning on the water and checking for leaks.
Applying Waterproof Tape
Waterproof tape is a quick fix for small cuts or holes. It stops leaks and keeps water flowing.
| Material Needed | Purpose |
| Waterproof Tape | Seal the cut or hole |
| Scissors | Cut the tape to size |
| Clean Cloth | Dry the hose before taping |
To apply the tape:
- Dry the hose well around the cut.
- Wrap the tape tightly around the damaged area.
- Overlap the tape by half its width for a better seal.
- Press the tape down firmly to remove air bubbles.
Credit: www.amazon.com
Advanced Repair Techniques
Fixing a cut garden hose requires more than quick fixes. Advanced methods ensure longer-lasting repairs. These techniques use tools and parts to restore hose strength and function.
This guide covers replacing hose sections and using couplings and connectors. Both methods improve hose durability and prevent leaks.
Replacing Hose Sections
Cutting out the damaged part and adding a new section can save your hose. You need a sharp knife, a new hose piece, and hose clamps. This method works well for large cuts or holes.
- Cut the hose cleanly on both sides of the damaged area.
- Measure and cut a new hose section of the same diameter and length.
- Insert each end of the new section inside the existing hose ends.
- Secure each connection with hose clamps, tightening them firmly.
- Test the hose for leaks by running water through it.
Using Couplings And Connectors
Couplings and connectors join two hose pieces securely. They come in plastic, metal, or brass. Using the right type ensures a tight seal and easy repair.
| Type | Material | Best Use |
| Barbed Coupling | Plastic | Light garden hoses |
| Compression Connector | Brass | Heavy-duty hoses |
| Quick-Connect Coupler | Metal | Frequent hose changes |
To install a coupling, slide the hose ends over the barbs or into the connector. Tighten any screws or clamps included. This creates a strong join that resists leaks and breaks.
Preventing Future Cuts
Keeping your garden hose in good shape saves time and money. Cuts can stop water flow and cause leaks. Taking steps to prevent cuts helps your hose last longer.
Use simple methods to protect your hose from sharp objects and rough handling. Follow the tips below to avoid common hazards.
Proper Storage
Store your hose in a cool, shaded place to avoid damage from the sun and heat. Use a hose reel or hanger to keep it off the ground and prevent kinks.
Avoid Sharp Edges
Keep the hose away from sharp tools, rocks, and rough surfaces. These can easily cut or wear down the hose material over time.
Use Protective Covers
- Place foam sleeves over sections that rub against rough edges.
- Wrap hose ends with tape to guard against cracks.
- Use hose protectors near spigots and connectors.
Regular Inspection
| Inspection Point | What to Check | Action Needed |
| Entire Hose Length | Look for small cuts or wear spots | Apply repair tape or patch if found |
| Connectors and Fittings | Check for cracks or looseness | Tighten or replace parts as needed |
| Storage Area | Ensure no sharp objects nearby | Clear area to prevent damage |
Maintenance Tips For Garden Hoses
Garden hoses need care to last longer and work well. Fixing a cut hose quickly helps prevent leaks.
Regular maintenance keeps your hose strong and saves water. Follow simple tips to avoid damage.
Check For Damage Regularly
Look for cuts, cracks, or holes on your hose often. Early spotting stops small problems from growing.
Inspect the hose before and after use. Pay attention to the ends and connectors.
Store Your Hose Properly
Keep your hose in a cool, dry place away from sunlight. Sun can weaken the hose material over time.
Use a hose reel or hanger to avoid kinks and tangles. This prevents stress on the hose walls.
- Drain water before storing
- Keep it off the ground
- Avoid sharp bends
Fix Cuts Quickly
Use a hose repair kit to fix cuts and leaks fast. This keeps water from wasting and pressure steady.
Cut out the damaged section and attach the repair connector. Follow the kit instructions for best results.
- Turn off water before repair
- Cut cleanly around the damage
- Secure connectors tightly
Avoid Dragging Your Hose
Dragging your hose over rough surfaces causes cuts and tears. Lift the hose when moving it.
Use a cart or hose reel to move the hose easily without damage.
Use Proper Water Pressure
High water pressure can burst your hose. Check your water pressure and keep it moderate.
Use a pressure regulator if your water pressure is too strong for the hose.

Credit: www.youtube.com
Frequently Asked Questions
How Do I Repair A Cut Garden Hose Quickly?
To fix a cut garden hose quickly, first turn off the water supply. Cut out the damaged section using a sharp knife. Use a hose repair kit to insert connectors and secure the hose. Tighten clamps to prevent leaks. Test by turning the water back on.
What Tools Are Needed To Fix A Cut Garden Hose?
You need a sharp utility knife, a hose repair kit with connectors, and hose clamps. Optionally, a pair of scissors and pliers can help. These tools allow you to cut out damaged parts and securely reattach the hose sections for a leak-free repair.
Can I Use Tape To Fix A Cut Garden Hose?
Using tape is a temporary fix for a cut garden hose. It may stop leaks briefly but won’t last under pressure. For a durable repair, use a hose repair kit with connectors and clamps. Tape is best avoided for long-term hose functionality.
How Long Does A Garden Hose Repair Last?
A properly done garden hose repair using a kit can last several seasons. Longevity depends on hose quality, repair precision, and usage. Avoid sharp bends and store the hose properly to extend the repair’s life. Regular checks help catch leaks early.
Conclusion
Fixing a cut garden hose is easier than you think. A few simple tools and steps can stop leaks fast. This saves water and keeps your plants happy. Regular checks help spot problems early. Quick repairs extend your hose’s life.
You can enjoy gardening without wasting time or money. Try these tips and keep your garden green. Small fixes make a big difference. Don’t let a cut hose slow you down.