
Are you tired of wrestling with your gas cooktop igniter every time you want to cook a meal? You’re not alone.
Many people face the frustrating issue of a faulty igniter, disrupting their cooking flow and causing unnecessary stress. But before you consider calling a technician or replacing your cooktop altogether, there’s good news. You can often fix this common problem yourself, saving both time and money.
Imagine the satisfaction of reigniting your cooktop back to its perfect state, ready to fire up your culinary creations with ease. In this guide, we’ll walk you through straightforward, step-by-step solutions to get your cooktop igniter working like new. Dive in and discover how you can bring the spark back to your kitchen quickly and efficiently.
Common Causes Of Igniter Issues
Gas cooktop igniters can stop working for several reasons, and understanding these causes can save you time and frustration. Often, the issue is simpler than you think, and a quick fix is all it takes. Let’s look at some common problems that might be preventing your igniter from sparking.
Dirty Or Greasy Igniter
Grease and food debris can build up on the igniter, blocking the spark. This is especially common if you cook frequently without cleaning the cooktop. Have you ever noticed a weak or no spark after a big cooking session? Cleaning the igniter gently with a toothbrush and some rubbing alcohol can often restore its function.
Faulty Igniter Switch
The igniter switch controls the spark’s flow, and if it’s defective, the igniter won’t work. Sometimes, the switch gets stuck or wears out over time. If pressing the knob doesn’t produce any clicking sound, the switch may need replacement to get your cooktop back in action.
Loose Wiring Connections
Wiring inside the cooktop can become loose due to vibration or movement. Loose connections interrupt the electrical flow to the igniter, causing it to fail. Checking the wiring carefully and tightening any loose connections can often solve the problem without needing new parts.
Worn Out Spark Module
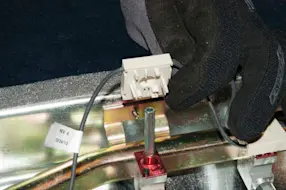
The spark module generates the spark that lights the burners. Over time, this part can wear out or get damaged. If you have multiple burners that won’t ignite, the spark module is often the culprit, and replacing it might be necessary to fix the issue.
Credit: www.searspartsdirect.com
Tools Needed For Repair
Fixing a gas cooktop igniter requires the right tools. Using proper tools ensures safety and saves time. Gather all tools before starting the repair. This helps keep the process smooth and efficient.
Screwdrivers And Pliers
Screwdrivers help remove screws holding the igniter and cooktop parts. Use both flathead and Phillips screwdrivers for different screws. Pliers assist in gripping and pulling wires or small parts. Needle-nose pliers work well for tight spaces. Having these basic hand tools ready is essential.
Multimeter For Testing
A multimeter checks if the igniter receives power. It measures electrical resistance and voltage. This tool helps identify if the igniter or wiring is faulty. Using a multimeter avoids replacing parts unnecessarily. It’s a must-have for accurate diagnosis.
Cleaning Supplies
Cleaning supplies remove dirt and grease from the igniter and surrounding areas. Use a soft brush or cloth to clean gently. Rubbing alcohol or mild detergent works well for cleaning. Keeping parts clean improves igniter performance and safety.
Replacement Parts
Replacement parts include a new igniter or wires if needed. Check the model number of your cooktop to find compatible parts. Having the correct replacements prevents repair delays. Keep spare parts handy for a quick fix.
Safety Precautions Before Repair
Repairing a gas cooktop igniter requires caution. Safety is the top priority before starting any fix. Taking the right safety steps helps avoid accidents and injuries. This section covers essential safety precautions to follow before repair work.
Turn Off Gas Supply
Stop the gas supply to your cooktop. Locate the main gas valve and close it completely. This action prevents gas leaks and reduces fire risk. Never attempt repairs with the gas turned on. Check twice to ensure no gas flows during the repair.
Unplug The Cooktop
Disconnect the cooktop from the electrical outlet. Unplugging cuts off power to the igniter and other parts. This step prevents electric shock and accidental sparking. Always remove the plug gently to avoid damaging the cord.
Work In A Well-ventilated Area
Open windows or use fans to improve airflow. Proper ventilation helps clear any gas fumes in the air. It lowers the chance of inhaling harmful gases. A fresh air environment makes repair work safer and more comfortable.
Step-by-step Igniter Cleaning
Cleaning your gas cooktop igniter is often the key to restoring its reliable spark and smooth operation. Dirt, grease, and food debris can easily block the igniter, preventing it from lighting properly. Taking a few moments to clean it carefully can save you from unnecessary replacements and keep your cooking on track.
Remove Burner Grates And Caps
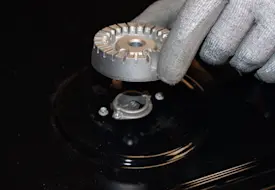
Start by carefully lifting off the burner grates and caps. These parts usually come off with a gentle pull, but if they feel stuck, check your cooktop’s manual to avoid damage. Setting them aside on a clean surface prevents losing any pieces and keeps your workspace organized.
Have you noticed any crumbs or spills accumulating around these areas? Removing the grates gives you a clear view of the igniter and surrounding parts, so you can identify any buildup that needs attention.
Clean The Igniter With A Brush
Use a soft-bristled brush, like an old toothbrush, to gently scrub the igniter. Focus on the small ceramic tip and the metal electrode where sparks are created. Avoid using too much force to prevent damaging the fragile parts.
If grease or food residue is stubborn, dampen the brush slightly with rubbing alcohol. This helps break down grime without leaving moisture that could cause electrical issues. Do you find it surprising how much dirt can accumulate in such a tiny spot?
Dry And Reassemble Components
Before putting everything back, make sure the igniter and burner parts are completely dry. Use a clean cloth or let them air dry for a few minutes to prevent any moisture from interfering with ignition. Moisture can cause misfires or slow sparks, which often frustrate users.
Once dry, carefully reassemble the burner caps and grates in their original positions. Test the igniter by turning on the burner—does it spark quickly and consistently now? If it does, you’ve done a great job extending your cooktop’s life with a simple, effective cleaning.
Testing The Igniter Switch
Testing the igniter switch is crucial for fixing a gas cooktop igniter issue. This switch controls the spark that lights the burner. A faulty switch can stop the igniter from working properly. Checking the switch helps identify if it needs replacement or repair.
Locate The Igniter Switch
First, turn off the gas and power supply. Open the cooktop’s control panel carefully. Look for the small switch connected to the igniter wire. It usually sits behind the control knob or near the burner assembly. Use a flashlight for better visibility.
Use A Multimeter To Check Continuity
Set your multimeter to the continuity test mode. Remove the igniter switch from its place. Place the multimeter probes on the switch terminals. A continuous beep or low resistance reading means the switch is good. No beep or infinite resistance means it is faulty.
Replace Switch If Faulty
Buy a replacement switch that matches your cooktop model. Disconnect the old switch wires carefully. Attach the new switch wires in the same order. Secure the new switch back in place. Restore power and test the igniter to confirm the fix.

Credit: www.familyhandyman.com
Fixing Wiring Issues
Fixing wiring issues is a key part of repairing a gas cooktop igniter. Faulty wiring can stop the igniter from sparking. Check the wires carefully to find any problems. This keeps the cooktop safe and working well.
Inspect Wiring For Damage
Look closely at all wires connected to the igniter. Check for cracks, burns, or frayed areas. Damaged wires can cause sparks to fail. Use a flashlight for better visibility. Replace any wire that looks worn or broken.
Secure Loose Connections
Loose wire connections stop electricity from flowing properly. Gently push or twist wires to ensure they fit tightly. Tighten any screws or clamps holding the wires. A strong connection helps the igniter spark every time.
Replace Damaged Wires
Cut out any wires that are damaged beyond repair. Use wires that match the original size and type. Strip the ends carefully before attaching new connectors. Secure the new wires firmly to avoid future problems. Test the igniter after replacing wires to confirm it works.
Replacing The Spark Module
Replacing the spark module is a key fix if your gas cooktop fails to ignite properly. This small component sends the electrical spark needed to light the gas. Swapping it out can restore your cooktop’s performance without the need for a full replacement.
Identify The Spark Module
First, locate the spark module inside your cooktop. It’s usually a small box connected to several wires leading to the igniters. Check your cooktop’s manual or look for a black or gray plastic module near the burners.
Pay attention to any markings or part numbers on the module. These details help you buy the exact replacement and avoid compatibility issues.
Disconnect And Remove Old Module
Before touching anything, make sure to unplug your cooktop or switch off the gas supply. Safety is crucial when dealing with electrical parts and gas appliances.
Carefully disconnect the wires from the old spark module. Take a photo or label the wires so you remember their positions. Then, unscrew or unclip the module from its mounting spot.
Install New Module
Match your new spark module with the old one to confirm it’s the correct part. Attach it to the mounting area using screws or clips as required.
Reconnect the wires exactly as they were, referring to your photo or labels. After that, restore power or gas supply, then test the ignition. Does your cooktop spark immediately? If not, double-check your connections.
Credit: www.searspartsdirect.com
Testing The Cooktop After Repair
After fixing the gas cooktop igniter, testing is essential. This step ensures the repair works well and the cooktop is safe to use. Careful testing helps catch any problems early and confirms the unit runs smoothly.
Restore Gas And Power
Turn on the gas supply valve slowly. Make sure the gas flow is steady. Plug the cooktop back into the power outlet. This action powers the igniter and other electrical parts. Watch for any gas smell before lighting. Safety first.
Check For Proper Ignition
Press the ignition button or knob. Listen for the clicking sound of the igniter. Look for a strong, blue flame at each burner. The flame should be steady, not flickering. No delays in ignition mean the igniter works right.
Observe For Any Issues
Watch the burners for a few minutes. Check for unusual noises or weak flames. Smell for gas leaks or burnt odors. Ensure all burners light evenly and stay on. If problems appear, turn off the cooktop immediately and inspect again.
When To Call A Professional
Knowing when to call a professional to fix your gas cooktop igniter can save you time, money, and frustration. While some issues are simple enough to handle on your own, others require expert attention. Recognizing the signs that point to professional help is key to ensuring your cooktop works safely and efficiently.
Persistent Ignition Problems
If your igniter keeps failing despite your attempts to clean or reset it, the problem might be deeper than surface dirt or minor glitches. Repeated clicking without ignition or inconsistent sparks often mean internal parts are worn out or damaged. At this stage, continuing to troubleshoot alone could cause more harm than good.
Have you noticed your cooktop struggling to light even after multiple tries? That’s a clear signal to stop and call an expert who can diagnose hidden issues effectively.
Complex Electrical Issues
Gas cooktop igniters rely on electrical components that can be tricky to handle without proper knowledge. If you suspect wiring problems, blown fuses, or faulty igniter modules, professional tools and skills become necessary. Attempting repairs on complex electrical parts without experience can be dangerous and may worsen the problem.
Ask yourself: do you have the right tools and training to safely work with your cooktop’s electrical system? If not, it’s best to let a professional manage the repair.
Safety Concerns
Gas appliances carry inherent risks, including fire hazards and gas leaks. If you detect a strong smell of gas, hear unusual noises, or notice damaged components, prioritize safety and seek professional assistance immediately. Handling gas-related issues without expertise can put you and your household in danger.
Your safety comes first. Don’t hesitate to call a certified technician if you feel uncertain about the condition of your cooktop or the nature of the problem.
Frequently Asked Questions
Why Is My Gas Cooktop Igniter Not Sparking?
A dirty or wet igniter often causes no spark. Clean the igniter and dry the area. Check for loose wiring or a faulty igniter switch.
How Can I Safely Fix A Gas Cooktop Igniter?
Turn off the gas supply and unplug the cooktop first. Use a screwdriver to access the igniter. Clean or replace the igniter as needed. Reassemble and test carefully.
What Tools Do I Need To Repair A Cooktop Igniter?
You’ll need a screwdriver, multimeter, cleaning brush, and possibly a replacement igniter. A flashlight helps for visibility. Safety gloves are recommended to protect your hands.
How Long Does It Take To Fix A Gas Cooktop Igniter?
Fixing a gas cooktop igniter typically takes 15 to 30 minutes. Time varies with your experience and the problem’s complexity. Always ensure safety precautions before starting.
Conclusion
Fixing a gas cooktop igniter does not have to be hard. Follow the steps carefully and take safety first. Check the igniter, clean it well, or replace if needed. Small problems often cause the igniter to fail. Regular care can keep your cooktop working longer.
Stay patient and take your time with each step. You can save money by doing it yourself. Keep your kitchen safe and your meals cooking well. Simple fixes make a big difference.