Are you ready to beat the heat and enjoy cool comfort wherever you need it? Installing your Hisense portable air conditioner doesn’t have to be confusing or stressful.
With just a few simple steps, you can have your space feeling fresh and cool in no time. This guide will walk you through everything you need to know, making the setup quick and easy—even if you’ve never done it before.
Keep reading to discover how to get your Hisense portable AC up and running smoothly today!

Credit: www.youtube.com
Preparation Before Installation
Choose a flat, stable surface near a window for venting. Avoid direct sunlight or heat sources. Leave at least 20 inches of space around the unit for air flow. Make sure the power outlet is close enough.
Check the package to confirm all parts are included. This usually includes the air conditioner, exhaust hose, window kit, and user manual. Missing pieces can delay installation.
- Screwdriver
- Measuring tape
- Scissors or utility knife
- Level
Gather these tools before you start. This will make the process faster and easier.
Setting Up The Window Kit
Measure the window panel width carefully. Use a tape measure for accuracy.
Adjust the window panel to fit the window size. The panel should fit snugly.
Extend or shorten the panel as needed by sliding the pieces.
Place the window kit panel into the window frame securely.
- Make sure the panel sits tightly to avoid air leaks.
- Use screws or brackets to fix the panel in place.
- Check that the panel does not move when touched.
Seal any gaps with foam strips or weatherproof tape for better cooling.
Connecting The Exhaust Hose
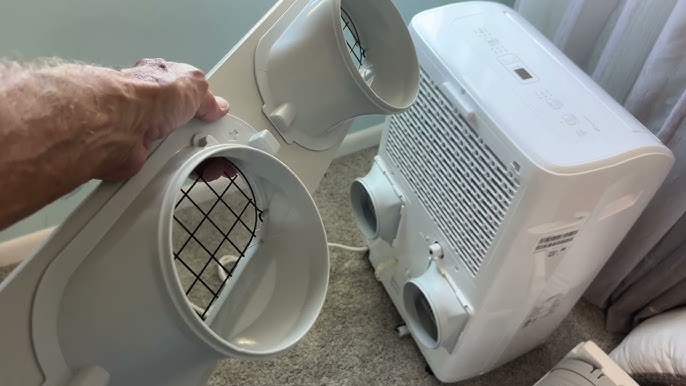
First, find the exhaust port on the back of the Hisense portable air conditioner. Align the exhaust hose connector with the port. Push the hose firmly until it clicks or feels secure. Make sure there are no gaps to avoid air leaks.
Next, connect the other end of the exhaust hose to the window kit. Slide the hose into the round opening on the window kit. Twist or lock it in place to keep it stable. The window kit should fit snugly into the window frame.
- Check that the hose is straight and not bent.
- Secure the window kit tightly to prevent outside air from entering.
- Use weather stripping if needed to seal any gaps.
Positioning The Air Conditioner
Place the air conditionernear a window for easy venting. The unit needs clear spacearound it for air to flow well. Avoid tight corners or blocking vents.
Ventilation is key.Use the included hose to connect the unit to the window kit. This lets hot air leave the room. Make sure the hose is not bent or crushed.
Keep the window panel tight and sealed to stop warm air from coming in. Check that the hose is securely attachedto both the unit and window.
Level the unitusing the adjustable feet. A flat surface helps the unit drain water properly and run smoothly. Use a small level tool if needed.
- Choose a spot close to a power outlet.
- Leave at least 20 inches of space around the unit.
- Keep the exhaust hose straight for better airflow.
- Check that the window kit fits snugly with no gaps.
Powering On And Initial Setup
Connect the portable air conditionerto a proper power outlet. Make sure the plug fits securelyand the outlet is not damaged. Avoid using extension cords to prevent power issues.
Turn on the unit using the power buttonon the control panel or remote. Wait a few seconds for the unit to initialize. The display will show the current temperature.
Set your desired temperatureusing the up and down buttons. Choose the modebased on your needs:
- Coolfor lowering room temperature
- Fanfor air circulation without cooling
- Dryto reduce humidity
Adjust the fan speed if the option is available. You can select low, medium, or highspeed for comfort.

Credit: www.youtube.com
Maintenance Tips
Cleaning the filter regularlykeeps the air conditioner working well. Dust and dirt block airflow and reduce cooling. Take out the filter every two weeks. Wash it with warm water and mild soap. Let it dry completely before putting it back.
Proper storage during the off-season helps the unit last longer. Drain all water from the unit to avoid mold. Cover the air conditioner with a plastic sheet or cloth. Store it in a dry and cool place, away from dust and sunlight.

Credit: manuals.plus
Frequently Asked Questions
How Do I Install A Hisense Portable Air Conditioner?
First, place the unit near a window. Attach the exhaust hose to the back. Connect the window kit securely. Plug in the unit and turn it on. Follow the manual for detailed steps to ensure proper setup.
What Tools Are Needed For Installation?
You only need a screwdriver and the included window kit. No special tools are required. The kit contains all parts for window mounting. This makes installation straightforward and quick for any user.
Can I Install The Unit Without A Window?
No, the unit needs a window for exhaust. Proper ventilation prevents overheating and ensures efficiency. Always use the window kit included for best performance. Avoid blocking the exhaust hose during use.
How Do I Maintain My Hisense Portable Air Conditioner?
Clean the filter regularly and empty the water tank. Wipe the exterior with a damp cloth. Check the exhaust hose for blockages. Regular maintenance improves cooling and extends the unit’s lifespan.
Conclusion
Installing a Hisense Portable Air Conditioner is simple and straightforward. Follow each step carefully for the best results. Ensure all parts are secure and properly connected. Double-check the vent placement for optimal airflow. Keep your user manual handy for extra guidance.
Enjoy the refreshing coolness in your home. Regular maintenance keeps your unit running smoothly. Clean filters and inspect parts regularly. Experience comfort with a well-installed air conditioner. Your space will feel more inviting and comfortable. Stay cool and relaxed during hot weather.
Happy cooling with your Hisense Portable Air Conditioner!