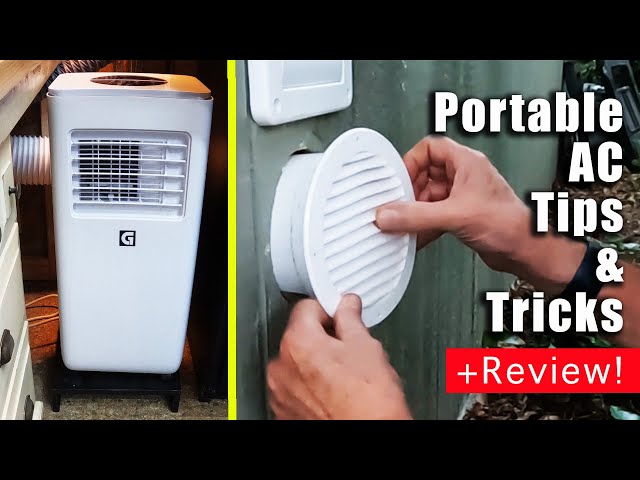
Are you tired of the heat but don’t want a bulky window unit blocking your view? Installing a portable air conditioner through a wall might be the perfect solution for you.
It keeps your space cool without sacrificing your window’s look or letting hot air sneak inside. In this guide, you’ll learn simple, step-by-step instructions to install your portable AC safely and efficiently. By the end, you’ll have a cool, comfortable room and the confidence to handle the installation yourself.
Keep reading—your perfect indoor temperature is just a few steps away!
Choosing The Right Portable Ac
Installing a portable air conditioner through a wall needs the right unit. Picking the right portable AC helps cool your room well.
Think about your space and needs before choosing a model. This guide covers important points to help you decide.
Room Size And Btu Rating
The size of your room matters when buying a portable AC. BTU rating shows how much heat the AC can remove.
Choose a BTU that matches your room size. Too low BTU won’t cool well. Too high wastes energy.
- Up to 150 sq ft: 5,000 BTU
- 150 to 250 sq ft: 6,000–8,000 BTU
- 250 to 350 sq ft: 8,000–10,000 BTU
- 350 to 450 sq ft: 10,000–12,000 BTU
Energy Efficiency
Energy efficiency saves money and helps the environment. Look for units with a good Energy Efficiency Ratio (EER).
A higher EER means the AC uses less power to cool the room. This lowers your electricity bill.
- Check the EER label on the unit
- Choose units with EER above 9 for good efficiency
- Energy Star certified models use less power
Noise Levels
Noise can affect comfort, especially in bedrooms or offices. Look for portable ACs with low noise ratings.
Most units list noise in decibels (dB). A quieter unit usually runs around 50 dB or less.
- Below 50 dB is quiet and good for sleeping
- 50-60 dB is average noise for cooling
- Above 60 dB can be loud and distracting

Credit: www.dreo.com
Tools And Materials Needed
Installing a portable air conditioner through a wall needs the right tools and materials. Using the correct items makes the process easier and safer.
This guide lists the tools and parts you will need to complete the installation properly.
Essential Tools
You will need some common tools to install the air conditioner. These tools help you measure, cut, and secure the unit through the wall.
- Electric drill with drill bits
- Screwdriver set (Phillips and flathead)
- Measuring tape
- Level
- Stud finder
- Jigsaw or reciprocating saw
- Caulking gun
- Safety glasses and gloves
- Pencil for marking
- Vacuum cleaner (to clean dust)
Installation Kit Components
The portable air conditioner usually comes with an installation kit. These parts fit the unit through the wall and keep it secure and sealed.
- Wall sleeve or bracket for mounting
- Window or wall vent kit
- Plastic or metal exhaust hose
- Hose adapter or connector
- Foam weatherstripping to seal gaps
- Screws and mounting hardware
- Instruction manual
Preparing The Wall For Installation
Installing a portable air conditioner through a wall needs careful preparation. You must plan the spot and prepare the wall correctly to ensure a good fit.
This guide helps you get the wall ready. Follow these steps to select the spot, measure, and create the right opening.
Selecting The Installation Spot
Choose a wall spot near a power outlet and a window for ventilation. The spot should be flat and strong enough to hold the air conditioner.
Avoid walls with pipes, wires, or studs where you will cut. Check both inside and outside sides carefully.
Measuring And Marking
Measure your air conditioner’s wall vent size before marking the wall. Use a tape measure for accuracy.
- Measure the height and width of the vent panel.
- Mark these dimensions on the chosen wall spot using a pencil.
- Double-check the measurements before cutting.
- Use a level to make sure the markings are straight.
Creating The Wall Opening
Cut the wall opening carefully following your marks. Use the right tools for your wall type, like a drywall saw or a drill.
| Tool | Wall Type | Purpose |
|---|---|---|
| Drywall Saw | Drywall | Cutting the marked opening |
| Drill with Hole Saw | Brick or Concrete | Start hole for cutting |
| Jigsaw | Wood Panel | Precise cutting of opening |
After cutting, clean the edges and check the opening fits the air conditioner vent tightly.
Installing The Exhaust Hose
Installing the exhaust hose is key for your portable air conditioner. It lets hot air leave your room through the wall.
Follow these steps to connect and secure the hose properly. This will help your AC work well and keep your space cool.
Connecting Hose To Ac Unit
First, attach the exhaust hose to the air conditioner. The hose usually fits on a round vent at the back.
Push the hose firmly into the vent. You may need to twist it slightly to lock it in place.
Securing Hose To Wall Vent
Next, connect the other end of the hose to the wall vent. This vent lets hot air flow outside.
Use screws or brackets to hold the hose tightly at the wall vent. This stops the hose from moving or falling.
- Align the hose end with the wall vent opening.
- Attach the hose collar to the vent.
- Secure with screws or mounting clips.
Ensuring Proper Sealing
Seal any gaps around the hose and wall vent. This keeps warm air from coming back inside.
Use weather stripping or silicone caulk to close openings. Check the seal regularly for leaks.
- Apply weather stripping around the vent edges.
- Use silicone caulk to seal small gaps.
- Inspect the seal every few weeks.
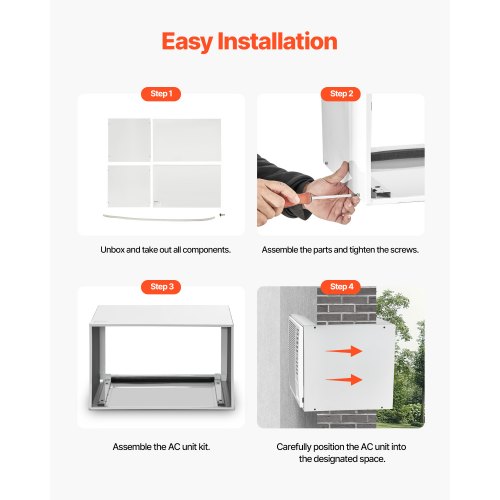
Mounting The Wall Vent Kit
Installing a portable air conditioner through a wall requires a wall vent kit. This kit helps you vent hot air outside. Proper mounting keeps your room cool and your unit working well.
Follow the steps carefully to mount the wall vent kit. This guide explains how to install the panel and seal gaps for good insulation.
Installing The Window Or Wall Panel
First, measure the wall opening where you want to install the vent. The panel should fit tightly in the space.
Place the wall or window panel in the opening. Secure it with screws or brackets provided in the kit. Make sure it is level and stable.
- Check the panel fits without gaps
- Use a drill to fix screws firmly
- Follow the kit instructions for brackets
- Keep the vent outlet facing outside
Sealing Gaps And Insulation
After mounting the panel, seal any gaps around it. This stops hot air and insects from entering your room.
Use foam insulation or weatherstripping around the edges. Press it down tightly for a strong seal.
- Apply foam tape to all panel edges
- Fill large gaps with expanding foam
- Check for leaks by feeling air flow
- Replace insulation if damaged over time
Credit: www.vevor.ca
Final Setup And Testing
After installing your portable air conditioner through the wall, the final steps are important. These steps ensure the unit works safely and cools your space well.
Follow the instructions below to connect power, test airflow, and troubleshoot common problems.
Connecting Power
Plug the air conditioner into a proper electrical outlet. Use a grounded socket that matches the unit’s power needs. Avoid using extension cords to prevent fire risks.
Check the power cord for damage before plugging in. Make sure the plug fits tightly and does not wobble.
Testing Airflow And Cooling
Turn on the air conditioner and set it to the desired cooling mode. Feel the airflow from the unit to see if it is strong and steady.
Check if the air coming out is cooler than room temperature. Let the unit run for at least 10 minutes to stabilize the temperature.
- Ensure no air leaks around the wall installation
- Listen for unusual noises or vibrations
- Confirm the exhaust hose is properly vented outside
Troubleshooting Common Issues
If the unit does not turn on, check the power connection and circuit breaker. Reset the breaker if needed.
If cooling is weak, clean or replace the air filter. Make sure the exhaust hose is not bent or blocked.
- Unit shuts off quickly: Check for overheating and clean vents
- Water leaks inside: Verify the drain hose is correctly installed
- Strange noises: Tighten loose parts and remove debris
Maintenance Tips
Proper maintenance keeps your portable air conditioner working well. It helps the unit last longer and cool better.
Regular care is simple but important. Focus on cleaning and storing the unit the right way.
Cleaning Filters
Filters trap dust and dirt. Clean filters help air flow and improve cooling. Check filters every two weeks during use.
- Turn off and unplug the unit before cleaning.
- Remove the filter carefully from the back or side.
- Wash the filter with warm water and mild soap.
- Let the filter dry completely before putting it back.
- Do not use harsh chemicals or sharp tools on the filter.
Storing The Unit During Off-season
Proper storage protects your air conditioner during months you do not use it. Follow these steps to keep it safe and clean.
| Action | Details |
|---|---|
| Clean the unit | Remove and clean filters, wipe outside with a damp cloth. |
| Drain water | Empty the water tank to prevent mold and odors. |
| Dry completely | Let all parts dry fully before storing. |
| Cover the unit | Use a cloth or plastic cover to keep dust out. |
| Store in a cool place | Keep the unit in a dry, shaded area to avoid damage. |

Credit: www.dreo.com
Frequently Asked Questions
How Do I Install A Portable Ac Through A Wall?
To install a portable AC through a wall, first measure and mark the wall opening. Cut a hole matching the AC’s exhaust vent size. Secure the exhaust hose through the hole, seal gaps with weatherproof caulk, and mount the AC unit inside.
Follow the manufacturer’s instructions carefully.
What Tools Are Needed For Wall Installation Of Portable Ac?
You will need a drill, hole saw or jigsaw, screwdriver, measuring tape, level, caulking gun, and weatherproof sealant. Safety gear like gloves and goggles is recommended. These tools help cut the wall, secure the exhaust vent, and seal gaps to ensure proper installation and efficiency.
Can I Install A Portable Ac Through A Brick Wall?
Yes, you can install a portable AC through a brick wall by drilling a hole with a masonry bit. Use proper anchors and sealants designed for masonry to secure the exhaust vent and prevent air leaks. Consider professional help if unfamiliar with brick work.
How To Seal Gaps After Portable Ac Wall Installation?
Use weatherproof silicone caulk or expanding foam sealant to fill gaps around the exhaust vent. This prevents air leaks and improves cooling efficiency. Apply sealant evenly and allow it to dry fully before using the AC unit. Proper sealing is crucial for energy savings.
Conclusion
Installing a portable air conditioner through a wall can cool your room fast. Follow each step carefully for a secure fit and good airflow. Take your time cutting the hole and sealing gaps to avoid leaks. This method saves space and keeps the unit stable.
Enjoy a cooler home without needing a window. Stay comfortable during hot days with your new setup. Keep the unit clean and check seals often. Simple care helps your air conditioner last longer. You’re ready to beat the heat easily now.