Are you ready to keep your home cool without relying on bulky window units? Installing a through the wall air conditioner sleeve is a smart way to enjoy efficient cooling with a clean, permanent look.
But if you’re worried it’s complicated or expensive, don’t be. This guide will walk you through every step, making the process simple and manageable—even if you’ve never done this before. By the end, you’ll have the confidence to upgrade your space and beat the heat like a pro.
Keep reading, and discover how easy it is to install your own air conditioner sleeve.
Tools And Materials Needed
Installing a through the wall air conditioner sleeve requires specific tools and materials. Having everything ready makes the job easier and safer.
This guide lists all the items you will need before starting the installation process.
Basic Tools
You will need some common tools to cut, measure, and secure the sleeve in the wall opening.
- Measuring tape
- Level
- Power drill with drill bits
- Hammer
- Chisel
- Reciprocating saw or jigsaw
- Screwdrivers (flat and Phillips)
- Caulking gun
- Safety glasses and gloves
Materials For Installation
Besides tools, you need the right materials to properly fit and seal the air conditioner sleeve.
| Material | Purpose |
|---|---|
| Through the wall air conditioner sleeve | Holds the air conditioner securely in the wall |
| Exterior trim or flange | Seals the outside wall around the sleeve |
| Wood shims | Helps level and stabilize the sleeve |
| Expanding foam insulation | Fills gaps to prevent air leaks |
| Exterior grade caulk | Seals the edges against water and air |
| Mounting screws | Secure the sleeve and trim to the wall |
Safety Equipment
Safety equipment protects you during cutting and handling materials.
- Safety glasses to protect your eyes
- Work gloves to protect your hands
- Dust mask to avoid inhaling debris
Credit: www.vevor.ca
Choose The Right Sleeve Size
Picking the correct size sleeve is important for a through the wall air conditioner. A good fit keeps the unit secure and stops air leaks.
This guide helps you measure and select the right sleeve size for your wall air conditioner.
Measure Your Air Conditioner
Start by measuring the width, height, and depth of the air conditioner. Use a tape measure for accurate results.
- Measure the width at the widest point
- Measure the height from top to bottom
- Measure the depth from front to back
Measure Your Wall Opening
Check the wall opening where the sleeve will go. The sleeve must fit inside this space comfortably.
| Dimension | Measure at | Notes |
| Width | Inside wall opening | Allow 1/2 inch clearance |
| Height | Inside wall opening | Allow 1/2 inch clearance |
| Wall Thickness | Thickness of the wall | Choose sleeve depth accordingly |
Match Sleeve Size To Measurements
The sleeve should be slightly larger than the air conditioner but fit well within the wall opening.
- The sleeve width and height must be at least 1 inch bigger than the unit
- The sleeve depth should match the wall thickness
- Check manufacturer specs for exact sleeve sizes
Consider Sleeve Material And Features
Sleeves come in metal or plastic. Metal sleeves are sturdy and last longer. Some have built-in insulation.
Tip:Choose a sleeve with weather stripping to reduce drafts.
Select The Best Wall Location
Choosing the right wall for your through the wall air conditioner sleeve is important. It affects how well the unit cools your room and how easy it is to install.
Pick a wall that fits the size of the air conditioner and allows for proper air flow. Avoid walls with plumbing or electrical wiring inside.
Check Wall Thickness And Material
The wall must be thick enough to hold the air conditioner sleeve firmly. Most walls made of brick, concrete, or wood work well. Thin walls may not support the unit safely.
Avoid Obstacles Inside The Wall
Look inside the wall for pipes, wires, or ducts. Cutting into these can cause damage or danger. Use a stud finder or consult building plans to avoid obstacles.
Choose A Location Near An Electrical Outlet
The air conditioner needs power. Pick a wall close to a grounded electrical outlet. This makes installation safer and reduces the need for long extension cords.
Consider The Room Layout And Air Flow
Place the unit where it can cool the room evenly. Avoid corners or areas blocked by furniture. The cooler air should flow freely across the room.
- Choose a wall with open space in front
- Avoid walls with direct sunlight
- Keep the unit away from heat sources
- Ensure easy access for installation and maintenance
Check Outside Wall Conditions
The outside wall should be free of obstructions like bushes or vents. The sleeve needs clear air flow outside to work well. Also, check for weather exposure that may affect the unit.
| Wall Feature | Good Condition | Poor Condition |
| Wall Thickness | 6 inches or more | Less than 4 inches |
| Obstacles Inside Wall | None or easily avoided | Pipes, wires, ducts |
| Electrical Outlet | Nearby grounded outlet | No outlet or unsafe wiring |
| Outside Air Flow | Clear and open | Blocked by plants or vents |
Prepare The Wall Opening
Installing a through the wall air conditioner requires a precise wall opening. Preparing the space correctly helps the unit fit securely and work well.
Follow careful steps to measure and cut the wall opening before placing the air conditioner sleeve. This guide covers these important tasks.
Measure And Mark The Wall
Start by measuring the air conditioner sleeve dimensions. You will need the height, width, and depth to mark the wall accurately.
- Use a tape measure to find the sleeve’s exact height and width.
- Mark the center point on the wall where you want the unit installed.
- Draw a rectangle on the wall with a pencil, matching the sleeve’s size.
- Double-check your measurements before cutting to avoid mistakes.
Cut The Wall Opening Safely
After marking, carefully cut the wall opening. Safety and precision are key to avoid damage to your home and to fit the sleeve properly.
| Tool | Purpose | Safety Tip |
|---|---|---|
| Stud Finder | Locate wall studs before cutting | Mark studs to avoid cutting into them |
| Jigsaw or Reciprocating Saw | Cut the drywall or siding | Wear safety goggles and gloves |
| Utility Knife | Score drywall edges | Cut slowly to control the blade |
| Dust Mask | Protect lungs from dust | Wear it during cutting |
Install The Sleeve
Installing a through the wall air conditioner sleeve is a key step. The sleeve holds the unit securely and protects your wall. This guide shows how to insert and secure the sleeve properly.
Follow careful steps to ensure the sleeve fits well and stays sealed. This prevents drafts and water leaks around your air conditioner.
Insert The Sleeve Into The Opening
Before placing the sleeve, check that the wall opening is clean and free of debris. Slide the sleeve into the opening slowly. Make sure it fits snugly without forcing it.
- Align the sleeve so it is level and straight.
- Push the sleeve until it sits flush with the wall surface.
- Check both inside and outside walls for proper fit.
- Adjust the sleeve to center it in the opening.
Secure The Sleeve With Screws And Sealant
Use screws and sealant to fix the sleeve firmly in place. Screws hold the sleeve tight. Sealant stops air and water from entering around the edges.
| Material | Purpose | Tip |
|---|---|---|
| Exterior-grade screws | Fasten the sleeve to the wall | Use screws that resist rust |
| Silicone sealant | Seal gaps around the sleeve | Apply evenly for full coverage |
| Drill | Create holes for screws | Pre-drill to avoid wall damage |
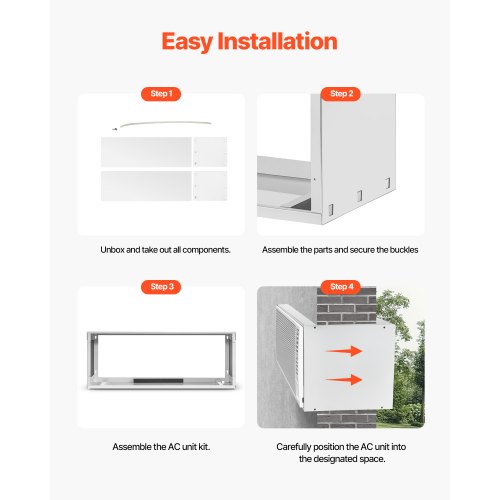
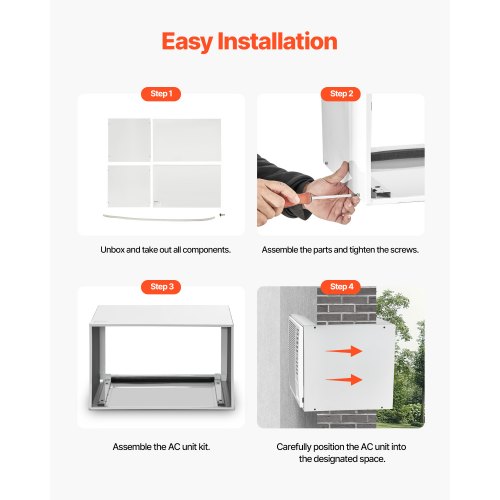
Mount The Air Conditioner Unit
Mounting the air conditioner unit is a key step in installing a through the wall sleeve. This process holds the AC securely in place.
Follow clear steps to slide the AC into the sleeve and lock it safely.
Slide The Ac Into The Sleeve
Carefully lift the air conditioner unit and line it up with the wall sleeve. Make sure the unit is level before sliding it in.
Push the AC slowly into the sleeve until it fits snugly inside.
- Hold the unit steady to avoid damage
- Check that the front panel is flush with the wall
- Ensure no gaps remain around the edges
Lock The Ac In Place
Once the AC is fully inside the sleeve, secure it using the locking brackets or screws. This keeps the unit from moving or falling out.
Tighten all fasteners evenly to hold the air conditioner firm and stable.
- Use a screwdriver or drill for screws
- Check the unit does not shift after locking
- Follow your AC model’s instructions for locking points
Seal And Insulate
Sealing and insulating your air conditioner sleeve helps keep your home comfortable. It stops air leaks and saves energy. Doing this right protects your walls from damage.
This guide covers how to apply weatherproof sealant and add insulation for best results. Follow these steps to improve your air conditioner’s efficiency.
Apply Weatherproof Sealant
Use weatherproof sealant around the sleeve edges to block outside air and moisture. This seal keeps rain and drafts from entering your home.
- Clean the surface before applying sealant.
- Apply a smooth, even bead of sealant around the sleeve.
- Check for any gaps or cracks and fill them thoroughly.
- Allow the sealant to dry according to the instructions.
Add Insulation For Energy Efficiency
Insulation reduces heat loss and stops cold air from entering. It helps your air conditioner work better and lowers your energy bills.
| Insulation Type | R-Value | Best Use |
|---|---|---|
| Foam Board | 3.5 to 5 per inch | Fits around sleeve edges |
| Spray Foam | 6 to 7 per inch | Seals gaps and cracks |
| Fiberglass | 2.2 to 4.3 per inch | Used inside wall cavities |
Test The Installation
After installing the air conditioner sleeve through the wall, testing the setup is important. This helps to make sure the unit works well and no air escapes.
Two key checks are needed: checking for air leaks and ensuring proper operation. Both help keep your room comfortable and save energy.
Check For Air Leaks
Air leaks can cause cold or warm air to enter or escape around the sleeve. Find leaks and seal them to keep your room insulated.
- Look for gaps or cracks around the sleeve edges.
- Feel for air movement with your hand near the edges.
- Use weatherstripping or caulk to seal any gaps you find.
- Check both inside and outside the wall for leaks.
Ensure Proper Operation
Confirm the air conditioner runs smoothly and cools the room effectively. Check the controls and airflow for proper function.
| Test | What to Check | Action if Problem |
|---|---|---|
| Power On | Unit starts without noise or delay | Check power connection and reset breaker |
| Cooling | Air feels cool and steady from the vent | Clean filters or call service if weak |
| Controls | Buttons and settings respond correctly | Refer to manual or repair unit |
| Noise Level | Unit runs quietly without rattles | Tighten screws or adjust installation |
Maintenance Tips
Keeping your through the wall air conditioner sleeve in good shape helps the unit work well. Regular care stops damage and saves money.
Simple maintenance tasks can make your sleeve last longer and keep your home comfortable.
Clean The Sleeve Regularly
Dirt and dust build up inside and outside the sleeve. Cleaning stops blockages and rust from forming.
Use a soft brush or cloth to remove dirt. Clean at least once every few months for best results.
- Remove debris from the sleeve opening
- Wipe down the outer edges and vents
- Check for signs of rust or damage while cleaning
Inspect Seals Annually
Seals keep air and water from leaking through the wall. Check seals once a year to avoid leaks and energy loss.
Look for cracks, gaps, or worn areas. Fix or replace seals quickly to keep your home safe and dry.
- Check all around the sleeve for seal damage
- Use weatherproof sealant if you find gaps
- Replace old or cracked seals to maintain tight fit

Credit: www.doityourself.com

Credit: www.vevor.ca
Frequently Asked Questions
What Tools Are Needed To Install An Ac Sleeve?
You need a drill, saw, screwdriver, measuring tape, level, and sealant. These tools ensure precise cutting and secure fitting for the sleeve installation.
How Do You Measure For A Wall Ac Sleeve?
Measure the width, height, and depth of the air conditioner. Match these dimensions to the sleeve size for a perfect fit in the wall.
Can I Install An Ac Sleeve In Any Wall Type?
Yes, but the wall must support the unit’s weight. Concrete and brick walls are ideal, while drywall may need reinforcement.
How Do You Seal A Through-the-wall Ac Sleeve?
Use weatherproof caulk or sealant around the sleeve edges. This prevents air leaks, water intrusion, and improves energy efficiency.
Conclusion
Installing a through the wall air conditioner sleeve can be simple. Follow each step carefully for the best fit and seal. Check measurements twice before cutting any wall space. Secure the sleeve firmly to avoid air leaks. A well-installed sleeve helps your air conditioner work better.
Enjoy cool air and save energy with this setup. Taking time now prevents problems later. You’ll be comfortable all summer long.