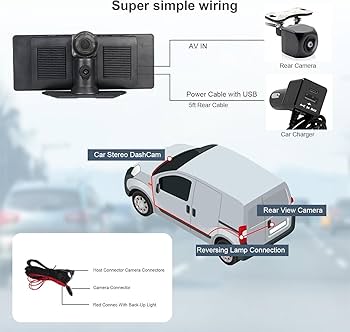
Have you ever struggled to see what’s behind your car while reversing? Installing a backup camera can solve that problem instantly.
It’s a simple upgrade that makes parking safer and easier for you. In this guide, you’ll learn exactly how to install a backup camera on your car, step by step. No confusing jargon, just clear instructions that anyone can follow.
Keep reading, and you’ll soon enjoy the confidence that comes with having a clear view every time you back up.

Credit: www.youtube.com
Choosing The Right Backup Camera
Installing a backup camera makes parking safer and easier. Picking the right camera is key for good results.
Not all cameras work the same. Knowing the types and features helps you choose the best one for your car.
Types Of Backup Cameras
Backup cameras come in different styles. Each type fits different needs and car designs.
- License Plate Cameras:Attach to your license plate frame. Easy to install.
- Flush Mount Cameras:Installed inside the car’s bumper. Offers a clean look.
- Surface Mount Cameras:Stick on the car’s rear surface. Simple and visible.
- Wireless Cameras:Send video without wires. Easier to install but may lag.
- Wired Cameras:Connect with wires. Provide steady and clear video.
Features To Consider
Look for features that improve safety and ease of use. Some features make parking clearer.
- Wide Viewing Angle:Shows a broad area behind your car.
- Night Vision:Helps see clearly in the dark.
- Waterproof:Protects the camera in rain and snow.
- Guidelines:Lines on the screen help judge distance.
- Resolution:Higher resolution gives a clearer image.
Compatibility With Your Car
Not all cameras fit every car. Check your car’s model and screen type before buying.
Some cameras work only with certain head units or display sizes. Make sure the camera fits well.
- Check your car’s make and model for camera fit.
- Match the camera’s video output to your car’s display input.
- Consider power supply and wiring options in your vehicle.
- Look for cameras designed for your car brand or type.
Tools And Materials Needed
Installing a backup camera on your car needs the right tools and materials. This guide lists what you need to prepare before starting the job.
Having everything ready will make the installation easier and faster.
Essential Tools
These tools are necessary to complete the backup camera installation properly.
- Screwdrivers (Phillips and flathead)
- Wire strippers and cutters
- Electrical tape
- Drill with drill bits
- Multimeter for testing electrical connections
- Panel removal tool
- Measuring tape
- Zip ties for securing wires
Optional Accessories
You can use these accessories to improve the installation or camera function, but they are not required.
| Accessory | Purpose |
| Backup camera monitor | Displays the camera view inside the car |
| Extension wires | For longer cable runs if needed |
| Waterproof connectors | Protect connections from moisture |
| Fuse tap | Makes wiring to the fuse box easier |
| Heat shrink tubing | Insulates and protects wire joints |
Preparing Your Car
Installing a backup camera requires some preparation. Getting your car ready helps the installation go smoothly.
Focus on cleaning the area and making sure the power is safe to handle. These steps protect your car and tools.
Cleaning The Installation Area
Clean the spot where the backup camera will go. Dirt and grease can stop the camera from sticking well.
- Use a clean cloth to wipe the area.
- Apply rubbing alcohol to remove grease and dirt.
- Let the area dry completely before installing the camera.
- Check for any damage or rust on the surface.
Disconnecting The Battery
Disconnect the car battery to avoid electric shocks or short circuits during installation.
| Step | Action |
| 1 | Turn off the car and remove the keys. |
| 2 | Locate the negative terminal on the battery. |
| 3 | Use a wrench to loosen the nut on the terminal. |
| 4 | Remove the negative cable from the battery. |
| 5 | Secure the cable away from the battery to prevent contact. |
Credit: www.walmart.com
Mounting The Camera
Mounting the backup camera on your car is a key step. The camera must be fixed in the right place for good view.
Secure mounting keeps the camera stable and protects it from damage. This helps the camera last longer.
Selecting The Camera Position
Choose a spot that shows the area behind your car clearly. Most cameras go above the license plate.
Make sure the camera lens is not blocked by dirt or parts of the car. The view should be wide and low.
- Place camera near the center of the rear bumper
- Check for a clear line of sight with no obstacles
- Avoid spots where water or mud collect
- Consider height so the camera sees both near and far
Attaching The Camera Securely
Use screws or strong adhesive to fix the camera. Tighten screws to keep it from moving.
Seal any holes to stop water from entering. Check the camera after installation to confirm it is steady.
- Clean the surface before attaching the camera
- Use weatherproof materials for durability
- Test camera angle and adjust if needed
- Secure cables to prevent damage or loose connections
Routing The Wiring
Installing a backup camera requires careful wiring inside the car. Proper routing keeps cables safe and neat.
Follow these tips to run wires and protect them from damage while driving.
Running Wires Through The Vehicle
Begin by planning the wiring path from the camera to the monitor or head unit. Look for existing wire channels or gaps in the car’s frame.
- Remove interior panels carefully to access wire routes.
- Use rubber grommets when passing wires through metal parts.
- Route wires away from moving parts and sharp edges.
- Keep wires hidden under carpets or trim for a clean look.
- Measure wire length to avoid slack or tight pulls.
Protecting And Securing Cables
Secure wires firmly to prevent rattles and damage. Use clips, zip ties, and sleeves to organize cables.
| Protection Method | Description |
| Zip Ties | Bundle wires together and attach to fixed points. |
| Wire Loom | Cover wires to shield from abrasion and heat. |
| Adhesive Clips | Stick clips on surfaces to guide and hold cables. |
| Electrical Tape | Wrap wire connections to insulate and secure. |
| Grommets | Protect wires passing through holes in metal or plastic. |

Credit: www.amazon.com
Connecting To Power And Display
Installing a backup camera requires connecting it to power and your car’s display. This guide covers the main connections.
Proper wiring ensures the camera works only when reversing. You also need to connect the video to your monitor or head unit.
Wiring To Reverse Light
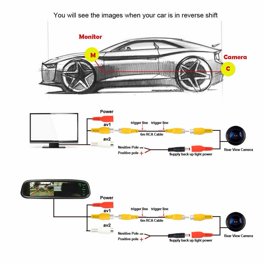
The backup camera gets power from the reverse light circuit. This makes the camera turn on when you shift to reverse.
To connect, locate the wires going to your reverse light. Use a test light or multimeter to find the positive wire.
- Turn off the car and disconnect the battery for safety.
- Find the reverse light wire behind the tail light.
- Use a wire tap or splice connector to connect the camera’s red power wire to the reverse light positive wire.
- Connect the camera’s black wire to a good ground point on the car chassis.
- Secure all wires to avoid loose connections.
Connecting To The Monitor Or Head Unit
The video signal from the camera goes to your car’s monitor or head unit. This shows the camera view on the screen.
Most backup cameras use an RCA video cable. Connect the camera’s video cable to the monitor’s video input port.
- Locate the video input on your monitor or head unit.
- Plug the RCA connector from the camera into the video input port.
- Some monitors need a trigger wire connected to the reverse light circuit to switch the display automatically.
- Test the system by shifting your car into reverse and checking the screen.
Testing The Backup Camera
After installing your backup camera, testing it is important. This ensures the camera works correctly and shows a clear image.
Follow simple checks to confirm the camera’s power and image quality. Also, adjust the angle for the best view behind your car.
Powering Up And Checking The Feed
First, turn on your car and put it in reverse. The backup camera should power on automatically.
- Check if the camera’s LED or indicator light turns on.
- Look at the display screen for a clear picture from the camera.
- Verify the image is stable and free of flickers or lines.
- If no image appears, check the wiring and connections.
- Make sure the camera’s fuse is not blown.
Adjusting Camera Angle
The camera angle affects how much you can see behind your car. Adjust it to cover the widest and safest view.
| Camera Position | What to Check | Adjustment Tip |
|---|---|---|
| Too High | Sees mostly ground, misses low objects | Lower the angle for more rear view |
| Too Low | Sees mostly bumper, misses far back | Raise the angle to see farther |
| Centered | Balanced view of ground and distance | Fine tune left or right if needed |
Troubleshooting Common Issues
Installing a backup camera on your car is helpful for safety. Sometimes, problems can happen after installation.
This guide helps you fix common issues with your backup camera. Check these tips if your camera does not work right.
No Signal Or Display
If your screen stays blank or shows no signal, the camera may not be connected properly. Check all cable connections first.
Make sure the video cable is plugged into the correct port. Check if the camera power is on and the fuse is not blown.
- Inspect video cable for damage or loose connections
- Verify the camera is getting power
- Check the fuse for the camera circuit
- Confirm the display input matches the camera output
Poor Image Quality
If the image looks blurry, dark, or has lines, the lens may be dirty or damaged. Clean the camera lens with a soft cloth.
Also, check if the camera angle is correct. Adjust it to get a clear view behind your car. Use quality cables to avoid interference.
- Clean the camera lens regularly
- Adjust camera angle to improve view
- Use shielded video cables to reduce noise
- Replace damaged cables or camera if needed
Power Problems
If your backup camera does not turn on, it may have power issues. Check the power source and wiring for any problems.
Look at the car battery connection and the camera’s power cable. Make sure the camera is connected to the reverse light power wire, so it turns on when you reverse.
- Test the power cable for breaks or loose ends
- Verify connection to the reverse light power wire
- Check car battery voltage and fuse box
- Replace blown fuses or faulty wiring
Maintaining Your Backup Camera
Keeping your backup camera clean and checked helps it work well. A clear camera gives you a better view when reversing.
Regular care can stop problems and keep your camera safe from damage. Here are simple ways to maintain your backup camera.
Cleaning Tips
Clean the camera lens often to remove dirt and dust. Use a soft cloth to avoid scratches on the lens.
Do not use harsh chemicals. Water and mild soap work best. Dry the lens gently after cleaning.
- Use a microfiber cloth or soft cotton cloth
- Apply a small amount of mild soap with water
- Wipe the lens softly without pressing hard
- Dry the lens to avoid water spots
Regular Inspections
Check the camera and wiring often for damage or loose connections. Make sure the camera stays in place and points correctly.
Look for cracks, fog, or water inside the camera lens. Fix any issues quickly to keep the camera working well.
- Inspect camera mount and screws for tightness
- Look for damaged or worn wires
- Check for moisture inside the camera case
- Confirm the camera angle is clear and correct
Frequently Asked Questions
How Do I Install A Backup Camera On My Car?
First, choose a compatible backup camera kit. Mount the camera at the rear, usually near the license plate. Connect the camera to your car’s power source and display unit. Test the camera to ensure proper alignment and function before finalizing the installation.
What Tools Are Needed For Backup Camera Installation?
You will need a drill, screwdrivers, wire strippers, electrical tape, and a voltage tester. A multimeter helps in identifying power wires. Having zip ties and mounting brackets is useful for securing cables and the camera.
Can I Install A Backup Camera Without Professional Help?
Yes, many backup cameras come with detailed instructions for DIY installation. Basic knowledge of car electrical systems is helpful. Follow safety precautions and take your time to ensure correct wiring and mounting.
How Long Does Backup Camera Installation Take?
Installation usually takes between 1 to 3 hours, depending on your car model and skill level. More complex setups may take longer. Preparing all tools and reading instructions beforehand can speed up the process.
Conclusion
Installing a backup camera improves safety. It helps see blind spots easily. Follow the steps and install it yourself. No need for professional help. Just gather the right tools and equipment. Carefully connect the wires to avoid issues. Test the camera for proper functioning.
Enjoy safe and stress-free driving. A backup camera makes parking easier too. Once installed, you’ll wonder how you managed without it. Feel more confident on the road with this simple addition. Happy driving!