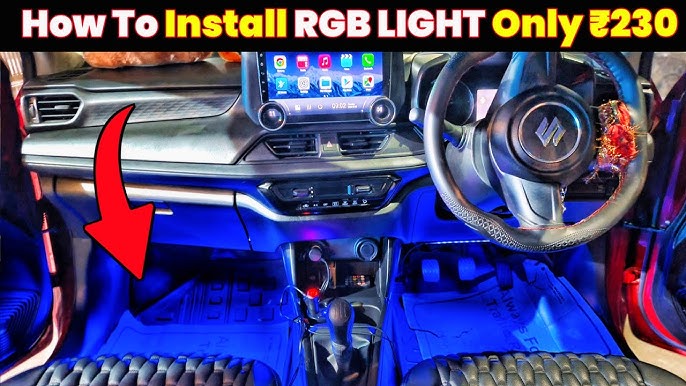
Are you ready to give your car a sleek, modern look that turns heads everywhere you go? Installing LED light strips on your car is one of the easiest and most affordable ways to upgrade its style and visibility.
But if you’ve never done it before, the idea of wiring and sticking those tiny lights might feel overwhelming. Don’t worry—you’re in the right place. This guide will walk you through every step, making the process simple and stress-free. By the end, you’ll know exactly how to install car LED light strips like a pro and enjoy that cool glow every time you hit the road.
Keep reading to find out how!

Credit: www.amazon.com
Choosing The Right Led Strips
Installing LED light strips in your car can add style and improve visibility. Picking the right LED strips is important for a good result.
This guide helps you understand types, brightness, colors, and waterproof ratings of LED strips.
Types Of Led Strips
There are different LED strips for car use. You should know the main types before buying.
- Single Color LED Strips:Light up with one color, like white or red.
- RGB LED Strips:Offer many colors by mixing red, green, and blue LEDs.
- Addressable LED Strips:Allow control of each LED for effects and patterns.
Brightness And Color Options
Brightness is measured in lumens. Higher lumens mean brighter light. Choose brightness based on where you want to install the strips.
| Brightness Level | Use Case | Approximate Lumens |
| Low | Ambient or decorative lighting | 100-300 |
| Medium | Interior lighting or accent lighting | 300-700 |
| High | Exterior lighting or undercarriage | 700+ |
Color options include fixed colors or changeable RGB modes. Pick colors that match your car style or needs.
Waterproof Ratings
Waterproof rating tells you if the LED strip can handle water and dust. This is important for outdoor or undercarriage use.
- IP20:No water protection, good for dry interior areas.
- IP65:Protected against water jets, can handle light rain.
- IP67:Can be submerged in water up to 1 meter for short times.
- IP68:Can be submerged deeper and longer, best for wet environments.
Credit: www.amazon.ca
Preparing For Installation
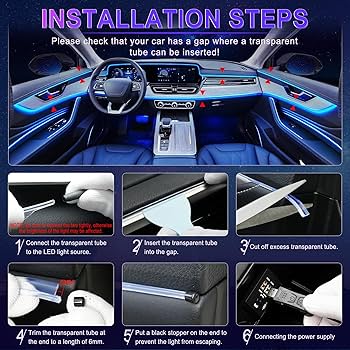
Installing car LED light strips needs careful preparation. This helps the strips stick well and work properly.
Before starting, you should get the right tools, clean the area, and plan where to place the strips.
Gathering Necessary Tools
Having the right tools makes the installation smooth and safe. You do not want to stop midway to find something.
- LED light strips kit
- Clean cloth or wipes
- Rubbing alcohol or cleaner
- Measuring tape or ruler
- Electrical tape or clips
- Wire cutters or scissors
- Screwdriver (if needed)
- Power source or adapter
Cleaning The Installation Area
Cleaning the surface helps the LED strips stick better. Dirt or dust can cause the strips to fall off.
Use a clean cloth with rubbing alcohol to wipe the area. Let it dry fully before attaching the strips.
Planning The Strip Placement
Decide where you want to place the LED strips before sticking them. This saves time and avoids mistakes.
Measure the length of the area and check the strip length. Make sure the strips fit and look good.
- Front bumper edges
- Under the dashboard
- Along door panels
- Under the seats
- Trunk edges
Wiring The Led Strips
Wiring LED light strips in your car needs care and attention. Proper wiring ensures your lights work safely and well.
This guide will help you connect the LED strips to your car’s power system without causing damage.
Understanding Your Car’s Electrical System
Your car uses a 12-volt electrical system. It powers all the lights and devices inside your vehicle.
Learn where to find the battery, fuse box, and ground points before wiring the LED strips.
- The battery is the main power source
- The fuse box protects electrical parts
- Ground points complete the electrical circuit
Connecting To The Power Source
Connect the positive wire of the LED strip to the car battery’s positive terminal or fuse box.
Attach the negative wire to a clean, metal ground point on the car frame for a good connection.
- Use wire connectors for secure joins
- Avoid loose wires to stop short circuits
- Keep wires away from moving parts
Using A Fuse For Safety
Always use a fuse between the power source and LED strips. It protects your car from electrical damage.
Choose a fuse rated slightly higher than the LED strip’s current draw. This prevents blowing the fuse unnecessarily.
- Install the fuse close to the battery
- Check fuse size in LED strip instructions
- Replace blown fuses with the same rating
Mounting The Led Strips
Mounting LED light strips on your car is a simple task. It helps to brighten your vehicle and add style.
Follow these tips to attach the strips safely and securely. Proper mounting keeps the strips working well.
Peeling And Sticking The Strips
Start by cleaning the surface where you want to place the strips. Dirt and dust make the tape less sticky.
Carefully peel off the tape backing from the LED strip. Press the strip firmly onto the surface in a straight line.
- Clean surface with rubbing alcohol
- Peel tape backing slowly
- Press strip evenly without bubbles
Securing With Clips Or Adhesive
Use clips or extra adhesive for more security. Clips help hold the strip in place on curved or rough areas.
Choose automotive-safe adhesive if extra stickiness is needed. Attach clips or glue evenly along the strip.
- Use plastic clips for curves
- Apply strong automotive glue if needed
- Space clips evenly every few inches
Avoiding Heat And Moisture
Place LED strips away from hot engine parts. Heat can damage the lights or cause them to fall off.
Avoid areas where water pools or moisture collects. Moisture can cause electrical problems or corrosion.
- Mount strips away from the engine block
- Keep strips clear of wheel wells and splash zones
- Check for water exposure during rain or washes
Testing The Lights
After installing your car LED light strips, testing ensures they work properly. This step helps spot any issues early.
Follow these checks carefully to confirm your lights are ready to use.
Powering On The Strips
Connect the LED strips to the car’s power source. Turn on the car ignition or switch to power mode. Observe if the strips light up immediately.
Checking For Proper Function
Look for these signs to confirm the strips function well:
- All sections of the strip glow evenly.
- Colors appear bright and consistent.
- Lights respond correctly if using a remote or switch.
- No flickering or dim spots occur.
- Heat from the strips stays at a safe level.
Troubleshooting Common Issues
| Issue | Cause | Solution |
| Lights do not turn on | Power connection loose | Check and secure wiring |
| Flickering lights | Voltage drop or poor contact | Inspect connectors and power source |
| Some sections off | Damaged LED strip part | Replace damaged strip section |
| Colors incorrect | Wrong wiring or remote issue | Verify wiring and reset remote |
Final Adjustments And Maintenance
After installing your car LED light strips, it is important to make final adjustments. Proper maintenance will keep the lights bright and safe to use. This guide covers key steps to tidy wires, clean lights, and replace parts if needed.
Following these tips will help your LED strips last longer and look their best on your car.
Tucking Away Wires
Tidy wires prevent damage and keep your car interior neat. Use wire clips or zip ties to hold cables in place. Avoid sharp edges or moving parts that may cut the wires.
- Route wires along car panels or under trim pieces
- Secure wires with clips or zip ties every few inches
- Keep wires away from heat sources like the engine
- Test the lights before finalizing wire placement
Cleaning The Led Strips
Regular cleaning removes dust and grime that dull the light. Use a soft cloth with mild soap and water. Avoid harsh chemicals that can damage the strip surface.
| Cleaning Tip | Details |
| Use Soft Cloth | Prevents scratches on LED cover |
| Mild Soap | Removes dirt without damage |
| Avoid Water Pooling | Prevents electrical issues |
| Dry Completely | Stops moisture buildup |
Replacing Damaged Sections
If a section of your LED strip stops working, replace it carefully. Cut the damaged part at the marked lines. Connect a new strip of the same type using solder or quick connectors.
- Turn off power to avoid shocks
- Identify the damaged section clearly
- Cut only at the designated cut points
- Attach new strip using connectors or soldering
- Test the new section before securing in place

Credit: perfectdealz.co.za
Frequently Asked Questions
How Do I Install Car Led Light Strips Safely?
To install car LED light strips safely, disconnect the battery first. Clean the surface before applying strips. Use appropriate connectors and avoid water exposure. Secure wires properly to prevent damage during driving.
What Tools Are Needed For Led Light Strip Installation?
You need a screwdriver, wire stripper, electrical tape, and connectors. A multimeter helps check voltage and connections. Clean cloth and alcohol wipes ensure a good surface for adhesion.
Can Led Light Strips Be Installed On Any Car Surface?
LED strips can be installed on smooth, clean surfaces like dashboards or door panels. Avoid rough, curved, or oily areas to ensure strong adhesion and proper lighting effect.
How To Connect Led Strips To Car Power Source?
Connect LED strips to a 12V power source, typically the fuse box or battery. Use a fuse tap for safety. Ensure proper polarity and secure connections to avoid shorts.
Conclusion
Installing car LED light strips can enhance your vehicle’s look and safety. Follow the steps carefully to avoid mistakes. Take your time to measure and place the strips correctly. Use proper tools and connect wires firmly. Test the lights before finalizing the setup.
Enjoy the bright, stylish glow on your car. Small effort brings big changes to your ride. Keep your car lights clean for the best effect. Ready to drive with a fresh new style?