
Installing a central vacuum system might seem like a daunting task, but it can transform the way you clean your home. Imagine a space free from the noise and hassle of dragging a vacuum cleaner from room to room.
With a central vacuum, you’ll enjoy a quieter, more efficient cleaning experience. You might be wondering how to start, what tools you’ll need, or if you can do it yourself. The good news is, with the right guidance, you absolutely can! This guide will walk you through each step, making the process straightforward and stress-free.
By the end of this article, you’ll have the knowledge and confidence to install your own central vacuum system, enhancing the cleanliness and value of your home. Let’s dive in and discover how simple it can be!

Credit: superiorvacuums.ca
Benefits Of Central Vacuum Systems
Central vacuum systems offer many benefits that improve daily cleaning and home health. They provide a powerful and effective way to keep your living space clean. These systems also help maintain better air quality and add value to your home. Understanding these benefits can help you decide if this system suits your needs.
Improved Air Quality
Central vacuum systems remove dust and allergens from your home effectively. Unlike portable vacuums, they expel dirt outside the living area. This reduces the amount of dust and allergens circulating in your rooms. It helps people with allergies or asthma breathe easier. Cleaner air means a healthier environment for your family.
Convenience And Efficiency
These systems make cleaning easier and faster. You only need to carry a lightweight hose and cleaning tools. There is no heavy vacuum to drag around. The system’s power is stronger than most portable vacuums. It cleans carpets, floors, and hard-to-reach places well. This saves time and effort during your cleaning routine.
Increased Home Value
Installing a central vacuum system can raise your home’s market appeal. Many buyers see it as a modern and valuable feature. It shows that the home is well-maintained and has quality upgrades. This system adds long-term value to your property. It can make your home stand out in a competitive market.
Planning Your Installation
Planning your central vacuum installation ensures smooth setup and effective cleaning. Good planning saves time and avoids costly mistakes. It involves selecting the right system, deciding on hose routes, and choosing the power unit’s location. Each step matters to create a system that works well with your home layout.
Choosing The Right System
Pick a system based on your home size and cleaning needs. Smaller homes may only need a basic unit. Larger homes require more powerful systems with multiple inlets. Consider features like noise level and filter type. Check energy efficiency and warranty terms. Choose a system that matches your budget and lifestyle.
Mapping Out Vacuum Hose Routes
Plan the paths where vacuum hoses will run inside walls. Avoid sharp bends to keep suction strong. Keep hose runs short and direct. Mark all inlet valve locations on a house plan. Aim for easy access in main rooms and hallways. Ensure routes do not interfere with plumbing or electrical wiring.
Selecting Power Unit Location
Locate the power unit in a central, dry, and ventilated space. Common places include basements, garages, or utility rooms. The spot should allow easy access for maintenance. Avoid noisy areas near bedrooms. Ensure the location has proper electrical connections and drainage if needed.
Tools And Materials Needed
Gathering the right tools and materials is the foundation of a smooth central vacuum installation. Without the proper equipment, you risk delays and frustration. Let’s break down exactly what you’ll need to get started and keep your project on track.
Essential Installation Tools
Having the correct tools ready saves you time and effort during installation. Basic hand tools like a drill, screwdriver set, and a stud finder are must-haves. A pipe cutter or a fine-toothed saw ensures clean cuts on your vacuum pipes.
Don’t forget a tape measure and a level to ensure precise placement of pipes and fittings. A vacuum hose or compressed air can clear out debris from pipes after cutting. You might also want a hole saw for drilling through walls or floors.
Vacuum Pipes And Fittings
Choosing the right pipes and fittings is crucial for optimal airflow and suction power. Most systems use PVC or ABS pipes designed specifically for central vacuums. These pipes come in various diameters; 2-inch pipes are common for main lines, while 1.25-inch pipes often serve branch lines.
Fittings like elbows, tees, and couplers help you navigate corners and connect multiple pipes smoothly. Make sure to get mounting brackets or straps to secure the pipes firmly inside walls or basements. Remember, tight connections prevent air leaks that reduce vacuum efficiency.
Electrical Components
Your central vacuum system needs power, so electrical components are part of the package. You’ll require wiring suitable for your vacuum unit’s voltage, typically 120V or 240V. A dedicated circuit breaker or fuse is essential for safety and to avoid overloads.
Don’t overlook low-voltage wiring for the system’s on/off switches at each inlet valve. Using the correct gauge wire ensures reliable communication between the valve and the central unit. Planning your electrical layout thoughtfully makes later use effortless and safe.

Credit: evacuumstore.com
Step-by-step Installation Process
Installing a central vacuum system may seem complex at first, but breaking down the process into clear tasks makes it manageable. Each part of the installation plays a crucial role in ensuring the system works efficiently and lasts for years. Let’s dive into the key steps you’ll take to bring your central vacuum to life.
Installing The Power Unit
Choose a dry, easily accessible area for the power unit, like a garage or basement. Make sure it’s close to an electrical outlet and has enough space for proper ventilation.
Mount the unit securely on the wall using the provided brackets. This keeps it off the floor and reduces noise and vibration. Once mounted, double-check the unit is level and stable before proceeding.
Running Pvc Pipes Through Walls
Plan your pipe routes carefully to minimize bends, which can reduce suction power. Use PVC pipes designed for central vacuum systems—they’re smooth inside and prevent debris buildup.
Cut holes in walls or ceilings where the pipes will pass, keeping them hidden as much as possible. Secure pipes with brackets and use PVC cement to join sections tightly, preventing air leaks that weaken suction.
Mounting Inlets And Outlets
Place inlet valves in convenient locations around your home for easy access. Think about where you usually vacuum—hallways, living rooms, and bedrooms are good spots.
Cut openings for the inlets, then attach the valve plates firmly to the wall. These inlets connect to the pipe network, so make sure the connections are tight and the valves open and close smoothly.
Connecting Electrical Wiring
Central vacuum systems often require low-voltage wiring to control the power unit from each inlet. Run the electrical wiring alongside the PVC pipes but keep them separate to avoid interference.
Connect wires to the terminals on the power unit and the inlet valves. Test each connection to ensure the system powers on when you insert the vacuum hose—this step confirms your wiring is correct.
Testing And Troubleshooting
Testing and troubleshooting are key steps after installing a central vacuum system. This ensures the system works correctly and cleans efficiently. Identifying issues early prevents bigger problems and keeps the system running smoothly.
Checking Airflow And Suction
Start by checking the airflow at each inlet valve. Open a valve and turn on the vacuum system. Place your hand near the opening to feel the suction power. Strong suction means good airflow. Weak suction suggests blockages or leaks.
Use a manometer or airflow meter for precise measurement. Compare readings to the manufacturer’s specifications. Low airflow can mean clogged pipes, loose connections, or a dirty filter. Clear any blockages and tighten fittings as needed.
Common Installation Issues
- Loose pipe connections causing air leaks
- Improper pipe slope leading to dirt buildup
- Blocked or crushed vacuum pipes
- Incorrect placement of inlet valves
- Dirty or clogged filters and bags
Check all pipe joints for tight seals. Pipes should slope slightly toward the power unit. Remove any obstacles inside the pipes. Confirm inlet valves are easy to reach and well spaced. Replace or clean filters regularly.
Maintenance Tips For Longevity
- Empty dirt canister or replace bags often
- Clean or replace filters every 3-6 months
- Inspect pipes yearly for cracks or leaks
- Test suction at each inlet every few months
- Keep the power unit area clean and dry
Regular maintenance keeps the system efficient and extends its life. Schedule checks and cleaning to avoid costly repairs. A well-maintained central vacuum makes home cleaning easier and faster.
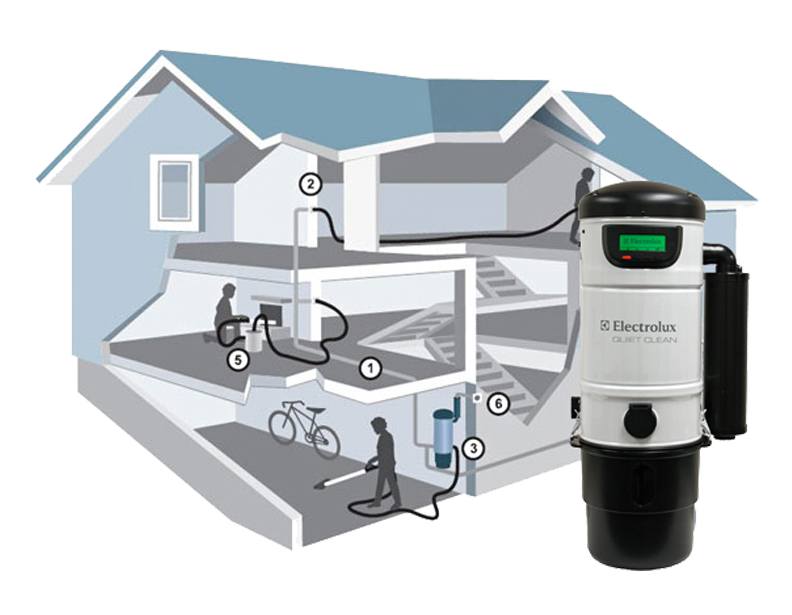
Credit: evacuumstore.com
Frequently Asked Questions
What Tools Are Needed To Install A Central Vacuum System?
You need PVC pipes, fittings, a power unit, wall inlets, and mounting hardware. Basic tools include a drill, screwdriver, pipe cutter, and measuring tape for proper installation.
How Long Does It Take To Install Central Vacuum?
Installation usually takes 1 to 2 days depending on house size and complexity. Proper planning and professional help can speed up the process efficiently.
Can I Install A Central Vacuum Myself?
Yes, if you have basic DIY skills and tools. Follow instructions carefully, plan pipe routes, and test the system for leaks to ensure success.
Where Should Central Vacuum Inlets Be Placed?
Place inlets in central, accessible locations like hallways and large rooms. This ensures easy cleaning and reduces the need for long hose extensions.
Conclusion
Installing a central vacuum can make cleaning easier and faster. Follow the steps carefully to avoid mistakes. Take your time and check each connection. A well-installed system lasts for many years. Enjoy cleaner floors and better air quality at home.
Start your project with confidence and patience. Small efforts bring great results in the end. Now, you know how to install central vacuum yourself.