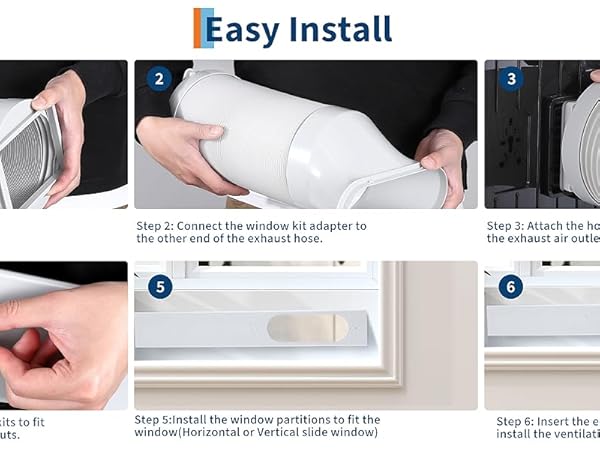
Are you tired of feeling sticky and uncomfortable during hot days? Installing a portable air conditioner window kit can be the quick fix you need to cool down your space without hassle.
But if you’re worried it might be complicated or time-consuming, don’t be. This guide will walk you through simple, step-by-step instructions that anyone can follow. By the end, you’ll know exactly how to set it up so you can enjoy cool air fast.
Ready to get started and beat the heat? Let’s dive in!

Credit: www.dreo.com
Choosing The Right Location
Choosing the right location for your portable air conditioner window kit is important. It affects how well the unit cools your room.
Consider window size, power access, and airflow before installing the kit. This guide helps you select the best spot.
Measuring Window Dimensions
Measure your window carefully to ensure the kit fits properly. A tight fit prevents air leaks and improves cooling.
- Use a tape measure to find the width and height of the window opening.
- Check if the window slides or opens outward.
- Note any obstructions like window locks or handles.
- Compare measurements with the kit’s size requirements.
Checking Electrical Outlet Access
Your air conditioner needs a nearby power source. Check the outlet’s location before installation.
| Outlet Feature | Why It Matters |
| Distance from window | Keep power cord length in mind |
| Type of outlet | Use a grounded outlet for safety |
| Voltage rating | Match unit’s power needs |
| Condition | Avoid damaged or loose outlets |
Ensuring Proper Ventilation
Good airflow removes hot air from the unit. Make sure the location allows proper venting.
Check these points for ventilation:
- Keep the exhaust hose straight and short.
- Do not block the window or vents.
- Avoid placing the unit near curtains or furniture.
- Choose a spot with fresh air outside the window.
Gathering Necessary Tools
Installing a portable air conditioner window kit needs some tools. Getting these tools ready makes installation easier.
Having the right tools helps you work faster and avoid mistakes. Let’s see what you need.
List Of Required Tools
You need a few simple tools to install the window kit. These tools help you measure, cut, and secure the parts.
- Measuring tape to check window size
- Screwdriver for tightening screws
- Utility knife to cut foam or plastic
- Drill with drill bits for holes
- Level to keep the kit straight
- Marker or pencil to mark measurements
- Safety gloves to protect your hands
Preparing The Installation Area
Clear the window area before you start. Remove curtains, blinds, or screens that block the window.
Clean the window frame and sill. Dirt or dust can stop the kit from fitting well.
- Open the window fully
- Remove window screens
- Clean window frame and sill with a cloth
- Check for any damage or gaps
- Make sure the window locks work
Assembling The Window Kit
Assembling the window kit is key to using your portable air conditioner. The kit fits your window and directs warm air outside.
This guide covers connecting the exhaust hose and extending the window slider panel. Follow each part carefully for best results.
Connecting The Exhaust Hose
Connect the exhaust hose to your air conditioner to vent hot air outside. This helps keep the room cool.
- Attach one end of the exhaust hose to the air conditioner outlet.
- Twist or click the hose until it locks in place.
- Connect the other end of the hose to the window kit’s exhaust port.
- Make sure both ends are secure to avoid air leaks.
Extending The Window Slider Panel
The window slider panel fits into your window frame. Adjust it to match your window width for a tight seal.
| Action | Description |
| Measure Window | Check the width of your window opening. |
| Slide Panel | Extend the slider panel to fit the window width. |
| Secure Panel | Lock the panel in place using the built-in tabs or screws. |
| Insert Seal | Place foam or rubber seal to block gaps and prevent air leaks. |
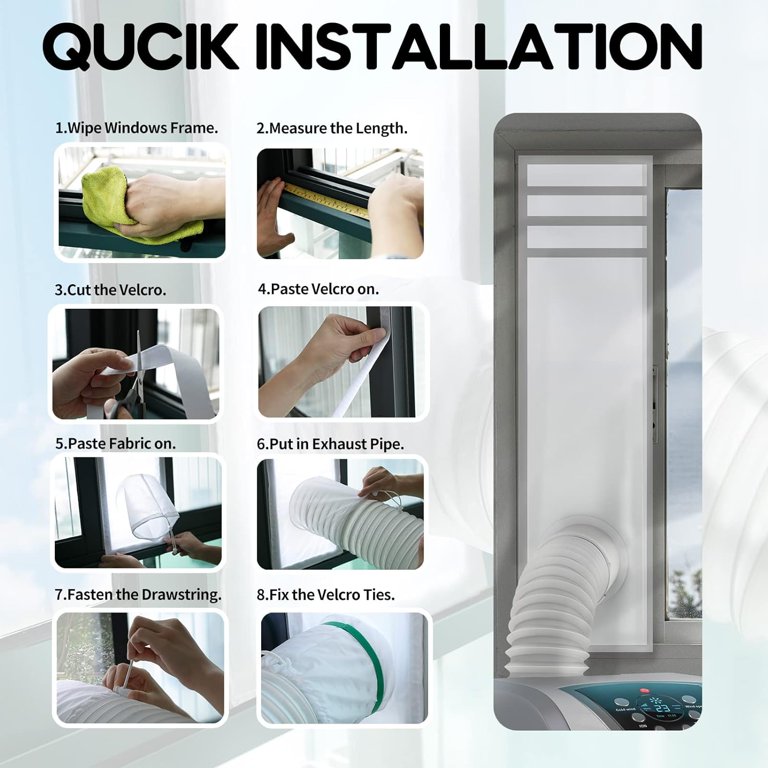
Credit: www.walmart.com
Installing The Window Kit
Installing the window kit is important for your portable air conditioner. It helps vent hot air outside. Follow simple steps to set it up correctly.
This guide shows how to place the slider panel, secure the panel and hose, and seal gaps for better efficiency.
Placing The Slider Panel In The Window
First, open your window enough to fit the slider panel. Slide the panel into the window frame. Adjust the length to fill the window width.
Make sure the panel sits flat and covers the open space. This prevents hot air from coming inside.
Securing The Panel And Exhaust Hose
Attach the exhaust hose to the air conditioner and the panel. Use the included connectors to join them tightly. This directs hot air outside.
Use screws or brackets to fix the panel in place. This stops it from moving or falling out. Check that the hose is not bent or squeezed.
- Connect hose to air conditioner and panel
- Use connectors for a tight fit
- Secure panel with screws or brackets
- Avoid bending or squeezing the hose
Sealing Gaps For Energy Efficiency
Seal any gaps between the slider panel and window frame. Use weather stripping or foam tape to fill spaces. This keeps hot air out and cool air in.
Check all edges and corners. A good seal improves your air conditioner’s performance and saves energy.
- Apply weather stripping along panel edges
- Use foam tape for small gaps
- Check corners for proper sealing
- Reapply sealant if gaps appear over time
Connecting The Air Conditioner
Connecting a portable air conditioner is simple when you follow the right steps. This guide helps you attach the window kit properly.
Focus on connecting the hose and placing the unit near your window for best cooling results.
Attaching The Hose To The Unit
Start by locating the exhaust port on the air conditioner. This is where the hose will connect to vent hot air outside.
Fit the hose connector tightly to the unit’s exhaust port. Make sure it clicks or locks in place to avoid leaks.
- Align the hose connector with the port.
- Push and twist until secure.
- Check for any gaps or loose parts.
- Use tape if needed to seal the connection.
Positioning The Unit Near The Window
Place the air conditioner close to the window where you will install the window kit. This helps the exhaust hose reach outside easily.
Ensure the unit sits on a flat surface and the hose is not bent or stretched. The window should be open enough to fit the window kit securely.
- Choose a stable and level spot near the window.
- Keep the exhaust hose straight for best airflow.
- Leave space around the unit for air intake.
- Make sure the window opens wide enough for the kit.

Credit: www.walmart.com
Testing And Adjustments
After installing the portable air conditioner window kit, it is important to test the unit. This ensures it works well and cools your room efficiently.
Adjustments might be needed to improve performance. Check power, air leaks, and hose setup carefully.
Powering On The Unit
Plug the air conditioner into a power outlet. Turn on the main power switch. Use the control panel to select the cooling mode.
Listen for the fan and compressor. These sounds show the unit is running properly.
Checking For Air Leaks
Look around the window kit for gaps or loose seals. Air leaks reduce cooling efficiency and let warm air in.
- Feel for air blowing or sucking near the edges
- Use weatherstripping to seal small gaps
- Tighten screws or clamps on the window kit
- Replace damaged foam or rubber seals
Adjusting Hose Length And Position
Check the exhaust hose for bends or kinks. A straight hose helps air flow out smoothly.
Shorten the hose if it is too long. Avoid stretching it tightly, which can cause damage.
- Keep the hose as straight as possible
- Use hose brackets or clips to hold it in place
- Make sure the hose connects tightly to the unit and window kit
Maintenance Tips
Maintaining your portable air conditioner window kit helps it last longer. Proper care keeps it working well all season.
Follow simple steps to clean, inspect, and store the kit. This prevents damage and improves performance.
Cleaning The Exhaust Hose
Dust and dirt can build up inside the exhaust hose. Clean it regularly to avoid blockages and keep air flowing.
- Detach the hose from the unit carefully.
- Use a soft brush or cloth to remove dust inside.
- Wash the hose with mild soap and water if very dirty.
- Let it dry completely before reattaching.
Inspecting Seals Regularly
Seals around the window kit stop warm air and insects from entering. Check them often for damage or gaps.
| Inspection Area | What to Check | Action Needed |
| Foam or rubber seals | Cracks or hardening | Replace if damaged |
| Window frame contact | Gaps or loose fit | Adjust or reseal |
| Hose connection | Tightness and cracks | Tighten or repair |
Storing The Kit After Season
Proper storage keeps the window kit safe during the off-season. Clean parts dry and store them in a dry place.
- Remove all parts from the window.
- Clean and dry each piece thoroughly.
- Store the kit in a sealed container or bag.
- Keep it in a cool, dry area away from sunlight.
- Check the kit before next use to ensure no damage.
Frequently Asked Questions
How Do I Install A Portable Ac Window Kit?
First, measure your window’s dimensions. Attach the window kit panels to fit the window. Secure the exhaust hose to the AC unit and window kit. Seal gaps with weatherstripping to prevent air leaks. Follow the manufacturer’s instructions for best results.
What Tools Are Needed For Installation?
You typically need a screwdriver, measuring tape, and possibly a drill. Some kits include mounting hardware. Having a level and weatherstripping tape helps ensure proper sealing and alignment. Always check your specific kit instructions before starting.
Can I Install The Kit In Any Window Type?
Most kits fit sliding or double-hung windows. Casement or awning windows may require special adapters. Always check compatibility before purchasing. Ensure the window can support the unit’s weight safely.
How Do I Prevent Air Leaks During Installation?
Use weatherstripping tape around window panels and exhaust hose connections. Fill any gaps between the window frame and kit panels. Proper sealing improves cooling efficiency and reduces energy costs. Check for leaks after installation.
Conclusion
Installing a portable air conditioner window kit is simple. First, gather your tools. Follow the instructions step by step. Ensure a snug fit to prevent leaks. Proper installation boosts efficiency and comfort. Portable units offer flexibility for cooling different rooms.
Keep your home cool and energy-efficient. With practice, you’ll install it faster each time. Remember, safety first. Check for secure fittings to avoid accidents. Enjoy a cooler home environment during hot days. Always consult the manual for specific guidance. Stay comfortable and relaxed with your portable air conditioner.