Are you ready to make laundry day easier by installing your own washer and dryer connections? You might think it’s complicated, but with the right steps, you can do it yourself quickly and safely.
Imagine having your washer and dryer set up exactly where you want, saving time and money. In this guide, you’ll discover simple instructions that anyone can follow—even if you’re not an expert. Keep reading, and you’ll learn how to get your laundry area up and running without stress or confusion.
Credit: www.mi.com
Gather Necessary Tools
Installing washer and dryer connections needs the right tools. Using proper tools helps the job go smoothly.
Before starting, gather all tools to avoid interruptions. This saves time and effort during installation.
Adjustable Wrench
An adjustable wrench fits different sizes of nuts and bolts. It is important for tightening connections.
This tool lets you work on water supply lines and dryer vent clamps with ease and control.
Screwdrivers
You need both flathead and Phillips screwdrivers. They help secure hose clamps and electrical covers.
Screwdrivers are small but essential for making sure parts stay in place during and after installation.
Pipe Wrench
A pipe wrench helps tighten or loosen plumbing pipes. It is useful for water supply connections.
This tool gives a strong grip on round pipes, ensuring secure and leak-free connections.
Tape Measure
Use a tape measure to check space and pipe lengths. Proper measurement prevents fitting problems.
It helps you place the washer and dryer in the right position with enough room for connections.
Teflon Tape
Teflon tape seals threaded water pipe connections. It prevents leaks in your washer setup.
Wrap the tape around pipe threads before connecting hoses to ensure a tight seal.
Level
A level checks if the washer and dryer stand flat. This stops machines from shaking during use.
Place the level on top of the machines to make sure they are even before finishing the setup.
Pliers
Pliers help grip and twist small parts like hose clamps. They give you more control than your hands.
Use pliers to tighten connections and make sure hoses do not come loose during use.
Choose The Installation Location
Picking the right place for your washer and dryer is important. It affects how well they work and how safe they are.
Consider key factors like water, air flow, and electricity before you start installation.
Check Water Supply Access
Make sure the location has easy access to both hot and cold water lines. This is needed for the washer to work properly.
The water valves should be close by and easy to reach. Check for any leaks or damage before installing.
Ensure Proper Ventilation
Dryers need good airflow to release hot air and moisture. Poor ventilation can cause problems like mold and fire risk.
- Locate near an outside wall for venting
- Keep vents clear of dust and debris
- Use proper venting materials recommended by the dryer manufacturer
- Allow space around the dryer for air circulation
Verify Electrical Outlet Placement
Check that the electrical outlets match your washer and dryer power needs. Dryers usually require a 240-volt outlet.
| Appliance | Voltage | Outlet Type | Distance from Installation |
| Washing Machine | 120 volts | Standard grounded outlet | Within 6 feet |
| Electric Dryer | 240 volts | Four-prong outlet | Within 6 feet |
| Gas Dryer | 120 volts | Standard grounded outlet | Within 6 feet |
Prepare Water Supply Lines
Installing washer and dryer connections starts with preparing the water supply lines. This ensures your appliances get water safely and work properly.
Follow simple steps to set up the connections without leaks or damage. Proper preparation saves time and prevents problems.
Turn Off Main Water Valve
Before working on water lines, turn off the main water valve. This stops water flow and avoids spills or flooding.
Locate the main valve, usually near your water meter or where the pipe enters your home. Turn it clockwise to close it.
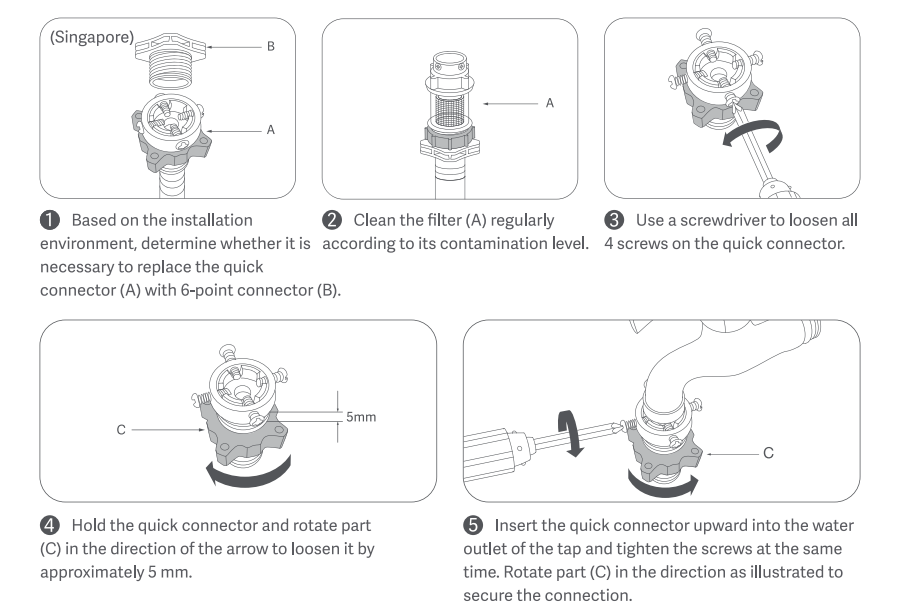
Attach Hot And Cold Water Hoses
Connect the hot and cold water hoses to the correct valves. The hot water hose goes to the hot valve, usually on the left.
Use a wrench to tighten the hoses. Do not over-tighten to avoid damaging the threads or causing leaks.
- Check hose ends for rubber washers
- Attach hoses firmly to valves
- Hand tighten first, then use wrench
- Match hose colors if possible (red for hot, blue for cold)
Check For Leaks
After connecting hoses, turn the main water valve back on. Watch the connections closely for leaks.
If you see any water dripping, tighten the connections a little more. Replace washers if leaks continue.

Credit: www.reddit.com
Install Drain Hose
Installing the drain hose correctly is important for your washer’s proper drainage. The hose directs water from the washer to the drain pipe safely.
This guide shows how to position the drain pipe and secure the hose to avoid leaks and blockages.
Position The Drain Pipe
Place the drain pipe close to your washer. It should be between 18 and 30 inches high from the floor. This height helps water flow without backflow.
- Make sure the pipe is sturdy and fixed to the wall.
- Use a standpipe if possible for better drainage.
- Check that the pipe opening is not blocked or too narrow.
- Keep the pipe free from bends or kinks.
Secure Hose With Clamps
Attach the drain hose firmly to the drain pipe. Use clamps to keep it tight and prevent water leaks during washer cycles.
| Clamp Type | Use | Tip |
| Worm Gear Clamp | Best for flexible hoses | Tighten but do not over-squeeze |
| Spring Clamp | Good for quick installation | Check clamp pressure regularly |
| Oetiker Clamp | Permanent secure fit | Use proper tool to install |
Set Up Electrical Connections
Setting up electrical connections for your washer and dryer is important for safety and performance. Follow clear steps to connect everything properly.
This guide helps you identify power needs, connect the dryer, and test electrical safety.
Identify Power Requirements
Check the power requirements on your washer and dryer labels. Most dryers need a 240-volt outlet, while washers usually use 120 volts.
- Read the appliance manual for voltage and amperage
- Make sure your home’s circuit matches the appliance’s needs
- Use dedicated circuits to avoid overloads
Connect Dryer To Power Source
Turn off power at the breaker before connecting the dryer. Use the correct plug type for your dryer’s power cord.
| Power Cord Type | Voltage | Amperage | Plug Style |
| 3-Prong | 240V | 30A | NEMA 10-30 |
| 4-Prong | 240V | 30A | NEMA 14-30 |
Secure the power cord to the dryer terminal block. Tighten screws and connect ground wires properly.
Test Electrical Safety
After connections, restore power and test your dryer and washer for safe operation.
- Use a voltage tester to check the outlet
- Ensure the dryer starts and runs without tripping breakers
- Listen for unusual noises or smells during operation
- Inspect cords for heat or damage after a short test run
Vent The Dryer Properly
Installing dryer connections is essential for safety and efficiency. Proper venting ensures your dryer works well and reduces fire risks. Follow these steps to vent your dryer correctly.
Select Vent Duct Type
Choosing the right vent duct is crucial for proper airflow. There are several types available, but not all are suitable for every home.
- Rigid metal ducts are durable and efficient.
- Flexible metal ducts are easier to install.
- Plastic ducts are not recommended due to fire hazards.
Attach Vent Hose
Once you have selected the duct type, attach the vent hose to the dryer. Make sure it fits snugly and securely.
Ensure the hose is not kinked or crushed. This can restrict airflow and cause overheating.
Seal And Secure Vent
Sealing the vent is important to prevent air leaks. Use metal foil tape to secure the connections tightly.
Avoid using duct tape as it can lose adhesion over time. Check all connections to ensure they are secure and airtight.
Level And Position Washer And Dryer
Setting up your washer and dryer correctly is important. It helps them run smoothly and last longer.
Make sure both machines are level and well-positioned. This reduces noise and prevents damage.
Adjust Legs For Stability
Ensure the washer and dryer sit flat on the floor. Adjusting the legs is key to stability.
| Tool | Purpose |
| Wrench | Turn the legs |
| Level | Check evenness |
Leave Adequate Space Around Units
Space around the washer and dryer is crucial. It ensures airflow and easy access.
- Keep at least 1 inch on sides.
- Leave 6 inches at the back.
- Ensure 1 foot in front for door opening.
Run Initial Test Cycle
After installing your washer and dryer connections, running a test cycle is important. This ensures everything works correctly and safely.
During the test, watch and listen carefully for any problems. Fix any issues before using the machines regularly.
Check For Water Leaks
Turn on the washer and let it fill with water. Look closely at all water connections for drips or puddles.
- Inspect hose connections at the back of the washer.
- Check the water supply valves for tight seals.
- Watch the drain hose for any leaks or cracks.
- Make sure the washer tub does not overflow.
Listen For Unusual Noises
Run the washer and dryer through a short cycle. Pay attention to any sounds that seem strange or loud.
| Noise Type | Possible Cause | Action |
| Rattling | Loose parts or objects inside | Check and tighten parts |
| Grinding | Worn motor or belt | Inspect and replace parts |
| Thumping | Unbalanced load | Adjust load and level machine |
| Whistling | Air or vent blockage | Clear vents and hoses |
Ensure Dryer Venting Efficiency
Proper dryer venting helps clothes dry faster and stops fire risks. Check the vent path for blockages or damage.
Follow this checklist to ensure good dryer venting:
- Confirm the vent hose is firmly attached to the dryer.
- Make sure the vent hose is not crushed or kinked.
- Clean lint from the vent hose and outside vent.
- Check that the outside vent flap opens freely.
- Use rigid or semi-rigid metal venting, not plastic.

Credit: www.reddit.com
Frequently Asked Questions
What Tools Are Needed For Washer And Dryer Installation?
You need a wrench, screwdriver, pliers, drill, and level. Also, have water supply hoses, vent duct, and electrical cords ready. These tools ensure proper and safe installation of washer and dryer connections.
How Do I Connect The Water Supply For My Washer?
Attach the hot and cold water hoses to the corresponding taps. Tighten securely to avoid leaks. Connect the other ends to the washer’s water inlets. Turn on water supply to check for leaks before use.
How To Properly Vent A Dryer Outside?
Use a rigid or semi-rigid metal vent pipe to connect the dryer to the outside vent. Avoid plastic or foil vents. Secure connections with clamps and ensure the vent outlet is clear of obstructions for safe drying.
What Electrical Connections Are Required For Washers And Dryers?
Washers usually need a standard 120-volt outlet. Dryers often require a 240-volt outlet. Ensure the power source matches your appliance’s specifications. Use proper grounding and avoid extension cords for safety and efficiency.
Conclusion
Installing washer and dryer connections can be simple and safe. Follow each step carefully and take your time. Check all connections for leaks or loose parts. Use the right tools and materials for best results. Proper installation saves water, electricity, and prevents damage.
You can enjoy clean clothes without worry. Always remember safety first when working with water and electricity. A well-installed laundry setup makes your home more comfortable. Try these tips and feel confident in your work.