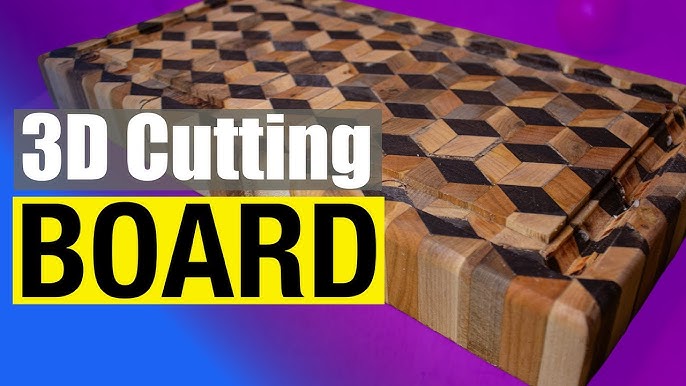
Are you ready to create something unique and useful for your kitchen? Making 3D cutting boards is easier than you think, and the results are impressive.
Imagine a cutting board that isn’t just flat but has depth and style, making your kitchen stand out. In this guide, you’ll learn simple steps to craft your own 3D cutting board, even if you’ve never worked with wood before.
By the end, you’ll have a beautiful, personalized piece that’s both functional and a conversation starter. Keep reading, and let’s bring your kitchen creativity to life!
Materials And Tools Needed
Making 3D cutting boards requires specific materials and tools. Picking the right items helps you create a safe and beautiful board.
This guide covers the wood types, essential tools, and safety gear you need for the project.
Choosing The Right Wood
Select hardwoods that are safe for food and durable. Avoid soft woods because they can get damaged easily.
Good wood choices make your cutting board last longer and look great.
- Maple – strong and food safe
- Walnut – dark color and durable
- Cherry – smooth and rich color
- Beech – tight grain and sturdy
Essential Tools For 3d Cutting Boards
You need tools that help shape and smooth the wood. Each tool has a specific job in making the 3D design.
- Table saw or circular saw to cut wood pieces
- Router for creating 3D edges and shapes
- Orbital sander to smooth the surface
- Clamps to hold wood firmly while gluing
- Wood glue for strong joints
- Measuring tape and square for accurate cuts
Safety Gear And Precautions
Working with wood and power tools can be dangerous. Use safety gear to protect yourself from injury.
Follow safety rules and work carefully to avoid accidents.
- Safety glasses to protect your eyes
- Hearing protection like earplugs or earmuffs
- Dust mask to avoid breathing wood dust
- Gloves for hand protection (use carefully with power tools)
- Keep your work area clean and well-lit
- Read instructions before using any tool

Credit: www.youtube.com
Design Planning
Planning your 3D cutting board design helps ensure a smooth project. It guides your wood choice, pattern, and colors.
Good planning saves time and materials. It also makes your board look attractive and unique.
Selecting A 3d Pattern
Choose a pattern that fits your skill level and tools. Simple shapes suit beginners, while complex ones need more experience.
- Look for patterns with clear lines
- Consider the size of the board
- Pick a design that fits your kitchen style
- Use online resources for inspiration
Sketching Your Design
Draw your pattern on paper before cutting wood. This helps spot mistakes early and plan the cuts well.
| Sketching Tool | Purpose |
| Pencil | Make light lines for easy changes |
| Ruler | Draw straight lines |
| Eraser | Fix mistakes quickly |
| Colored Pencils | Show different wood colors |
Choosing Wood Grain And Colors
Wood grain and colors affect the board’s look and feel. Pick wood types that match your design’s style.
- Use light woods like maple for contrast
- Add darker woods like walnut for depth
- Match grain direction with the pattern flow
- Test wood samples before cutting
Preparing The Wood
Preparing the wood is an important first step to make 3D cutting boards. It helps the pieces fit well and look good.
Good preparation makes the cutting board strong and smooth. Take your time to get this right.
Cutting Wood Pieces To Size
Start by cutting the wood into small pieces. Each piece should have the right size for the design.
Use a saw to cut straight lines. Check the measurements twice before cutting to avoid mistakes.
- Measure each piece carefully
- Cut with a sharp saw
- Keep pieces uniform in thickness
- Label pieces to remember their place
Sanding And Smoothing
After cutting, sand each wood piece. Sanding removes rough edges and splinters.
Use fine sandpaper for a smooth finish. Smooth pieces fit better and look nicer.
- Start with medium grit sandpaper
- Finish with fine grit for smoothness
- Sand edges and flat surfaces
- Wipe off dust after sanding
Arranging Pieces For 3d Effect
Arrange the wood pieces to create a 3D design. Use different heights and angles for depth.
Lay out the pieces before gluing. This helps you see the final look and make changes.
- Place taller pieces in the center or as highlights
- Use shorter pieces around taller ones
- Mix wood colors for contrast
- Make sure pieces fit tightly together

Credit: www.youtube.com
Assembling The Board
Putting together a 3D cutting board needs care and attention. This step makes sure your board stays strong and looks great. Follow these tips to assemble it right.
We will cover three key parts: gluing, clamping, and checking the fit. Each part helps build a sturdy and neat cutting board.
Gluing Techniques For Stability
Use wood glue that is strong and dries clear. Apply glue evenly on all surfaces to join. Avoid too much glue to stop mess and weak spots.
- Spread glue with a brush or stick for full coverage
- Press pieces together firmly to avoid gaps
- Remove extra glue quickly with a damp cloth
- Use glue suitable for kitchen use and moisture resistance
Clamping And Drying Times
Clamps hold the board pieces tight while the glue dries. Keep the pressure even across the surface. Let the board dry for the best strength.
| Clamping Type | Recommended Drying Time | Pressure Tips |
|---|---|---|
| Bar Clamp | 1 to 2 hours | Apply steady, medium pressure |
| Pipe Clamp | 2 to 3 hours | Check for even pressure on all parts |
| Spring Clamp | 30 minutes to 1 hour | Use for small areas only |
Checking Alignment And Fit
After clamping, remove clamps carefully. Check if all pieces line up well. Sand any rough edges or uneven spots for a smooth finish.
- Look for gaps or misaligned edges
- Test the board surface with your hand for smoothness
- Use a square tool to check right angles
- Fix small issues with light sanding or trimming
Shaping And Carving
Shaping and carving add beauty and function to 3D cutting boards. These steps help create unique designs and textures. Careful work makes the board safe to use and nice to look at.
Use the right tools and techniques to shape wood. This guide covers ways to add depth and texture, use routers and carving tools, and refine edges and details.
Creating Depth And Texture
Depth and texture bring your cutting board to life. Start by marking the areas to carve. Use chisels, gouges, or sandpaper to add layers and patterns. This makes the board more interesting and unique.
- Draw your design on the wood surface
- Use chisels to remove thin layers
- Sand edges for smooth transitions
- Carve grooves or patterns for texture
- Check depth often to keep balance
Using Router And Carving Tools
Routers and carving tools help shape wood quickly and accurately. They can create curves, hollows, and detailed designs. Choose bits that match your design style.
| Tool | Purpose | Tip |
| Router | Create smooth curves and edges | Use guide templates for accuracy |
| Carving Knife | Detail small areas and shapes | Keep blade sharp for clean cuts |
| Gouge | Remove wood in curved patterns | Work with the grain for safety |
| V-Tool | Make fine lines and textures | Apply light pressure to avoid slips |
Refining Edges And Details
Refining edges and details gives a clean, finished look. Use sandpaper or small files to smooth rough spots. Pay attention to corners and carved patterns. This step improves safety and style.
Follow these tips for refining:
- Start with coarse sandpaper, then switch to fine grit
- File sharp corners to round shapes
- Use a soft brush to clear dust from carvings
- Test the surface with your hand to check smoothness
Finishing Touches
After shaping your 3D cutting board, finishing is key to a great look and feel. Proper finishing helps protect the wood and makes it safe for food use.
This section explains sanding, applying finishes, and caring for your cutting board.
Sanding For Smoothness
Sanding removes rough spots and makes the surface smooth. Start with coarse sandpaper and move to finer grits.
Sand all edges and curves carefully to avoid splinters.
- Use 80-grit sandpaper to shape the board
- Switch to 120-grit for smoothing
- Finish with 220-grit for a soft touch
- Wipe dust off before applying finishes
Applying Food-safe Finishes
Choose finishes that protect wood and are safe to touch food. Oil finishes are popular for cutting boards.
Apply the finish with a clean cloth and let it soak in. Add more coats for better protection.
- Use mineral oil or beeswax for safety
- Apply thin coats to avoid sticky surfaces
- Let each coat dry before adding the next
- Do not use finishes with chemicals or toxins
Polishing And Maintenance Tips
Polishing keeps the board looking fresh. Use a soft cloth to buff the surface after finishing.
Regular care extends the life of your cutting board and keeps it safe for food.
- Reapply oil every few weeks or after washing
- Clean with mild soap and warm water
- Avoid soaking or putting in dishwasher
- Store in a dry place to prevent warping
Troubleshooting Common Issues
Making 3D cutting boards can be fun but also tricky. Some problems may happen during or after making the board.
This guide helps you fix common issues and keep your cutting board in good shape.
Fixing Cracks And Gaps
Cracks and gaps appear if wood dries too fast or is not glued well. Fixing them keeps the board strong and safe to use.
Use wood glue to fill cracks. Press the wood pieces tightly until dry. Sand the area smooth after drying.
- Apply wood glue inside cracks and gaps
- Clamp the board to hold pieces together
- Let glue dry fully before sanding
- Sand with fine paper for a smooth finish
Preventing Warping
Warping happens when wood loses or absorbs moisture unevenly. It can make your board bend or twist.
Store the board in a dry, cool place. Avoid leaving it near heat or water. Use oil to protect wood from moisture changes.
- Keep cutting board away from direct sunlight
- Do not soak the board in water
- Apply mineral oil regularly to seal wood
- Store flat on a stable surface
Maintaining Board Longevity
Good care makes your 3D cutting board last longer and look better. Regular cleaning and oiling help preserve the wood.
Clean the board with mild soap and water. Dry it fully after washing. Avoid harsh detergents or dishwasher use.
- Wash with warm water and mild soap
- Dry the board immediately after cleaning
- Apply food-safe mineral oil once a month
- Store in a cool, dry place

Credit: www.reddit.com
Frequently Asked Questions
What Materials Are Best For 3d Cutting Boards?
The best materials for 3D cutting boards are hardwoods like maple, walnut, and cherry. These woods are durable and resist knife marks. Their tight grain structure helps prevent bacteria buildup. Using a mix of these woods can enhance the board’s appearance, adding depth and contrast to the 3D pattern.
How Do You Design A 3d Pattern?
To design a 3D pattern, start with a simple geometric layout. Use software like SketchUp or AutoCAD for precision. Experiment with different wood colors to enhance the 3D illusion. Balance aesthetics with functionality, ensuring the board remains practical for cutting.
What Tools Are Needed For Making 3d Cutting Boards?
Essential tools include a table saw, clamps, and a planer. A router can be useful for finishing edges. Sandpaper of various grits ensures a smooth surface. Accurate measuring tools are crucial for precise cuts and a perfect fit.
How Long Does It Take To Make One?
Making a 3D cutting board can take several days. The process involves cutting, gluing, and finishing stages. Each stage requires drying or setting time. Patience ensures quality and durability in the final product.
Conclusion
Creating 3D cutting boards is a fun and rewarding project. You only need basic tools and some patience. Each board can be unique with different shapes and designs. This craft lets you combine creativity with practical use. Enjoy the process and learn from each step.
Soon, you will have a beautiful, useful item for your kitchen or gifts. Keep practicing, and your skills will grow stronger. Making 3D cutting boards brings joy and satisfaction to any woodworker. Give it a try and see what you create!