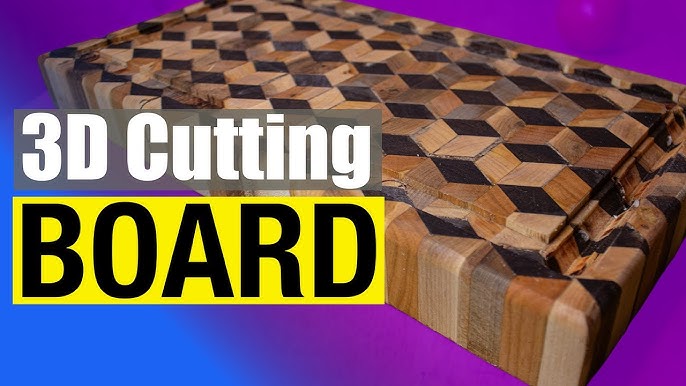
Are you ready to create a cutting board that stands out in your kitchen? Making a 3D cutting board is easier than you think, and it adds a unique touch to your cooking space.
Imagine crafting a board that not only looks amazing but feels great to use every day. In this guide, you’ll discover simple steps and tips that anyone can follow, even if you’re new to woodworking. Keep reading, and by the end, you’ll have the skills to make a cutting board that’s truly one of a kind—designed by you, for you.

Credit: www.amazon.com
Materials Needed
Making a 3D cutting board requires specific materials to ensure quality and safety. You will need different types of wood, proper tools, and safety gear.
Each material plays a role in crafting a sturdy and attractive cutting board. Prepare these items before starting your project.
Wood Types
Choose hardwoods that are safe for kitchen use. Hardwoods are durable and resist knife marks well.
- Maple – strong and light-colored
- Walnut – dark and rich in color
- Cherry – reddish tone and smooth texture
- Beech – fine grain and pale color
Tools Required
| Tool | Purpose |
|---|---|
| Table Saw | Cut wood pieces to size |
| Jointer | Flatten wood surfaces |
| Planer | Smooth and level wood thickness |
| Clamps | Hold pieces while glue dries |
| Sander | Finish the surface |
| Wood Glue | Bond wood pieces securely |
Safety Gear
Wear safety gear to protect yourself from injuries. Safety is very important during woodworking.
- Safety glasses to protect eyes
- Ear protection to reduce noise
- Dust mask to avoid inhaling sawdust
- Work gloves to protect hands
- Apron to keep clothes clean
Preparing The Wood
Preparing the wood is an important part of making a 3D cutting board. Careful preparation helps the board last longer and look great.
This guide covers how to select and measure the wood, cut it to size, and sand it smooth.
Selecting And Measuring
Choose hardwood like maple or walnut for your cutting board. These woods are strong and safe for food use. Avoid soft or porous wood that can absorb moisture.
- Pick wood free of cracks and knots
- Measure the wood length and width carefully
- Mark the cutting lines clearly with a pencil
- Use a square tool to ensure straight lines
Cutting To Size
Cut the wood pieces to the sizes you marked. Use a table saw or a circular saw for straight cuts. Always wear safety gear while cutting.
| Tool | Purpose | Safety Tip |
|---|---|---|
| Table Saw | Make straight, precise cuts | Keep hands clear of blade |
| Circular Saw | Cut large wood pieces | Use guide rails for straight cuts |
| Jigsaw | Cut curves or shapes | Secure wood firmly before cutting |
Sanding And Smoothing
After cutting, sand the wood to remove rough edges. Start with coarse sandpaper and finish with fine grit for a smooth surface.
- Use 80 grit sandpaper first
- Move to 120 grit for medium smoothing
- Finish with 220 grit for a fine, smooth finish
- Wipe dust off with a clean cloth between sanding steps
Designing The 3d Pattern
Creating a 3D cutting board starts with a good design. The pattern guides your cuts and layers. Careful planning makes the process smooth and the result beautiful.
Each step from choosing the pattern to planning the layers shapes the final look. Take time to think through every detail before you start cutting.
Choosing A Pattern
Select a pattern that fits your skill level and style. Simple geometric shapes are easier for beginners. More complex patterns add depth and interest but need more precision.
- Look for patterns with clear lines and shapes
- Consider the wood types and colors you want to use
- Choose a design that fits the size of your cutting board
- Find patterns that can be broken into layers easily
Marking The Design
Mark your design carefully on the wood. Use a pencil or fine marker that can be erased or sanded off. Clear markings help avoid mistakes during cutting.
| Tool | Purpose |
| Pencil | Draw main outlines |
| Ruler | Measure straight lines |
| Compass | Mark curves or circles |
| Carbon Paper | Transfer design between layers |
Planning The Layers
Divide the pattern into layers before cutting. Each layer adds height and depth. Plan how the layers will fit together and which wood pieces go where.
- Separate the pattern into parts that can be stacked
- Decide the thickness of each layer
- Choose wood colors for contrast between layers
- Check that layers align correctly when assembled
- Label each layer to avoid confusion during assembly
Cutting The Pieces
Cutting the pieces is a key step in making a 3D cutting board. It shapes the wood parts to fit together well.
Careful cutting helps the board look neat and last longer. Use the right tools and follow safety rules.
Using The Saw
Choose a saw that fits the wood size and type. A miter saw or table saw works well for straight cuts.
Keep the wood steady while cutting. Move the saw slowly to avoid splinters and mistakes.
- Wear safety goggles and gloves
- Mark the cutting lines clearly
- Cut along the lines carefully
- Turn off the saw before adjusting wood
Shaping The Edges
After cutting, shape the edges to make them smooth and safe. Use sandpaper or a router for this.
Rounded edges prevent splinters and give the board a nice look. Sand all sides evenly for the best result.
- Start with coarse sandpaper
- Finish with fine sandpaper
- Use a sanding block for flat edges
- Check edges for rough spots
Ensuring Precision
Measure each piece twice before cutting. Precision makes the 3D design fit tightly.
Use a square and ruler to check angles and lengths. Small errors can cause big gaps later.
- Mark all measurements clearly
- Check the saw blade alignment
- Test fit pieces before final cuts
- Fix any mistakes immediately
Assembling The Board
Making a 3D cutting board requires careful assembly of wooden layers. This process shapes the board and ensures its strength.
Follow each step closely to glue, clamp, and finish your board properly.
Gluing The Layers
Apply wood glue evenly on each layer’s surface. Avoid using too much glue to prevent messes. Press layers together firmly to get a strong bond.
- Spread glue with a brush or roller
- Align layers carefully to keep patterns intact
- Remove excess glue with a damp cloth
- Check for gaps or uneven spots
Clamping And Drying
Use clamps to hold the glued layers tight. Clamping keeps the layers from shifting and helps the glue dry well.
| Clamp Type | Recommended Pressure | Drying Time |
| Bar clamps | Moderate | 4 to 6 hours |
| Pipe clamps | Even | 6 to 8 hours |
| Ratchet clamps | Firm | Overnight |
Place the board in a flat area while drying. Avoid moving it until the glue sets fully.
Final Sanding
Once the glue is dry, sand the board to smooth the surface. Use coarse sandpaper first, then finer grades for a clean finish.
- Start with 80-grit sandpaper
- Progress to 120-grit for even surface
- Finish with 220-grit for smooth touch
- Check edges and corners carefully

Credit: www.youtube.com
Finishing Touches
Finishing a 3D cutting board makes it safe and beautiful. These last steps protect the wood and improve its look.
Proper finishing helps your cutting board last longer. It also makes cleaning easier and keeps it food safe.
Applying Food-safe Oil
Use food-safe oil to protect the wood from moisture and stains. This oil keeps the board looking fresh and healthy.
Apply the oil with a clean cloth. Rub it in the wood grain and let it soak for several hours.
- Choose mineral oil or beeswax-based oil
- Apply a thin, even layer over the whole board
- Let the oil soak for 4 to 6 hours or overnight
- Wipe off any extra oil before use
Polishing The Surface
Polishing smooths the surface and enhances the wood’s natural shine. It also removes small scratches and rough spots.
Use fine sandpaper or a polishing pad. Work gently to avoid damaging the wood’s design.
- Start with 220-grit sandpaper for rough spots
- Finish with 400-grit or higher for smoothness
- Polish in the direction of the wood grain
- Clean dust away before applying oil again
Maintenance Tips
Good care keeps your cutting board in top shape. Regular cleaning and oiling prevent cracks and warping.
Avoid soaking the board or using harsh detergents. These can damage the wood and finish.
- Wash with mild soap and warm water
- Dry board fully after washing
- Reapply food-safe oil once a month
- Store in a dry, cool place

Credit: www.youtube.com
Frequently Asked Questions
What Materials Are Needed For A 3d Cutting Board?
To make a 3D cutting board, you’ll need hardwoods like maple, cherry, or walnut. You’ll also require wood glue, clamps, sandpaper, and a food-safe finish. These materials ensure durability and a visually appealing design. Ensure all materials are safe for food contact to maintain hygiene.
How Do I Design A 3d Cutting Board?
Start by sketching your desired pattern on paper. Use geometric shapes for a 3D illusion. Consider using contrasting wood colors. This enhances the three-dimensional effect. The design should be planned before cutting any wood. This ensures precision and reduces material waste.
What Tools Are Essential For Crafting?
Essential tools include a table saw, planer, and a sander. Clamps and a square are also necessary. These tools help in cutting precise pieces and ensuring smooth surfaces. Accurate tools lead to a professional-looking cutting board. Safety equipment like goggles is also important.
How Long Does It Take To Make One?
Crafting a 3D cutting board can take several hours. This depends on the complexity of the design and drying time. Allow glue to dry overnight for best results. Patience ensures a high-quality finish. Rushing the process can lead to mistakes and an unsatisfactory product.
Conclusion
Creating a 3D cutting board adds charm to your kitchen. It takes some effort but is very rewarding. Use simple tools and follow the steps carefully. Personalize it with your favorite shapes or patterns. This project helps you practice woodworking skills.
Enjoy the process and take your time. Soon, you will have a unique cutting board. It looks good and works well every day. Try this craft and make your kitchen special.