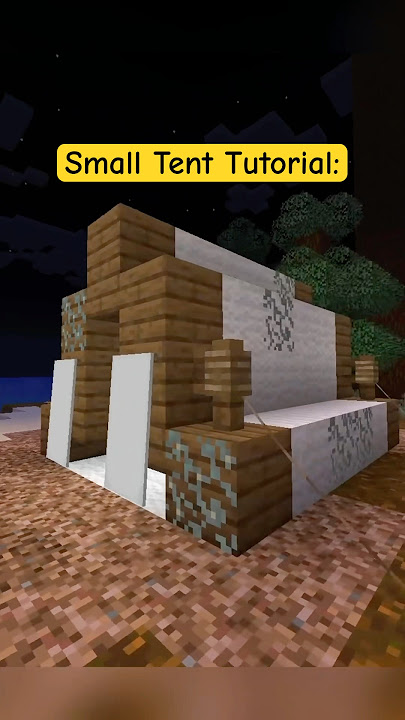
Are you ready to create your very own Minecraft tent? Whether you want a cozy hideout or a cool base for your adventures, building a tent in Minecraft is easier than you think.
This guide will walk you through simple steps that anyone can follow, even if you’re new to the game. By the end, you’ll have a stylish and functional tent that makes your Minecraft world feel more like home. Keep reading to discover the tricks and tips that will make your tent stand out!

Credit: m.youtube.com
Gather Essential Materials
Building a tent in Minecraft needs some basic materials. Collecting these items is the first step.
Focus on finding wood and wool, then gather tools to help with crafting your tent.
Collect Wood And Wool
Wood is the main building block for your tent’s frame. Wool makes the tent cover soft and colorful.
- Chop down trees to get wooden logs.
- Turn logs into wooden planks at your crafting table.
- Shear sheep to collect wool or kill them if shears are unavailable.
- Gather at least 10 wooden planks and 5 wool blocks for a small tent.
Find Tools For Crafting
Tools help you collect materials faster and craft items you need. Make sure to have the right tools.
| Tool | Purpose | How to Get |
| Wooden Axe | Chop trees faster | Craft with wooden planks and sticks |
| Shears | Collect wool from sheep | Craft with two iron ingots |
| Crafting Table | Craft items and blocks | Craft with four wooden planks |
Choose The Perfect Location
Building a tent in Minecraft needs a good spot. Picking the right place keeps you safe and close to what you need.
Think about where you set your tent. The right location helps you survive and enjoy the game more.
Scout Safe And Flat Areas
Look for a place that is flat and free from danger. Avoid spots near cliffs or deep water where mobs can easily attack.
- Choose flat ground to build on for easy setup.
- Stay away from places with many hostile mobs.
- Check that there is enough space for your tent and tools.
- Clear trees or grass so you have a good view around.
Consider Proximity To Resources
Pick a spot near important resources. This will save time and help you gather materials fast.
| Resource | Why It Matters | Distance to Tent |
|---|---|---|
| Wood | Needed for tools and building | Close |
| Water | Good for farming and fishing | Nearby |
| Stone | Used for stronger tools and furnace | Within walking range |
| Food Sources | Keep your hunger bar full | Accessible |
Build The Tent Frame
Building a tent frame in Minecraft gives you a base to add the rest of the tent. A strong frame keeps the tent stable and looks good.
This guide shows how to build the frame by making wooden supports and creating a doorway.
Construct Wooden Supports
Start by choosing wood blocks for your tent’s frame. Wood looks natural and is easy to find. Place vertical wooden logs as the main supports at each corner of the tent.
- Gather wooden logs or planks.
- Place four vertical supports in a square shape.
- Connect the tops with horizontal wood blocks to form the frame.
- Make sure the frame is tall enough to walk under.
Create A Doorway
Choose one side of the frame for the doorway. Remove two vertical blocks to make space. Add wooden doors or an open space for easy entry.
| Doorway Part | Action |
|---|---|
| Bottom blocks | Remove two blocks for entrance space |
| Door | Place wooden door blocks or leave open |
| Frame edges | Keep supports on sides for strength |
Add Tent Covering
Adding a covering to your Minecraft tent helps protect you from rain and mobs. It also makes your tent look more realistic and cozy.
You can use materials like wool or canvas blocks to create a good tent covering. These materials are easy to find and place over your tent frame.
Attach Wool Or Canvas
Start by selecting wool or canvas blocks in colors you like. White, brown, or green work well for natural tent colors.
Place the blocks above the frame to cover the top and sides. Make sure the covering is wide enough to protect the inside of the tent.
- Use wool blocks from sheep or craft canvas from string
- Choose colors that fit your tent style
- Place blocks carefully to avoid gaps
Secure The Covering To Frame
After placing the covering blocks, make sure they connect to the tent frame. This keeps the tent strong and stable.
Check that all wool or canvas blocks touch the wood or fence posts of your frame. This prevents the covering from floating or falling.
- Attach covering blocks directly to the frame blocks
- Fill any gaps between covering and frame
- Use stairs or slabs for angled edges if needed
Set Up Interior Essentials
Creating a cozy and useful interior in your Minecraft tent makes your stay better. Focus on adding key items that help you rest and organize.
Two main things to set up inside are a bed and storage with lighting. These make your tent both comfortable and practical.
Place A Bed
Start by placing a bed inside your tent. The bed lets you sleep and set your spawn point. Choose a spot away from the tent entrance for safety.
You can craft a bed using three wooden planks and three wool blocks. Place the bed on the ground so the head faces a wall or tent side.
Add Storage And Lighting
Storage and lighting keep your tent organized and bright at night. Use chests to store your items safely.
- Place one or two chests near your bed for easy access.
- Add torches or lanterns on walls or the ceiling to light the area.
- Make sure lighting covers all dark corners to prevent monster spawns.
- Use trapdoors or slabs to decorate and protect storage areas.
| Item | Purpose | Materials Needed |
| Chest | Storage for items | 8 Wooden Planks |
| Torch | Light source | 1 Stick, 1 Coal or Charcoal |
| Lantern | Bright light | 1 Torch, 8 Iron Nuggets |

Credit: www.youtube.com
Enhance Tent For Survival
Building a tent in Minecraft is only the first step. To survive longer, you need to improve it.
Adding defenses and nearby resources helps you stay safe and ready for challenges.
Build Defensive Barriers
Defensive barriers protect your tent from mobs and other dangers. Use materials that block attacks.
Walls, fences, and moats are good choices. They keep enemies out and give you time to react.
- Build walls using wood, stone, or cobblestone
- Place fences around the tent to stop mobs
- Dig a moat filled with water or lava for extra safety
- Light up the area with torches to prevent mob spawns
Create Nearby Resource Stations
Keep tools and materials close by for quick access. This helps you fix and upgrade your tent fast.
Set up stations like crafting tables, furnaces, and storage chests near your tent.
- Place a crafting table to make items quickly
- Use furnaces to cook food and smelt ores
- Store materials in chests near your tent
- Build a small farm for food and resources
Tips For Tent Maintenance
Keeping your Minecraft tent in good shape makes your adventure safer and more fun. Simple care helps your tent last longer.
This guide shares easy ways to fix your tent and improve it over time. Follow these tips to enjoy your shelter fully.
Repair Damage Quickly
Fix holes and tears as soon as you see them. Small damage can get worse fast. Use the right tools and materials for repairs.
- Check your tent walls every time you play
- Use wool or wood blocks to patch holes
- Replace broken fence posts or trapdoors
- Keep extra materials nearby for quick fixes
- Avoid leaving your tent in risky spots
Upgrade Materials Over Time
Start with simple blocks and improve your tent with stronger materials. This makes it safer and more weatherproof.
| Material | Durability | How to Get |
| Wood Planks | Low | Easy to craft from logs |
| Stone | Medium | Mine from caves |
| Iron Blocks | High | Smelt iron ore |
| Obsidian | Very High | Use diamond pickaxe on lava and water |
Credit: www.youtube.com
Frequently Asked Questions
How Do I Build A Basic Tent In Minecraft?
To build a basic tent, gather wool and wooden blocks. Create a rectangular frame, add wool walls, and a roof. Use torches inside for light. This simple design offers shelter and looks great in survival mode.
What Materials Are Best For Minecraft Tents?
Wool blocks are ideal for tent walls due to their color variety. Wooden planks and fences work well for the frame. Use torches or lanterns for lighting. These materials are easy to gather and build with.
Can I Customize My Minecraft Tent Design?
Yes, you can customize tents by changing wool colors, size, and shape. Add windows with glass blocks or doors for entry. Decorations like banners and flower pots enhance the tent’s look and functionality.
How Do I Make My Tent Safe From Mobs?
Place torches around and inside the tent to prevent mob spawning. Build walls at least two blocks high. Use doors to secure entry points. Adding a fence around your tent also increases safety.
Conclusion
Building a Minecraft tent is fun and simple. With these steps, anyone can create a cozy shelter. Gather your materials first. Choose a flat spot for your tent. Start placing blocks to form the base. Add details like a roof and entrance.
Customize with decorations. Lanterns and banners work well. Finally, enjoy your creation and invite friends. Explore, build, and dream up new designs. Minecraft lets your imagination soar. Happy crafting!