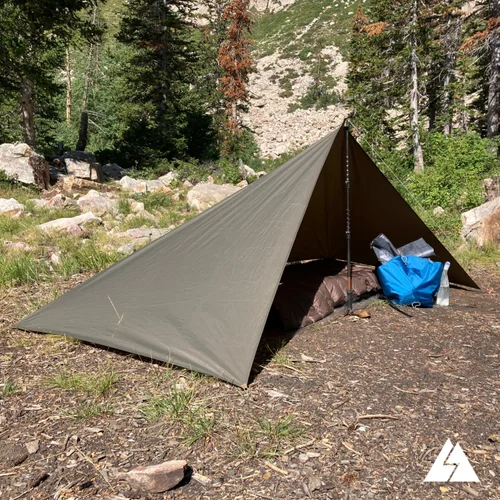
Have you ever wanted a simple, lightweight shelter that you can set up anywhere? Making a tarp tent is a smart way to protect yourself from the elements without carrying heavy gear.
Whether you’re camping, hiking, or just need a quick cover, this guide will show you how to create your own tarp tent with easy steps. By the end, you’ll have the confidence to build a shelter that fits your needs perfectly.
Ready to learn how to make a tarp tent that keeps you safe and comfortable? Let’s dive in!
Choosing The Right Tarp
Choosing the right tarp is the first step to making a good tarp tent. Your tarp must fit your needs and the weather you expect.
Pick a tarp that is strong, the right size, and can handle the weather conditions you will face.
Material Types
Tarp materials affect weight, strength, and water resistance. Common materials include polyester, nylon, and polyethylene.
Polyester is strong and resists stretching. Nylon is lightweight but can absorb water. Polyethylene is cheap and waterproof but heavy.
- Polyester: durable and water-resistant
- Nylon: light and strong, but less water-resistant
- Polyethylene: very waterproof, heavier, and less durable
Size And Shape
The tarp size must cover your sleeping area and gear. Bigger tarps give more space but weigh more.
Choose shapes like rectangular, square, or hexagonal based on how you want to set up your tent.
- Rectangular tarps offer simple coverage
- Square tarps work well for small groups
- Hexagonal tarps give more headroom and space
Weather Resistance
Check if the tarp is waterproof and can block wind. Look for coatings like polyurethane or silicone.
Good weather resistance keeps you dry and warm in rain and wind. Some tarps also resist UV damage from the sun.
- Waterproof coatings prevent leaks
- Windproof tarps block cold air
- UV resistant tarps last longer in sun
Essential Gear And Tools
Making a tarp tent is easy with the right gear. This guide will help you understand what you need.
We will cover ropes, stakes, poles, support, and other accessories. With these, you can set up a tarp tent in no time.
Ropes And Stakes
Ropes and stakes are key for a stable tent. They help secure the tarp to the ground.
Choose strong ropes that can withstand wind. Stakes should be durable and easy to drive into the ground.
- Nylon ropes are strong and lightweight
- Metal stakes work well in most soils
- Check the length of ropes to match tarp size
Poles And Support
Poles are needed to lift the tarp. They provide the main structure of your tent.
Select poles that are easy to carry. Adjustable poles help in uneven terrain.
- Aluminum poles are lightweight
- Wooden poles are strong but heavier
- Collapsible poles save space
Additional Accessories
Extra accessories make your tarp tent more comfortable. They can also add to its stability.
Consider using additional items like a groundsheet or extra guy lines for added protection.
- Groundsheet protects from moisture
- Guy lines add stability in high winds
- Clips and hooks help in securing the tarp
Selecting The Campsite
Choosing the right campsite is important for a safe and comfortable tarp tent setup. Look for a place that is easy to work with and protects you from weather.
Consider the ground, wind, and nearby dangers before pitching your tarp tent. This helps you enjoy your camping trip more.
Flat And Dry Ground
Pick a flat area to set your tarp tent. Flat ground makes sleeping easier and stops water from pooling under your tent.
Dry ground keeps you away from mud and moisture. Avoid low spots where rainwater can collect and soak your camp.
- Look for level soil or grass
- Avoid dips or holes
- Choose ground that drains water well
- Steer clear of wet or muddy spots
Natural Windbreaks
Find natural barriers like trees or bushes to block strong wind. This protects your tarp tent from wind damage and keeps you warm.
Position your tarp tent so the wind hits the windbreak first. This reduces the force on your shelter and stops it from shaking.
- Use trees, rocks, or hills as wind shields
- Face the tarp’s open side away from wind
- Check wind direction before setting up
Avoiding Hazards
Stay clear of hazards like dead trees, falling branches, or unstable ground. These dangers can cause injury or damage your tent.
Look up and around to spot risks. Avoid camping near cliffs, animal trails, or flood zones to stay safe.
- Do not camp under dead or loose branches
- Avoid steep slopes or cliffs
- Stay away from animal paths
- Pick spots not prone to flooding

Credit: www.youtube.com
Basic Tarp Tent Designs
Tarp tents are simple shelters made using a tarp and some ropes. They protect you from wind and rain. You can make different shapes to suit your needs.
Below are three common tarp tent designs that are easy to set up. Each design works well in different weather and terrain conditions.
A-frame Setup
The A-frame shape looks like the letter “A.” It is strong and sheds rain well. You need two trees or poles to tie the ridge line across.
- Find two sturdy trees about 6 to 8 feet apart.
- Tie a rope between the trees as a ridge line.
- Drape the tarp over the rope so it forms a triangle.
- Secure the tarp corners to the ground with stakes.
- Adjust tension for a tight, stable shelter.
Lean-to Style
The lean-to uses one tree or pole for support. It is open on one side and easy to set up quickly. This style blocks wind from one direction.
| Item | Description |
| Support | One tree or pole |
| Tarp Position | One side tied high, opposite side staked low |
| Protection | Good wind and rain block on one side |
| Best Use | Quick shelter and mild weather |
Pyramid Shape
The pyramid shape stands tall with one center pole. It offers good headroom and sheds rain well. It needs more space and a pole or stick.
To set up a pyramid tarp tent:
- Place the pole in the center of the tarp.
- Lift the tarp over the pole so it forms a pyramid.
- Stake all four corners out evenly from the center.
- Tighten the ropes to keep the shape firm.
Step-by-step Tarp Setup
Setting up a tarp tent is a simple way to create shelter outdoors. This guide will walk you through the main steps to set up your tarp tent properly.
Follow these instructions to prepare your tarp, secure the ridgeline, anchor the corners, and adjust the tension for a stable shelter.
Preparing The Tarp
First, unfold your tarp and lay it flat on the ground. Check for any tears or holes. Make sure the tarp is clean and dry before setting it up.
Securing The Ridgeline
Find two strong anchor points like trees or poles. Tie a sturdy rope between them at the height you want your tarp to hang. This rope is the ridgeline, which supports the tarp’s main structure.
Anchoring The Corners
- Pull each corner of the tarp away from the ridgeline.
- Stake the corners firmly into the ground using tent pegs.
- Make sure the tarp is spread tight but not overly stretched.
- Adjust corner positions to create the desired shelter shape.
Adjusting Tension
| Action | Purpose | Tip |
|---|---|---|
| Tighten ridgeline | Keep tarp stable and prevent sagging | Use a taut-line hitch knot for easy adjustment |
| Adjust corner stakes | Keep tarp edges smooth and firm | Push stakes deeper if loose |
| Check tarp tension regularly | Maintain shelter shape over time | Retighten ropes after rain or wind |
Tips For Stability And Comfort
Building a tarp tent is a great way to stay dry and protected outdoors. To enjoy your tarp tent, focus on making it stable and comfortable.
Simple changes can help your tent resist wind, stay cool, and keep the ground warm. These tips will improve your camping experience.
Windproofing Techniques
Wind can make your tarp tent unstable and cold. Use strong ropes and tight knots to secure the tarp. Place stakes deep in the ground to hold the tent firmly.
Set the tarp low and angled into the wind to reduce wind pressure. Use natural windbreaks like trees or bushes if possible.
- Use sturdy ropes and tight knots
- Place stakes firmly in the ground
- Angle tarp low against the wind
- Use natural windbreaks nearby
Ventilation Ideas
Good airflow stops your tarp tent from getting stuffy or wet inside. Leave some space between the ground and tarp edges for air to move.
Open the tent sides or create small vents at the top. This helps remove moisture and keeps you cool during warm nights.
- Leave gaps at tarp edges for air
- Open sides when weather is calm
- Create small vents near the top
- Avoid sealing the tent completely
Ground Insulation
Sleeping directly on the ground can feel cold and hard. Use a sleeping pad or extra blankets to add comfort and warmth below you.
Place a tarp or groundsheet under your sleeping area. This stops moisture from coming up and keeps your gear dry.
- Use a sleeping pad or blankets
- Put a tarp or groundsheet underneath
- Choose dry ground to set up your tent
- Clear sharp stones and sticks first
Maintaining Your Tarp Tent
Taking care of your tarp tent helps it last longer. Regular maintenance keeps it strong and ready for your next trip.
Proper cleaning, storage, and repairs protect the fabric and seams from damage.
Cleaning After Use
Clean your tarp tent soon after each trip. Dirt and debris can wear out the fabric over time.
Use mild soap and water to remove mud, leaves, and bugs. Avoid harsh chemicals that can harm the material.
- Shake off loose dirt before washing
- Use a soft brush or cloth for stains
- Rinse thoroughly with clean water
- Let it air dry completely before packing
Storage Tips
Store your tarp tent in a dry, cool place. Avoid areas with direct sunlight or moisture, which can cause mildew.
Fold or roll the tarp gently to prevent creases. Use a breathable bag or container to allow airflow.
- Keep away from sharp objects that can puncture the fabric
- Do not store when damp or wet
- Check the tarp regularly for signs of wear
Repairing Tears
Fix tears in your tarp tent quickly to stop them from getting bigger. Small holes can turn into large problems.
Use repair tape or patches made for outdoor gear. Clean the area before applying the patch for better hold.
- Trim loose threads around the tear
- Apply repair tape on both sides if possible
- Press firmly and let it dry before use
- Replace large damaged sections if needed

Credit: www.reddit.com

Credit: www.youtube.com
Frequently Asked Questions
What Materials Do I Need To Make A Tarp Tent?
You need a durable tarp, paracord or rope, stakes, and carabiners or clips. These materials are lightweight and easy to carry. Choose waterproof and tear-resistant tarps for better shelter. Quality ropes and stakes ensure stability in different weather conditions.
How Do I Set Up A Basic Tarp Tent?
Find two sturdy anchor points like trees or poles. Tie the tarp’s ridgeline tightly between them. Secure the tarp’s corners to the ground using stakes. Adjust tension to create a taut, sloped shelter that sheds rain effectively.
Can A Tarp Tent Protect Against Heavy Rain?
Yes, if set up properly with a steep pitch. Use waterproof tarps and ensure edges are pegged tightly to prevent water pooling. Adding a groundsheet helps keep moisture out. Proper drainage and wind orientation improve protection during heavy rain.
What Are The Benefits Of Using A Tarp Tent?
Tarp tents are lightweight, versatile, and quick to set up. They offer excellent ventilation and customizable shelter shapes. They are cost-effective and pack smaller than traditional tents. Ideal for backpackers and minimalists seeking flexible outdoor shelter.
Conclusion
Making a tarp tent is simple and useful. It protects you from rain and wind. You only need a tarp, some rope, and sticks. Practice setting it up before your trip. It saves space and weighs less than regular tents.
You can change its shape for different weather. Enjoy outdoor adventures with your new shelter. Try different designs to find what works best. Stay safe and dry on your next camping trip.