
Looking to create a quick, reliable shelter with just a tarp? You’re in the right place.
Making a tent with a tarp is easier than you think, and it can protect you from rain, wind, and sun when you need it most. Whether you’re camping, hiking, or facing an unexpected situation, knowing how to build a tarp tent gives you freedom and security.
In this guide, you’ll learn simple steps and tips that anyone can follow. Ready to turn a simple tarp into your next shelter? Let’s get started.

Credit: www.reddit.com
Choosing The Right Tarp
Making a tent with a tarp is simple and useful. Picking the right tarp helps you stay safe and dry.
Think about material, size, and how well it handles weather before you buy.
Material Types
Tarp materials affect weight and strength. Some dry fast and others last longer.
- Polyethylene: Cheap and waterproof but heavy.
- Nylon: Lightweight and strong, dries quickly.
- Canvas: Heavy but very durable and breathable.
- Polyester: Good strength and water resistance.
Size Considerations
Choose a tarp size based on how many people will use the tent. Also think about gear and space inside.
Common sizes include 8×10 feet for one person and 10×12 feet for two or more.
- Small tarps: Easy to carry but less space.
- Medium tarps: Good for solo campers with gear.
- Large tarps: Best for groups or extra room.
Durability And Weather Resistance
Look for a tarp that can handle rain, wind, and sun. This keeps you dry and safe.
Check if the tarp has reinforced corners and strong grommets. These parts help it last longer.
- Waterproof coatings stop rain from soaking in.
- UV resistance prevents damage from sun.
- Ripstop fabric stops small tears from growing.
- Strong grommets make setup easier and stable.
Credit: www.stitchbackgear.com
Essential Tools And Accessories
Making a tent with a tarp is simple. You need the right tools and accessories. These items will help you build a strong and durable shelter.
Having the right equipment ensures safety and comfort. Let’s explore the essential tools you need.
Ropes And Paracord
Ropes and paracord are vital for setting up a tarp tent. They provide support and stability. Choose strong and durable materials.
Paracord is lightweight and versatile. It’s excellent for securing your tarp in windy conditions.
- Nylon ropes are flexible and strong
- Paracord can hold heavy weight
- Use knots like bowline or taut-line hitch
Stakes And Pegs
Stakes and pegs anchor your tarp to the ground. They prevent it from blowing away. Use them to secure the corners and edges.
Choose stakes based on the ground type. Metal stakes are good for hard soil. Plastic pegs work well in softer ground.
- Metal stakes for rocky soil
- Plastic pegs for sandy soil
- Use at least four stakes for stability
Poles And Supports
Poles and supports lift your tarp off the ground. They create space underneath. You can use adjustable poles or natural supports like trees.
Adjustable poles are flexible and easy to use. Natural supports save you from carrying extra weight.
- Telescopic poles for height adjustment
- Use trees as natural supports
- Ensure poles are stable and secure
Selecting A Campsite
Choosing the right campsite is important for setting up your tarp tent. The place should be safe and comfortable. Picking a good spot helps protect you from bad weather and bugs.
Look for a place that fits your tarp tent well. The ground should be steady and clear of dangers. This will make your camping experience better.
Flat And Dry Ground
Find a flat area to pitch your tarp tent. Flat ground keeps you stable and stops rainwater from pooling. Avoid low spots where water can gather during rain.
Choose dry ground to keep your gear and sleeping area clean and comfortable. Wet ground can make your tent cold and damp.
- Look for a flat space free of rocks and roots
- Check if the ground is firm and not muddy
- Stay away from dips where water can collect
- Use a ground tarp to add extra dryness
Natural Windbreaks
Find natural windbreaks like trees, bushes, or hills. They block strong winds and make your tent more stable. Windbreaks also help keep you warm.
Set your tarp tent behind these natural barriers. Avoid spots where wind can blow directly into your tent. This keeps your shelter safe during windy weather.
- Look for thick trees or tall bushes nearby
- Use hills or rocks as wind shields
- Face the opening of your tarp away from the wind
- Secure your tarp well to avoid flapping
Avoiding Hazards
Check the area for hazards before setting up. Avoid places with dead trees or loose branches that can fall. Look out for animal trails or insect nests.
Stay away from steep slopes, cliffs, or flood zones. These areas can be dangerous during storms or heavy rain. Pick a safe spot to protect yourself and your gear.
- Do not camp under dead or unstable trees
- Avoid areas near rivers that can flood
- Watch for insect nests or animal signs
- Stay clear of steep or rocky slopes
Basic Tarp Tent Designs
Tarp tents are simple shelters made from a tarp and some rope. They protect you from wind, rain, and sun. You can make different styles depending on your needs and the environment.
Below are three basic tarp tent designs. Each has its own shape and setup method. Learn how to build an A-Frame, Lean-To, and Pup Tent style.
A-frame Shelter
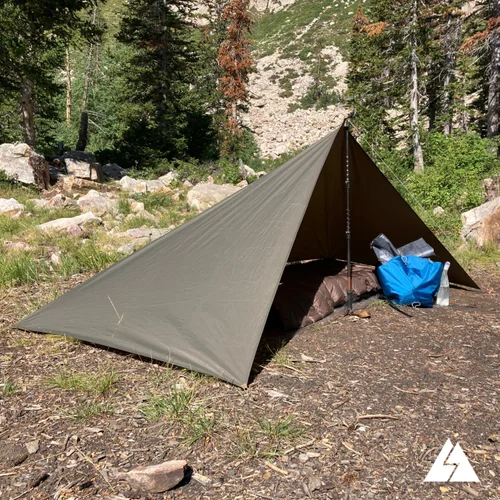
The A-Frame shelter is shaped like the letter A. It is strong and sheds rain well. You need two poles or trees to tie the ridge line.
- Find two trees about 6 feet apart
- Tie a rope between the trees as a ridge line
- Drape the tarp over the ridge line evenly
- Secure the tarp corners to the ground with stakes
- Adjust the sides to keep the shelter tight
Lean-to Shelter
The Lean-To uses one vertical side tied to a tree or pole. The tarp slopes down to the ground on the other side. It is quick to set up and good for blocking wind.
| Step | Action |
| 1 | Attach tarp’s top edge to a tree or pole |
| 2 | Pull tarp out away from the tree |
| 3 | Secure the lower edge to the ground with stakes |
| 4 | Check for tightness and adjust if needed |
Pup Tent Style
The Pup Tent style stands upright with poles at each end. It looks like a small triangular tent. This style gives good headroom inside.
To build a Pup Tent:
- Place poles at two points on the ground
- Stretch a rope between the poles
- Drape the tarp evenly over the rope
- Stake all four corners to the ground
- Tighten the tarp for stability
Step-by-step Setup Guide
Setting up a tent with a tarp is simple and saves space. This guide shows you how to do it step-by-step.
Follow these easy steps to create a shelter using a tarp. You only need a tarp, some rope, and stakes.
Preparing The Tarp
Start by choosing a flat area free of rocks and sticks. Lay your tarp flat on the ground with the corners spread out.
Check your tarp for any holes or tears. Fix them before setting up to keep rain and wind out.
Securing The Ridgeline
Tie a strong rope between two trees or poles. This rope is called the ridgeline and will hold the tarp up.
Make sure the ridgeline is tight and about head height. This helps the tarp stay steady and lets water run off.
- Find two sturdy trees 10-15 feet apart
- Use a knot like the taut-line hitch to keep it tight
- Check the line tension before attaching the tarp
Attaching Stakes And Adjusting Tension
Pull the tarp corners away from the ridgeline. Use stakes to secure each corner to the ground.
Adjust the tarp by pulling the ropes tight at each stake. This keeps the tarp firm and stops it from flapping in the wind.
- Drive stakes into the ground at a 45-degree angle
- Tighten the ropes or cords attached to tarp corners
- Check the tension regularly and adjust as needed

Credit: www.youtube.com
Tips For Enhancing Comfort And Stability
Making a tent with a tarp is simple and useful for camping. You can make it more comfortable and stable with some smart tips.
These tips help keep you dry, safe, and relaxed inside your tarp shelter.
Adding Ground Cover
Place a ground cover under your tarp to stay dry and clean. It stops moisture from the ground and adds extra comfort.
Use a tarp, foam pad, or blanket as ground cover. Make sure it is smaller than your tarp to keep rain off.
- Choose waterproof material for ground cover
- Keep ground cover inside tarp edges
- Clear sharp rocks or sticks before placing ground cover
Improving Ventilation
Good airflow stops condensation inside your tarp tent. Open sides or use gaps to let fresh air in.
Set your tarp at an angle to catch wind. Lift one side slightly or use mesh layers to allow air movement.
- Leave openings at the front or back
- Use breathable materials if possible
- Avoid sealing tarp edges tightly
Reinforcing Against Wind
Strong wind can damage your tarp shelter. Use extra ropes and stakes to keep it stable.
Tie corners tightly and add guy lines to hold your tarp in place. Check knots often and tighten as needed.
- Use sturdy stakes for anchoring
- Add extra guy lines on windy sides
- Choose a sheltered spot if possible
Maintenance And Storage
Taking care of your tarp tent helps it last longer. Proper maintenance keeps the tarp strong and ready to use.
Storing the tarp correctly prevents damage from moisture and dirt. Follow simple steps to keep it in good shape.
Cleaning The Tarp
Clean your tarp after every use. Dirt and debris can damage the material over time.
Use a soft brush or sponge with mild soap. Avoid harsh chemicals that can weaken the tarp.
- Remove loose dirt by shaking or brushing
- Wash with warm water and gentle soap
- Rinse thoroughly to remove soap
- Do not use bleach or strong detergents
Drying Before Storage
Dry the tarp completely before storing. Moisture can cause mold and mildew.
Hang the tarp or spread it out in a shaded area. Avoid direct sunlight to protect the fabric.
- Check all corners and folds for damp spots
- Let it air dry fully before packing
- Do not store if the tarp is wet or damp
Packing Tips
Fold the tarp neatly to save space. Avoid sharp folds that can weaken the material.
Store the tarp in a dry, cool place. Use a breathable bag to keep air flowing.
- Fold along natural creases
- Roll instead of folding to reduce wrinkles
- Keep the tarp away from heat sources
- Use a storage bag that allows ventilation
Frequently Asked Questions
What Materials Do I Need To Make A Tent With A Tarp?
You need a durable tarp, sturdy ropes, tent stakes, and poles or tree anchors. A hammer or mallet helps secure stakes. These basic materials make setting up your tarp tent easier and effective.
How Do I Choose The Best Tarp For Tent Making?
Select a tarp made of waterproof, tear-resistant material like polyethylene or nylon. Choose the right size to cover your sleeping area. Lightweight tarps are ideal for backpacking, while heavier ones suit camping.
What Are The Easiest Tarp Tent Designs For Beginners?
Start with an A-frame or lean-to design. These shapes are simple to set up using trees or poles. They provide good shelter and ventilation, making them perfect for novice campers.
How Do I Secure A Tarp Tent In Windy Conditions?
Use extra ropes and stakes to anchor your tarp firmly. Tie guy lines to nearby trees or strong stakes. Lower the tarp’s profile by tightening ropes to reduce wind resistance.
Conclusion
Making a tent with a tarp is simple and practical. It keeps you dry and safe outdoors. You only need a few tools and some patience. Practice a few times to get better and faster. This skill helps in camping, hiking, or emergencies.
Try different shapes to find what works best. Enjoy the outdoors with your DIY tarp tent!