Are you tired of using the same old fishing rods everyone else has? Imagine casting your line with a custom rod, tailored to fit your unique style and needs.
Creating your own fishing rod might sound like a daunting task, but with the right guidance, it can be a rewarding and enjoyable experience. You don’t need to be an expert to get started, just a bit of patience and creativity.
You’ll discover the secrets to making custom fishing rods that not only enhance your fishing game but also give you a sense of pride and accomplishment. Let’s dive in and uncover how you can craft the perfect rod for your next adventure on the water.

Credit: www.youtube.com
Choosing The Right Materials
Making a custom fishing rod starts with picking the right materials. Good choices affect the rod’s strength and feel.
Each part of the rod needs careful selection to match your fishing style and needs.
Selecting Rod Blanks
Rod blanks are the core of your fishing rod. They come in different materials like graphite, fiberglass, or composite. Graphite is light and sensitive. Fiberglass is tough but heavier. Composite blends offer a balance.
Choose a blank based on the fish you want to catch and the fishing conditions.
Picking Suitable Guides
Guides help the fishing line move smoothly. They come in different sizes and materials. Some guides resist corrosion better, which is key for saltwater fishing.
- Stainless steel guides are strong and rust-resistant.
- Ceramic guides reduce friction for longer casts.
- Titanium guides are lightweight and durable.
- Choose guide size to match your line weight.
Choosing The Handle Type
The handle affects comfort and control. Common handle materials include cork, EVA foam, and rubber. Cork feels natural and is lightweight. EVA foam resists water and lasts long. Rubber offers a firm grip in wet conditions.
Reel Seat Options
| Reel Seat Type | Material | Benefit |
| Down-locking | Aluminum or graphite | Strong hold and easy to tighten |
| Up-locking | Plastic or graphite | Lightweight and simple design |
| Skeleton | Graphite | Reduces overall weight |
Essential Tools For Building
Building custom fishing rods needs the right tools. These tools help you work safely and make good rods.
Having tools ready speeds up the process and improves the quality of your work.
Basic Tool Kit
The basic tool kit includes everyday tools used to shape and assemble fishing rods. These tools are easy to find and use.
They help you measure, cut, and attach parts of the rod properly.
- Measuring tape or ruler
- Utility knife or razor blade
- Sandpaper or sanding block
- Small screwdrivers
- Epoxy mixing sticks
- Masking tape
Specialized Equipment
Specialized equipment helps with tasks that need more accuracy. These tools make your rod stronger and more balanced.
You will need these tools for wrapping guides and finishing your rod smoothly.
- Rod dryer or wrapping station
- Guide wrapping jig
- Heat gun for curing epoxy
- Rod blank holder or vise
- Thread tensioner
- Brushes for epoxy application
Workspace Setup
Setting up a good workspace helps you work with less mess and more safety. Your workspace should be clean and well-lit.
Organize your tools and materials so you can find them fast and work with ease.
- Flat and sturdy workbench
- Good lighting with adjustable lamps
- Storage for small parts and tools
- Ventilation for epoxy fumes
- Comfortable chair
- Trash bin for waste
Preparing The Rod Blank
Preparing the rod blank is the first step in making a custom fishing rod. This process sets the base for the rod’s strength and performance.
Careful preparation helps you avoid problems later. It includes measuring, cutting, sanding, and marking guide spots.
Measuring And Cutting
Measure the rod blank to the length you want. Use a tape measure for accuracy. Mark the spot where you will cut.
Use a fine saw or rod blank cutter to make a clean cut. Cut slowly to avoid splintering the blank.
Sanding And Smoothing
Sand the cut ends of the rod blank using fine sandpaper. This removes rough edges and splinters. Smooth surfaces help with fittings.
Sand lightly and check often. Avoid sanding too much, as this can weaken the blank.
Marking Guide Positions
Mark where the guides will go on the rod blank. Use a measuring tape and pencil to place them evenly. Guides help control the fishing line.
- Start marking from the tip end
- Space guides closer near the tip
- Leave more space near the handle
- Check guide alignment along the rod

Credit: anglersresource.net
Attaching Guides And Reel Seat
Attaching guides and the reel seat is key to building a custom fishing rod. These parts help control the line and hold the reel in place. Proper attachment makes the rod strong and easy to use.
This guide explains how to align guides, secure them with thread wraps, and install the reel seat. Follow these steps for a solid fishing rod build.
Aligning Guides
Start by placing the guides along the rod blank. They must line up straight from the rod tip to the handle. This helps the fishing line run smoothly.
Use a marker or tape to mark guide positions. Make sure the guides face the same direction. Check alignment by looking down the rod from the handle.
- Place the tip guide at the very end of the rod
- Space guides evenly along the blank
- Ensure all guide rings align in a straight line
Securing With Thread Wraps
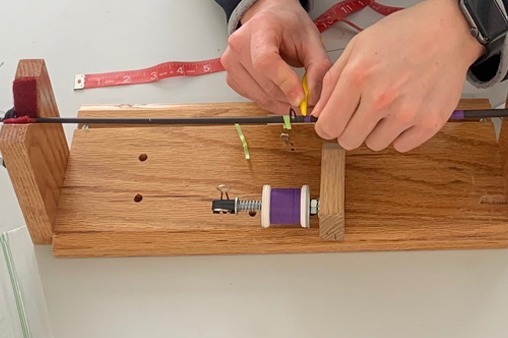
Wrap the guides tightly with thread to secure them. Use a rod wrapping jig if you have one to keep wraps neat. Start wrapping just behind the guide foot.
Keep thread wraps close together without gaps. Once wrapped, apply epoxy to protect the thread and hold the guide firmly in place.
- Begin wrapping at the guide base
- Wrap evenly around the blank and guide foot
- Cover all thread with clear epoxy for strength
Installing The Reel Seat
The reel seat holds the fishing reel on the rod handle. Slide the reel seat onto the blank where the handle ends. Position it so the reel foot fits properly.
Secure the reel seat with epoxy glue. Apply glue inside the reel seat and on the blank. Slide the seat in place and wipe away excess glue. Let it dry fully before use.
- Choose a reel seat that fits your reel
- Apply epoxy inside the seat and on the rod blank
- Slide seat firmly into place and align it
- Remove any glue that squeezes out
- Allow drying time as per epoxy instructions
Applying Finish And Coatings
Applying the right finish and coatings protects your custom fishing rod. It also improves its look and durability. This part is important to keep your rod strong and beautiful.
Different methods work best for different rod materials. Learn about epoxy, curing, and decorative wraps to get a great finish on your rod.
Epoxy Techniques
Epoxy is a strong resin used to coat and protect the rod. Use a slow hardening epoxy for a smooth finish. Mix the epoxy well to avoid bubbles. Apply thin layers with a brush or roller for even coverage.
- Use gloves to keep hands clean
- Mix equal parts of resin and hardener
- Stir slowly to reduce air bubbles
- Apply thin coats, let each dry before next
- Use a soft brush or foam roller
Curing Process
Curing is the time epoxy needs to harden fully. Keep the rod in a dust-free place. The temperature should be stable, around 70°F (21°C). Avoid touching the surface until it is dry.
| Stage | Time | Notes |
| Initial Set | 4-6 hours | Surface becomes tacky but not sticky |
| Hard Cure | 24-48 hours | Epoxy hardens and gains strength |
| Full Cure | 7 days | Epoxy reaches maximum hardness |
Adding Decorative Wraps
Decorative wraps add color and style to your rod. Use nylon or silk thread wraps. Wrap tight and neat around the rod blank. Seal wraps with clear epoxy for protection.
- Choose thread colors that match your style
- Use a thread tension tool for even wrapping
- Apply thin epoxy layers over wraps carefully
- Let epoxy dry fully before handling
Testing And Adjustments
Testing and adjusting your custom fishing rod is important. It ensures the rod works well and lasts long.
This process helps you find any problems and fix them before using the rod.
Checking Alignment
Start by checking if all parts of the rod line up correctly. This keeps the rod balanced and strong.
Look along the rod to see if the guides are straight. Adjust them if they are off.
- Place the rod on a flat surface
- View guides from tip to handle
- Move guides slightly if needed
Flexibility And Strength Tests
Test how the rod bends by applying gentle pressure. It should flex without cracking or feeling weak.
Check the rod’s strength by gently pressing on the middle and ends. It should resist bending too much.
- Bend the rod slowly to test flexibility
- Look for any cracks or soft spots
- Press on different parts to test strength
Making Final Adjustments
After tests, make final fixes. Tighten loose parts and smooth any rough edges.
Check the handle grip and guides one last time. Make sure they feel comfortable and secure.
- Use sandpaper to smooth rough spots
- Tighten all screws and bindings
- Re-check alignment after changes
- Test flex and strength again if needed
Tips For Customization
Making custom fishing rods lets you create a tool that fits your style. You can change many parts to make it truly yours.
These tips will help you personalize your fishing rod with style and function. Small changes can make a big difference.
Personalizing Handles
Handles are where you hold your rod, so comfort matters. Choose materials that feel good in your hand.
Wraps and grips can add texture and improve your hold. Try cork, foam, or leather for different feels.
- Use cork for a lightweight, natural feel
- Foam grips offer softness and shock absorption
- Leather adds a classic, stylish look
- Try custom shapes for better hand fit
Color And Design Ideas
Colors make your fishing rod stand out. Pick colors that show your personality or match your fishing gear.
Use paint or wraps to add stripes, patterns, or logos. Keep designs simple for a clean look or bold for fun.
- Choose bright colors for visibility
- Dark colors hide dirt and wear
- Add stripes or dots for a unique style
- Use waterproof paint for long-lasting design
Incorporating Unique Features
Add special features to make your rod one-of-a-kind. Think about what will help you fish better or look cool.
Extras like custom guides, reel seats, or decorative wraps add both style and function.
- Use lightweight guides to reduce rod weight
- Add a custom reel seat for comfort and style
- Wrap thread patterns to show craftsmanship
- Include your name or favorite fish in designs
Credit: lakeladyrods.com
Frequently Asked Questions
What Materials Are Needed To Make Custom Fishing Rods?
You need a rod blank, guides, reel seat, handle, epoxy, and wrapping thread. Quality materials ensure durability and performance.
How Do I Choose The Right Rod Blank?
Select a blank based on fishing style, target species, and preferred action. Consider length, power, and flexibility for best results.
What Tools Are Essential For Building Fishing Rods?
Basic tools include a rod dryer, wrapping jig, epoxy, sandpaper, and a heat gun. These help in precise assembly and finishing.
How Long Does It Take To Build A Custom Rod?
Building a rod typically takes 4 to 8 hours. Time varies with skill level and complexity of design.
Conclusion
Custom fishing rods offer a personal touch to your fishing trips. Building your own rod lets you choose every part carefully. This way, the rod fits your style and needs perfectly. The process can be fun and rewarding. Each step teaches you more about fishing gear.
Soon, you will enjoy fishing with a rod made by you. Give it a try and feel the difference yourself. Enjoy every cast and catch with your custom rod.