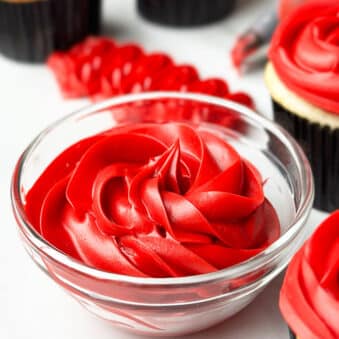
Are you looking to create stunning deep red icing that will make your cakes and cupcakes stand out? Whether you’re baking for a special occasion or just want to impress your friends, mastering the perfect shade of red icing can make all the difference.
In this guide, you’ll discover simple tips and tricks to achieve that rich, vibrant color without wasting time or ingredients. Get ready to transform your desserts and wow everyone with your baking skills! Keep reading to find out how you can make deep red icing that looks as good as it tastes.
Choosing The Right Ingredients
Choosing the right ingredients is key to making deep red icing. The texture and color depend on what you use. Picking the best base and colorants makes a big difference. It helps achieve a rich, vibrant red that stands out. Quality ingredients ensure the icing tastes good too.
Best Icing Bases For Deep Red
Some bases hold color better than others. Buttercream is smooth and creamy. It blends well with colorants and stays bright. Royal icing dries hard and shines. It works great for decorations needing firm shapes. Cream cheese icing has a tangy flavor. It can darken the red a bit but offers richness. Whipped frosting is light and airy. Its color may be softer but still lovely.
- Buttercream:Thick and creamy, holds color well.
- Royal icing:Hardens and shines, ideal for detailed work.
- Cream cheese icing:Adds tang, may deepen color.
- Whipped frosting:Light texture, softer color.
Natural Vs. Artificial Colorants
Natural colors come from fruits and vegetables. Beet juice and pomegranate juice are popular choices. They provide a warm, earthy red. Natural colors may fade faster or change in taste. Artificial colors offer bright, consistent reds. They last longer and mix easily. Some people avoid artificial dyes for health reasons. Testing both types helps find the best option for your recipe.
- Natural colorants:Beet juice, pomegranate, raspberry powders.
- Artificial colorants:Gel or liquid food coloring, vibrant red shades.

Credit: livinginnormal.com
Color Mixing Techniques
Getting the perfect deep red icing color takes more than just dumping red food coloring into your mix. Understanding how colors interact can help you achieve a rich, vibrant shade that looks professional and appetizing. Let’s break down some color mixing techniques that will give your deep red icing that wow factor.
Layering Colors For Depth
Layering colors means adding small amounts of different shades gradually to build a complex, deep red. Start with a base of red food coloring, then add tiny drops of other colors like blue or brown to deepen the hue. This slow layering prevents the icing from turning too bright or unnatural.
Try adding a bit of blue coloring to your red to cool it down and give it more richness. Adding brown can create a warmer, earthier red that feels more natural. Keep testing as you go—adding colors a drop at a time helps you avoid overshooting the shade you want.
Balancing Red With Other Shades
Balancing red means knowing how much of each color to add without overpowering the red. A little green or yellow might seem strange, but small amounts can adjust the tone and make the red appear deeper and more balanced. Be cautious; even a tiny bit can dramatically change the color.
Think about what your final icing will be used for—do you want a bold, bright red or a muted, sophisticated tone? Adding black food coloring in very small amounts can also darken the red without making it look dull. Experiment with these shades on a small batch before mixing your whole batch.
Achieving Vibrancy
Creating deep red icing requires careful mixing of red food coloring with white icing. Using gel colors helps achieve a rich, vibrant shade without thinning the icing. Adjust color slowly to avoid overpowering the taste or texture.
Achieving a vibrant deep red icing can be both an art and a science. The key is understanding how different coloring agents interact with your icing base. It requires patience and a bit of experimentation, but the result is a striking hue that elevates your baked creations.Adjusting Consistency For Color
The consistency of your icing can impact how colors develop. A stiffer icing might not absorb color as readily, leading to a less vibrant shade. To counter this, you might need to slightly thin your icing before adding color. Consider starting with a small batch to test how the consistency affects the final color. If the color isn’t right, adjust the icing consistency and try again. Remember, the goal is to achieve a smooth, even color throughout.Using Gel And Powder Colors
Gel and powder colors are your best friends for achieving deep, vivid hues. Unlike liquid colors, gels and powders are concentrated, meaning you need less to achieve a bold shade. This is crucial for maintaining the right icing consistency. I once struggled with achieving the perfect red using liquid color. Switching to gel made all the difference—it was a game-changer. Simply add a small amount of gel or powder, mix, and assess the color. Have you ever wondered why your icing color darkens over time? Gel and powder colors tend to deepen as they sit. This means your icing might look brighter initially but will become more vibrant after a few hours.Common Challenges
Creating deep red icing can be tricky. You might face some common challenges that affect the color and texture of your icing. Understanding these issues helps you avoid frustration and get that perfect vibrant red every time.
Preventing Color Bleeding
Color bleeding happens when the red dye spreads into other colors or parts of your decoration. This can ruin your design, especially on multi-colored cakes. To prevent it, use gel or paste food coloring instead of liquid versions, as they are less likely to run.
Another tip is to let your icing dry completely before adding other colors nearby. This creates a barrier and stops the colors from mixing. Have you noticed how some commercial cakes keep colors sharp? They often use this simple drying trick.
Avoiding Fading Over Time
Deep red icing can lose its vibrancy after a few hours or days. Exposure to light, air, and moisture causes fading. To keep your red strong, store iced cakes in a cool, dark place and cover them lightly to prevent drying out.
Adding a bit of red food coloring after mixing your icing can boost the color intensity. But be careful not to add too much, as this may affect the taste or texture. How long do you want your icing to stay bright? Planning storage can make a big difference.
Tips For Application
Applying deep red icing requires care and the right approach. Proper application enhances the color and texture. It also makes your baked goods look professional and inviting. Use these tips to get a smooth, even finish that highlights the rich red hue.
Best Tools For Smooth Finish
- Offset spatula: Perfect for spreading icing evenly.
- Bench scraper: Great for smoothing the sides of cakes.
- Piping bags with round tips: Ideal for precise decoration.
- Serrated knife: Useful for leveling cake layers before icing.
- Turntable: Helps rotate the cake for easy and smooth application.
Using clean, dry tools prevents clumps and uneven surfaces. Choose the right size for your cake to avoid mess.
Techniques For Even Coverage
- Apply a thin crumb coat first to seal crumbs.
- Chill the cake after crumb coating for better icing grip.
- Use long, smooth strokes with your spatula for a flat surface.
- Keep the icing cool but soft for easier spreading.
- Turn the cake slowly on the turntable while smoothing.
Work quickly to avoid drying or cracking. Check your work from different angles to spot uneven areas.

Credit: bakingbutterlylove.com
Storage And Preservation
Proper storage and preservation keep your deep red icing fresh and vibrant. Icing can lose its rich color and texture if stored incorrectly. Use simple steps to maintain its quality for longer periods.
Maintaining Color During Storage
Store icing in an airtight container to stop air from drying it out. Keep the container in a cool, dark place to prevent color fading. Avoid sunlight and heat, which cause the red color to dull quickly. If you must refrigerate, cover the icing tightly to avoid moisture buildup. Let the icing come to room temperature before using it again for best results.
Reactivating Dull Icing
Dull or hardened icing can be softened easily. Add a few drops of water or milk to the icing. Stir gently until it regains smoothness and shine. Use a small spoon or spatula to mix well without overworking it. If the color looks faded, mix in a tiny amount of red food coloring to restore brightness. Be careful not to add too much to keep the taste balanced.

Credit: chelsweets.com
Frequently Asked Questions
How Do I Get Deep Red Color In Icing?
Use gel or paste red food coloring for vibrant deep red icing. Avoid liquid colors, as they dilute the icing. Adding a small amount of cocoa powder can enhance the red tone. Mix thoroughly for even color distribution.
Can Natural Ingredients Make Deep Red Icing?
Yes, beet juice or powder is a natural option to color icing deep red. It provides a rich hue without artificial dyes. However, it may slightly alter the taste. Use small amounts and adjust to your preference.
Why Does My Red Icing Turn Pink?
Red icing turns pink if too little coloring is used or it’s diluted. Overmixing can also lighten the color by incorporating air. To fix this, add more red gel coloring and mix gently until you reach the desired deep red.
How Long Does Deep Red Icing Last?
Deep red icing lasts 3-5 days at room temperature if covered tightly. Refrigerate for up to 1 week to maintain freshness and color. Always store in an airtight container to prevent drying or color fading.
Conclusion
Making deep red icing is easier than it seems. Use the right ingredients and mix well. Watch the color as you add dye slowly. Achieve the perfect shade with patience and care. This icing will brighten cakes and cupcakes beautifully.
Enjoy your baking with rich, vibrant colors every time. Practice a few times to get it just right. Your treats will look professional and inviting. Simple steps lead to stunning results. Keep experimenting and have fun creating!