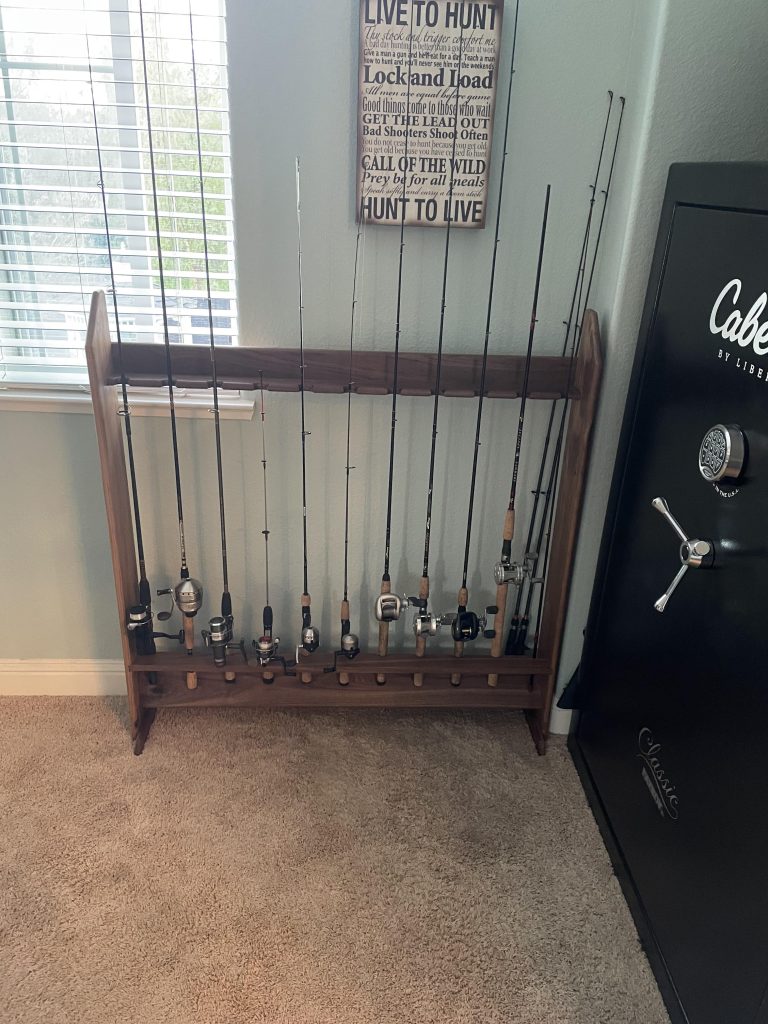
Are you tired of tripping over your fishing rods or struggling to find the right one when the perfect fishing opportunity strikes? Imagine having a neat and organized space where each rod has its own place, ready for your next adventure.
Creating your very own fishing rod rack isn’t just a practical solution; it’s a rewarding project that adds a personal touch to your angling gear. In this guide, you’ll discover how simple materials and a few hours of your time can transform your cluttered gear into a tidy showcase.
Get ready to eliminate the chaos and enhance your fishing experience with a DIY project that’s as satisfying as catching that big one! Read on to learn how to make your fishing rod rack and enjoy the benefits of a well-organized fishing arsenal.
Materials Needed
Making a fishing rod rack is a simple project that helps keep your rods safe and organized.
Before starting, gather all the materials you will need. This will make your work easier and faster.
Wood Selection
Choose wood that is strong and can hold the weight of your fishing rods.
- Pine wood is affordable and easy to work with.
- Oak wood is very durable and lasts longer.
- Cedar wood resists moisture and has a nice smell.
- Avoid soft or damaged wood to prevent breakage.
Tools Required
You need some basic tools to build the fishing rod rack safely and correctly.
| Tool | Purpose |
| Saw | Cut wood pieces to size |
| Drill | Make holes for screws |
| Screwdriver | Drive screws securely |
| Measuring tape | Measure wood accurately |
| Sandpaper | Smooth wood surfaces |
| Clamps | Hold wood steady when cutting or drilling |
Additional Supplies
Some extra supplies help finish the rack and keep it strong and neat.
- Wood screws to join wood parts
- Wood glue for extra strength
- Wood stain or paint to protect and decorate
- Brushes or rags for applying stain or paint
- Protective gloves and goggles for safety
Choosing The Design
Picking the right design for your fishing rod rack is key. It helps keep your rods safe and easy to find.
Think about where you will put the rack and how many rods you have. This guides your design choice.
Wall-mounted Options
Wall-mounted racks save floor space. They keep rods off the ground and organized vertically.
- Use sturdy hooks or slots to hold rods securely.
- Place the rack at a height easy to reach.
- Choose materials that resist moisture and rust.
- Consider adding a shelf for reels and accessories.
Freestanding Styles
Freestanding racks stand on their own. They can hold many rods and be moved easily.
| Type | Pros | Cons |
| Wooden Stand | Strong and classic look | Can be heavy |
| Metal Frame | Lightweight and durable | May rust if not treated |
| Plastic Holder | Cheap and water resistant | Less sturdy for heavy rods |
Space Considerations
Measure your space before building. This helps pick a rack that fits well.
Check these points to choose the right rack size:
- Width and height of the wall or floor area
- Number of rods you want to store
- Room for other gear near the rack
- Clearance to move rods in and out easily
Preparing The Wood
Preparing the wood is an important part of building a fishing rod rack. It helps make sure the rack is strong and looks good. You will measure, cut, sand, and mark the wood before assembly.
These steps make the wood safe to use and ready for the next building phases. Take your time and follow the instructions carefully.
Measuring And Cutting
Start by measuring the wood pieces you need for your rack. Use a tape measure to get exact lengths. Mark the wood clearly with a pencil. Cut along the marks using a saw. Make sure the cuts are straight and clean.
- Measure twice to avoid mistakes
- Mark the cutting lines clearly
- Use a fine-tooth saw for smooth cuts
- Wear safety goggles during cutting
Sanding And Smoothing
After cutting, sand all wood pieces to remove rough edges and splinters. Use medium-grit sandpaper first, then fine-grit for a smooth finish. Sand in the direction of the wood grain to avoid scratches.
Use a sanding block or electric sander for best results. Check all surfaces with your hand to ensure they are smooth. This step prevents injuries and gives a better look.
Marking Drill Points
Mark where you will drill holes to join the wood pieces. Use a ruler and pencil to place points evenly. Correct placement keeps the rack stable and balanced. Double-check measurements before drilling.
| Wood Part | Hole Location | Distance from Edge |
| Base | 4 holes | 1 inch |
| Side Supports | 2 holes each | 0.5 inch |
| Top Rail | 3 holes | 1 inch |
Credit: www.windycityfishing.com
Assembling The Rack
After cutting all parts for your fishing rod rack, it is time to put them together. Assembling the rack needs care to make it strong and stable.
Follow each step to connect the pieces, secure them with screws, and add support brackets for extra strength.
Joining The Pieces
Start by arranging all the wooden pieces on a flat surface. Match the parts that fit together based on your design.
Use wood glue on the edges to join pieces firmly. Press them together and hold until the glue sets.
- Align the base pieces first
- Attach vertical supports next
- Fit the top rails last
Securing With Screws
Once the glue dries, secure the joints with screws. Screws keep the rack from moving or falling apart.
Drill pilot holes before inserting screws to avoid splitting the wood. Use screws that fit your wood thickness.
- Use a drill with a screwdriver bit
- Insert screws evenly spaced along each joint
- Check that all parts feel tight and steady
Adding Support Brackets
Add metal support brackets to increase the rack’s strength. Brackets help hold corners and joints firm.
Place brackets inside corners where two pieces meet. Attach them with small screws for extra stability.
- Use L-shaped brackets for corners
- Fix brackets on base and top connections
- Tighten all screws firmly but not too tight
Finishing Touches
Finishing touches make your fishing rod rack look great and last longer. These steps protect the wood and add useful features.
Take time to apply paint or stain, seal the wood, and add hooks or padding. These details improve both style and function.
Painting Or Staining
Painting or staining your rack gives it color and protects it from water damage. Choose a finish that matches your outdoor gear or room decor.
Use a brush or spray to apply paint or stain evenly. Let it dry completely before adding any more coats for a smooth finish.
Sealing For Durability
Sealing the wood prevents moisture and dirt from causing damage. A clear sealant keeps the natural look of the wood while adding strength.
Apply sealant with a brush in thin, even layers. Let each layer dry well before applying the next to ensure full protection.
Adding Hooks Or Padding
Hooks help you hang extra gear like hats or lures. Padding protects your rods from scratches and keeps them secure.
- Attach metal or plastic hooks on the sides or front of the rack.
- Use foam or felt padding where rods rest or touch the wood.
- Secure padding with glue or staples for a tight fit.
Mounting And Installation
Mounting and installing a fishing rod rack correctly keeps your rods safe and organized. It also saves space and makes your fishing gear easy to reach.
This guide explains how to mount and install your fishing rod rack securely on a wall or other surface.
Locating Studs
Studs are the wooden beams behind your walls. Mounting the rack on studs makes it strong and stable.
Use a stud finder to locate the studs. Mark their positions with a pencil before drilling.
- Run the stud finder along the wall
- Look for solid signals on the tool
- Mark the center of each stud with a pencil
- Check spacing, studs are usually 16 or 24 inches apart
Using Anchors
If you cannot mount on studs, use wall anchors. Anchors hold screws firmly in drywall or plaster.
Choose anchors that support the rack’s weight and your fishing rods.
- Drill holes slightly smaller than the anchor size
- Push or tap anchors into the holes until flush with the wall
- Use screws that fit the anchors
- Tighten screws to secure the rack
Ensuring Stability
Check that the rack is level before final tightening. A crooked rack can cause rods to fall.
Use a level tool and adjust screws if needed. Make sure all mounting points are secure.
- Double-check screw tightness
- Test rack by gently pulling on it
- Ensure rack does not wobble or shift
- Distribute rods evenly to balance weight
Organizing Your Rods
Keeping your fishing rods neat helps protect them and saves space. A fishing rod rack is a great way to organize your rods safely.
Good organization makes it easy to find the rod you need. It also keeps your rods in good condition for longer.
Arranging By Size
Sort your rods by their length and thickness. This helps use the rack space better and keeps rods from tangling.
- Place longer rods at the back or top
- Keep shorter rods in front or bottom
- Group rods with similar thickness together
This order makes it easy to pick the right rod fast. It also stops rods from bending or getting damaged.
Labeling Sections
Label each section of your rod rack. Labels help you and others find rods quickly without searching.
- Use simple names like “Short Rods” or “Spinning Rods”
- Use waterproof labels for durability
- Place labels clearly where they are easy to see
Labeling makes your rack more user-friendly. It helps keep your rods organized over time.
Maintaining Accessibility
Arrange rods so you can reach each one easily. Avoid stacking rods on top of each other.
- Keep enough space between rods for easy removal
- Place the rack at a comfortable height
- Leave clear paths around the rack
Good accessibility saves time and reduces the chance of damage. It keeps your fishing gear ready to use.

Credit: www.reddit.com
Safety Tips
Building a fishing rod rack requires attention to safety. Following safety tips helps prevent accidents and damage.
Use the right tools and install the rack securely. Check it often for any wear or problems.
Tool Handling
Handle all tools carefully to avoid injury. Always wear safety glasses and gloves. Use tools only for their intended purpose.
- Keep tools sharp and clean
- Store tools properly after use
- Use a stable work surface
- Disconnect power tools when not in use
- Follow the manufacturer’s instructions
Proper Installation
Install the fishing rod rack in a secure place. Make sure the wall or surface can support the rack’s weight and the rods.
| Factor | Safety Tip |
| Wall Type | Use anchors for drywall, screws for wood |
| Height | Mount rack at easy reach to avoid stretching |
| Spacing | Leave space between rods to prevent damage |
| Fasteners | Use strong screws and check tightness regularly |
Regular Inspections
Check the fishing rod rack regularly to ensure it stays safe. Look for loose parts and signs of wear or damage.
- Tighten screws and bolts
- Replace worn or damaged parts
- Clean rack to prevent rust or decay
- Check that rods fit securely
- Test stability by gently shaking the rack
Alternative Ideas
Making a fishing rod rack does not always need new wood or metal. You can use different ideas to build a rack that fits your style and space.
These alternatives help you save money and add a unique touch to your fishing gear storage.
Repurposing Materials
Old furniture parts, like wooden pallets or ladder rungs, can become fishing rod racks. They are easy to find and give a rustic look.
Using PVC pipes or leftover metal rods also works well. These materials are light and durable for holding rods.
- Use an old wooden pallet as a wall rack
- Cut PVC pipes to hold rods vertically
- Attach metal rods to a board for a simple rack
- Recycle ladder rungs for rod holders
Decorative Enhancements
Add style to your fishing rod rack by painting it with bright colors or patterns. This makes your rack stand out in any room.
You can also add hooks or small shelves to hold fishing gear like reels or bait boxes. This keeps everything organized in one place.
- Paint the rack with waterproof paint
- Use stencils to create fish or wave designs
- Add hooks for hats or tackle boxes
- Attach small shelves for extra storage
Portable Racks
Portable racks are great for fishing trips. They are easy to carry and set up wherever you go.
Use lightweight materials like aluminum or foldable wood frames. Some racks even fit inside fishing bags for easy transport.
- Build a foldable wooden frame rack
- Use lightweight aluminum rods and connectors
- Design a rack that fits inside a fishing bag
- Add handles or straps for easy carrying

Credit: www.reddit.com
Frequently Asked Questions
What Materials Are Needed To Make A Fishing Rod Rack?
To make a fishing rod rack, you need wood, screws, hooks, and a drill. Choose sturdy wood like pine or oak. Hooks should fit your rod handles securely. Sandpaper and paint can enhance the finish and durability of your rack.
How Do I Build A Wall-mounted Fishing Rod Rack?
Start by measuring your wall space and rod length. Cut wooden boards to size and drill holes for hooks. Attach hooks evenly spaced to support rods. Secure the rack to the wall studs with screws for stability and safety.
Can I Customize My Fishing Rod Rack Design?
Yes, you can customize your rack’s size, shape, and finish. Add extra shelves for reels or tackle boxes. Use different wood stains or paint to match your decor. Custom racks improve organization and make your fishing gear more accessible.
How Long Does It Take To Make A Fishing Rod Rack?
Building a basic fishing rod rack usually takes 2-4 hours. This includes measuring, cutting, assembling, and finishing. More complex designs or customizations may take longer. Planning ahead ensures a smooth and efficient build process.
Conclusion
Making a fishing rod rack is simple and useful. You save space and keep rods safe. Using basic tools and materials works well. You can customize the rack to fit your needs. It helps organize gear and keeps everything neat.
Building your own rack feels rewarding and fun. Try this project to improve your fishing setup today.