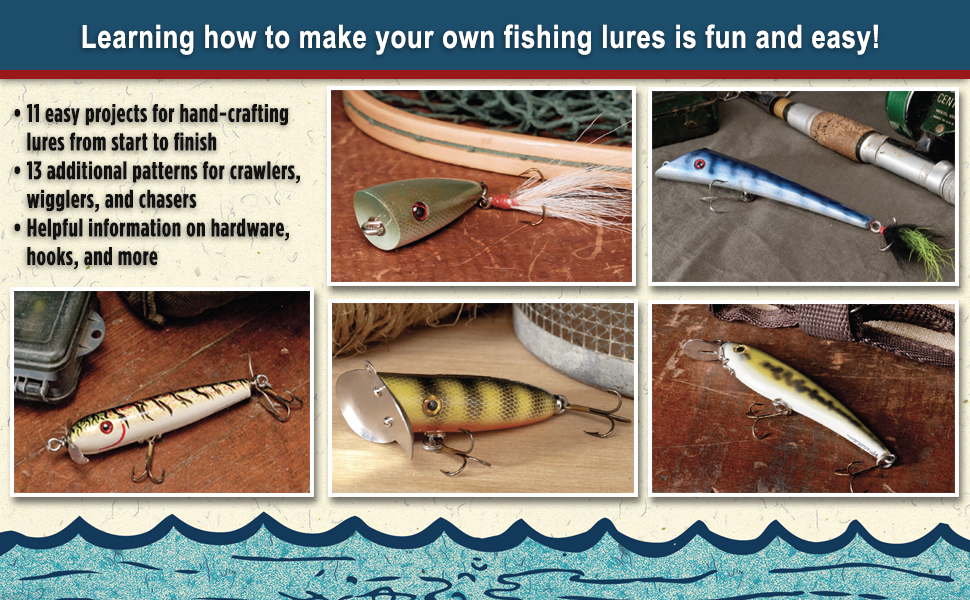
Are you ready to catch more fish and add a personal touch to your fishing gear? Making your own wooden fishing lures can be a fun and rewarding experience.
Not only do you get to craft something unique, but you also gain an edge on the water with lures designed by you. In this guide, you’ll discover simple steps to create beautiful, effective wooden lures that fish can’t resist.
Keep reading, and soon you’ll be turning plain wood into your secret weapon for fishing success.

Credit: www.amazon.com
Choosing The Right Wood
Choosing the right wood is important for making wooden fishing lures. The wood affects how the lure floats and moves in water. It also impacts how easy the lure is to shape and finish.
Different woods offer different qualities. Some are light and float well, while others are denser and sink faster. Knowing these differences helps you pick the best wood for your fishing needs.
Best Wood Types For Lures
Not all wood works well for lures. Some woods are better because they are easy to carve and have good strength. Here are some popular woods for making fishing lures.
- Balsa: Very light and floats well. Easy to carve and shape.
- Cedar: Strong and has a pleasant scent. Good for floating lures.
- Basswood: Soft and fine-grained. Carves easily and holds paint well.
- Mahogany: Dense and strong. Better for sinking lures.
- Poplar: Affordable and easy to work with. Has a smooth texture.
Wood Grain And Density
The grain and density of wood affect how the lure performs. Fine grain makes smooth surfaces and helps paint stick. Density decides if the lure will float or sink.
| Wood Type | Grain | Density (g/cm³) | Float or Sink |
| Balsa | Fine | 0.1 – 0.2 | Floats |
| Cedar | Medium | 0.3 – 0.4 | Floats |
| Basswood | Fine | 0.3 – 0.4 | Floats |
| Mahogany | Medium | 0.6 – 0.8 | Sinks |
| Poplar | Fine | 0.4 – 0.5 | Sinks |
Sourcing Sustainable Wood
Using sustainable wood helps protect forests and wildlife. Look for wood that comes from well-managed forests or recycled sources. This keeps the environment safe for the future.
- Buy from suppliers who follow sustainable practices
- Use scrap wood from other projects
- Check for wood certified by trusted organizations
- Avoid rare or endangered wood species
- Consider reclaimed wood for unique textures
Tools And Materials Needed
Making wooden fishing lures is a fun and creative hobby. You need the right tools and materials to build good lures. This guide lists what you will need to get started.
Each category covers important items to help you shape, finish, and assemble your wooden lures with ease and precision.
Essential Hand Tools
Hand tools help you carve and shape the wood by hand. They give you control over the small details of your lure.
- Carving knives for detailed shaping
- Small files to smooth rough edges
- Sandpaper with different grits for finishing
- Pliers to bend and hold hooks
- Drill with small bits for making holes
- Clamps to hold pieces while working
Power Tools For Efficiency
Power tools speed up the crafting process and make cutting wood easier. They help with shaping larger parts quickly.
| Tool | Use |
| Band saw | Cut rough shapes from wood blocks |
| Rotary tool | Carve and sand small parts |
| Drill press | Make precise holes for hooks and eyes |
| Electric sander | Smooth surfaces quickly |
Paints, Finishes, And Hooks
After shaping, paint your lure to attract fish. Finish it to protect the wood. Choose the right hooks for catching fish.
- Acrylic paints in bright colors
- Clear varnish or epoxy for waterproof finish
- Small eye screws to attach hooks
- Sharp treble hooks in various sizes
- Brushes for painting and finishing
Designing Your Lure
Designing a wooden fishing lure is a fun and creative process. The shape, size, and details affect how the lure works in water.
Good design helps attract fish and makes your lure swim naturally. Focus on the basics to start well.
Basic Shapes And Sizes
Start by choosing simple shapes like minnows, shads, or worms. These shapes mimic real fish or insects.
Sizes vary from small to large, depending on the fish you want to catch. Small lures work for panfish, big ones for bass or pike.
- Small lures: 2-3 inches long
- Medium lures: 3-5 inches long
- Large lures: 5-7 inches long
- Common shapes: minnow, crankbait, spoon
Adding Realistic Features
Add eyes, scales, and colors to make your lure look real. Use paint or markers for details.
Realistic features help fish notice your lure. Use shiny paint for scales or glow paint for night fishing.
- Paint eyes near the head
- Use small brushes for scale patterns
- Add glitter or reflective tape
- Finish with clear coat for shine
Balancing For Proper Action
Your lure must balance well to swim right. Add weights inside or outside to help it move naturally.
Test your lure in water. Adjust weight placement until it wobbles or dives like a live fish.
- Place weights near the front for diving
- Add weight in the center for wobbling
- Keep lure balanced to avoid spinning
- Use small metal balls or strips as weights
Cutting And Shaping
Cutting and shaping are the first steps in making wooden fishing lures. You start with a block of wood and create the basic form.
This process needs care and patience to make the lure look right and work well in water.
Safe Cutting Techniques
Always wear safety glasses and gloves before cutting wood. Use sharp tools to make clean cuts and reduce slips.
Cut slowly and keep your hands away from the blade. Secure the wood so it does not move while cutting.
- Wear protective gear
- Use sharp blades
- Cut slowly and carefully
- Clamp wood firmly
- Keep fingers away from cutting area
Sanding For Smoothness
Sanding removes rough edges and makes the lure smooth. Start with coarse sandpaper and move to fine grit.
Sand evenly around the lure to keep its shape and avoid flat spots. Smooth wood helps paint stick better.
- Start with 80-100 grit sandpaper
- Use 150-220 grit for fine smoothing
- Sand along the grain
- Check for rough spots often
Creating Details And Texture
Add small details like eyes, scales, or fins using carving tools or a wood burner. These details make lures look real.
Texture helps the lure move naturally in water. Use a wire brush or knife to create patterns on the wood surface.
- Use carving knives for fine lines
- Wood burners add dark details
- Wire brushes create scale patterns
- Test texture by feeling and sight
Painting And Finishing
Painting and finishing wooden fishing lures add beauty and protect them from water damage. Good paint and coatings help your lure last longer in water.
Follow these tips to choose paints, layer colors, and apply protective coatings well.
Choosing Durable Paints
Pick paints that stick well to wood and resist water. Acrylic paints are great because they dry fast and are strong. Avoid paints that peel or crack easily.
Look for paints made for outdoor use or models. These often have better durability for fishing lures.
- Acrylic paints dry quickly and last long
- Model paints provide fine details and durability
- Avoid water-based paints that peel easily
Layering Colors For Depth
Use several thin paint layers to create deep and rich colors. Let each layer dry fully before adding the next. This stops colors from mixing or running.
Start with a base coat, then add details like stripes or spots on top. Thin layers make the paint last longer and look better.
- Apply a base coat to cover the whole lure
- Add details with small brushes after base dries
- Use thin layers to avoid thick, uneven paint
Applying Protective Coatings
Protective coatings keep your paint safe and add shine. Use clear varnish or epoxy to seal the lure. These coatings stop water from damaging the paint.
Apply at least two coats of clear finish. Let each coat dry fully. Sand lightly between coats for a smooth surface.
- Use clear varnish or epoxy for water protection
- Apply two or more thin coats for best coverage
- Sand lightly between coats for smooth finish

Credit: www.youtube.com
Attaching Hardware
Attaching hardware to wooden fishing lures is key for making them functional. The hardware includes hooks, eyes, split rings, and swivels. Proper attachment ensures durability and good performance in water.
Use the right tools and methods to keep the hardware secure. Careful placement helps the lure move naturally and catch fish.
Selecting Hooks And Eyes
Choose hooks and eyes that fit the lure size and style. Strong hooks with sharp points improve hook-up rates. Eyes come in different sizes and shapes for various fishing needs.
- Use stainless steel or rust-resistant hooks
- Pick eyes that match the lure’s weight
- Consider the hook’s size to avoid scaring fish
- Choose eyes with smooth finishes to prevent line damage
Secure Attachment Methods
Secure the hardware tightly to the lure body. Loose parts can cause the lure to fail or lose fish. Use strong glue and screws where needed. Wrap thread or wire to add extra hold.
| Method | Use | Tip |
| Epoxy Glue | Bond hooks and eyes | Apply evenly and let dry fully |
| Small Screws | Fix heavy hardware | Pre-drill holes to avoid wood splitting |
| Thread Wrapping | Strengthen joints | Coat with glue after wrapping |
Adding Split Rings And Swivels
Split rings connect hooks to the lure and allow free movement. Swivels reduce line twist and improve lure action. Use pliers to open and attach split rings carefully.
- Pick split rings that fit the hook and eye sizes
- Use quality swivels to avoid rust and breakage
- Attach split rings securely to prevent loss
- Test the lure’s movement after adding hardware
Testing And Adjusting
Testing and adjusting wooden fishing lures is key to making them work well. This step helps you see how your lure moves in water and if it attracts fish.
Try different techniques to check your lure’s action and fix any problems. This guide covers water testing, fine-tuning movement, and solving common issues.
Water Testing Techniques
Test your lure in calm water like a pool or bucket first. Watch how it floats and moves when you pull it. Check if it dives, wiggles, or spins.
- Use a clear container to see underwater action
- Pull the lure slowly to observe its natural movement
- Try different speeds to see how the lure reacts
- Look for smooth gliding or erratic motion
- Note if the lure sinks too fast or floats too high
Fine-tuning Movement
Adjust your lure to get the right swimming action. You can trim, sand, or add weight to change its balance and movement.
| Adjustment | Effect |
| Trim the tail | Faster wiggle |
| Sand edges | Smoother glide |
| Add weight to nose | Dives deeper |
| Add weight to tail | Raises nose up |
| Use different hooks | Changes balance and action |
Troubleshooting Common Issues
If your lure does not swim right, check these common problems and fixes.
- Lure spins too much:Adjust the weight or trim the fins.
- Lure sinks too fast:Remove some weight or add buoyant paint.
- Lure floats without diving:Add weight to the front or shorten the lip.
- Movement is weak:Sand the edges or reshape the body.
- Hooks cause imbalance:Try lighter or smaller hooks.

Credit: www.amazon.com
Maintenance And Storage
Taking care of wooden fishing lures keeps them working well. Proper maintenance helps lures last longer. Good storage protects them from damage.
This guide covers cleaning, preventing wear, and storing lures the right way. Follow these tips after each fishing trip.
Cleaning After Use
Clean your wooden lures right after fishing. Saltwater and dirt can harm the wood and hooks. Use fresh water to rinse off dirt and salt.
- Rinse lures with fresh water
- Use a soft cloth to wipe them dry
- Check hooks for rust or dirt
- Dry lures completely before storing
Preventing Damage And Wear
Wooden lures need gentle care to avoid cracks and chips. Handle them carefully and avoid dropping them on hard surfaces. Check for loose parts before fishing.
| Cause of Damage | Prevention |
| Water swelling wood | Dry lures fully after use |
| Rust on hooks | Rinse and dry hooks properly |
| Chipping from drops | Handle lures gently |
Storing Lures Properly
Store wooden lures in a dry and cool place. Avoid direct sunlight to keep colors bright. Use a tackle box with separate compartments to stop lures from banging together.
- Keep lures dry before storing
- Use tackle boxes with dividers
- Store away from heat and sunlight
- Check stored lures regularly for damage
Frequently Asked Questions
What Materials Are Needed For Wooden Fishing Lures?
You need wood blocks, carving tools, sandpaper, paint, hooks, and waterproof sealant. These materials help create durable, attractive lures for fishing.
How Do You Shape A Wooden Fishing Lure?
Start by sketching the lure shape on wood. Use carving tools to cut and sand it smooth for a streamlined finish.
What Type Of Paint Works Best On Wooden Lures?
Use waterproof acrylic or enamel paint. These paints resist water and maintain color, ensuring your lure stays vibrant underwater.
How Do You Add Hooks To Wooden Fishing Lures?
Drill small holes in the lure’s body. Attach split rings and secure treble hooks for effective fishing performance.
Conclusion
Creating wooden fishing lures is a rewarding hobby. You gain skills and unique lures. This process involves creativity and patience. Start with simple designs. Gradually, add complexity and detail. Enjoy the satisfaction of using homemade lures. Share your creations with friends.
They might inspire others. Remember, practice improves your craftsmanship. Each lure tells a story. Happy fishing with your new handmade lures!