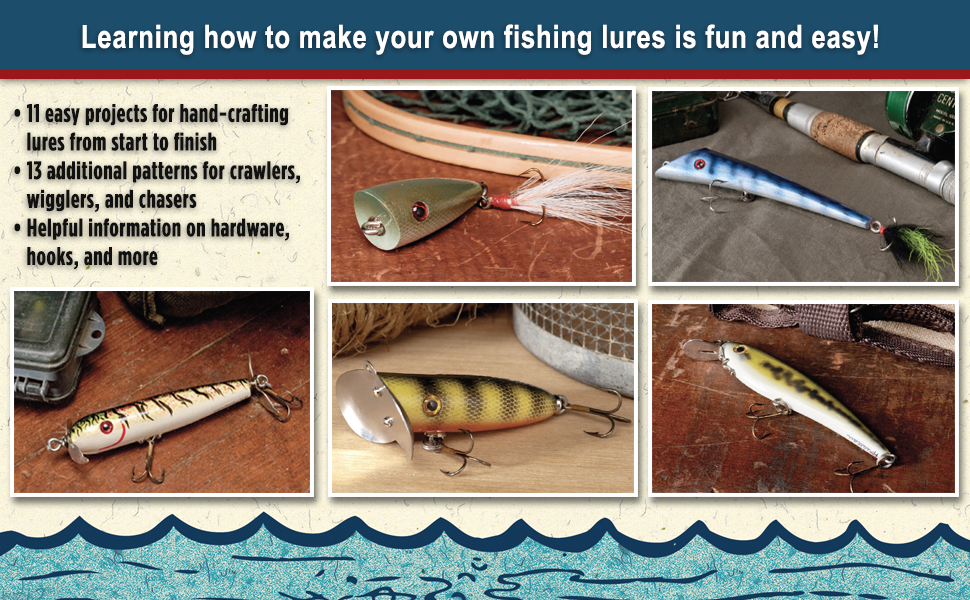
If you love fishing and want to catch more fish, making your own wooden lures is a game-changer. Imagine using lures you crafted yourself—designed to attract fish just the way you want.
It’s easier than you think, and it adds a personal touch to every fishing trip. In this guide, you’ll discover simple steps to create wooden lures that look great and work even better. Ready to boost your fishing success and impress your friends?
Let’s dive in and start crafting lures that will make your next catch unforgettable.
Choosing The Right Wood
Making wooden lures for fishing is fun and rewarding. The right wood ensures your lures float and move well in water.
The type of wood affects how your lure performs. It’s important to choose wisely for the best fishing experience.
Best Wood Types For Lures
Some woods are better for making lures. They need to be light and durable.
- Balsa wood is very lightweight, great for topwater lures.
- Cedar is strong and resistant to water, perfect for many lures.
- Poplar is easy to carve, suitable for beginners.
Wood Size And Shape
The size and shape of the wood affect how your lure moves. Smaller pieces are easier to handle.
Shaping the wood correctly helps mimic the movement of fish. This attracts more catches.
- Start with a block that is 4 to 6 inches long.
- Carve the shape slowly, following a pattern if needed.
- Sand the surface smooth for better water movement.
Gathering Essential Tools
Making wooden lures for fishing starts with having the right tools. Good tools help you work safely and create better lures.
This guide covers the main tool groups you need. Each group has a special role in the lure-making process.
Cutting And Shaping Tools
You need tools that cut and shape the wood into the lure form. These tools help you make smooth, detailed shapes.
- Sharp carving knives for detailed cuts
- Small saws to cut wood blocks
- Files to shape edges and curves
- Rasps for rough shaping
- Chisels for fine wood removal
Sanding And Finishing Supplies
Sanding smooths the lure surface. Finishing supplies protect the wood and prepare it for painting.
| Supply | Purpose |
| Sandpaper (various grits) | Smooths wood surface |
| Foam sanding blocks | Even sanding on curves |
| Tack cloth | Removes dust before painting |
| Wood sealer | Prepares wood for paint and finish |
| Clear finish (varnish or lacquer) | Protects and shines lure |
Painting And Sealing Materials
Painting adds color and pattern to attract fish. Sealing keeps paint safe and lure durable.
- Acrylic paints for bright, waterproof colors
- Fine brushes for detailed work
- Masking tape for clean paint lines
- Clear coat spray for sealing paint
- Mixing palette for paint colors
Designing Your Lure
Designing a wooden fishing lure starts with understanding its shape and parts. The right design helps attract fish effectively.
This guide covers selecting lure shapes and adding hooks and eyes to complete your lure design.
Selecting Lure Shapes
Choosing the shape of your lure depends on the fish you want to catch and the water you fish in. Some shapes float, others dive.
- Minnow shapes mimic small fish and swim well at the surface.
- Crankbait shapes dive deep and move in a wobbling pattern.
- Topwater shapes create splashes and attract fish from below.
- Jerkbait shapes move erratically, catching fish attention.
- Blade shapes produce vibrations to lure fish near.
Adding Hooks And Eyes
Hooks and eyes are key parts of your lure. They help catch fish and connect the lure to the fishing line.
| Part | Purpose | Tips |
| Hooks | Catches the fish | Use sharp, rust-resistant hooks sized for your target fish |
| Eyes | Attach the fishing line | Securely fasten eyes to prevent breaking under tension |

Credit: www.amazon.com
Cutting And Shaping The Wood
Cutting and shaping wood is the first big task in making wooden fishing lures. The wood must be carefully prepared to create the right shape and size.
Using the right tools and methods helps to make lures that are smooth and balanced for fishing.
Marking The Wood
Marking the wood guides your cuts and carvings. It helps to keep the shape even and accurate.
- Draw the lure shape on the wood with a pencil.
- Mark key points like the head, tail, and where hooks will attach.
- Use a ruler or template for straight lines and curves.
- Double-check measurements before cutting.
Carving Techniques
Carving shapes the lure from the marked wood piece. You use knives, chisels, or rotary tools for this work.
| Tool | Use | Tip |
| Carving knife | Shaping curves | Keep it sharp for clean cuts |
| Chisel | Removing large wood parts | Work with the grain |
| Rotary tool | Detail work and smoothing | Use low speed to avoid burning |
Sanding For Smoothness
Sanding removes rough edges and prepares the lure for finishing. Use different sandpaper grits to get a smooth surface.
- Start with coarse grit to shape the lure.
- Use medium grit to smooth out tool marks.
- Finish with fine grit for a polished surface.
- Sand evenly to keep the lure balanced.
Painting And Decorating
Painting and decorating wooden fishing lures adds life and detail to the bait. It helps the lure look like real fish or other prey.
Good painting makes your lure more attractive to fish. This guide covers paint types, base coats, and adding patterns.
Choosing Paint Types
Pick paint that sticks well to wood and resists water. Acrylic paints are popular for wooden lures. They dry fast and come in many colors.
Other options include enamel paints. They last long but take more time to dry. Avoid water-based paints that peel easily in water.
- Acrylic paint: quick drying, many colors
- Enamel paint: durable, slower drying
- Avoid cheap water-based paints for lures
Applying Base Coats
Start with a smooth, clean lure surface. Sand it lightly to help paint stick. Then apply a base coat to cover the wood.
Use a light color base coat like white or pale yellow. This makes the top colors brighter and more visible underwater.
- Sand lure surface lightly before painting
- Apply thin, even base coat
- Let the base coat dry fully before next step
Adding Details And Patterns
Add details like spots, stripes, or scales to mimic real fish. Use small brushes or paint pens for fine lines and shapes.
Layer paint carefully. Let each pattern dry before adding the next. Use colors that match the fish you want to catch.
- Use small brushes for detailed work
- Paint in thin layers to avoid clumps
- Choose natural colors like green, brown, and silver
- Seal painted lure with clear coat for protection
Sealing And Waterproofing
Sealing and waterproofing wooden lures protect them from water damage. It helps the lure last longer during fishing trips.
Proper sealing stops water from soaking into the wood. This keeps the lure strong and attractive.
Selecting Sealants
Choose sealants that block water and protect the wood. Some sealants are clear, keeping the lure’s natural look.
Common sealants include epoxy, polyurethane, and varnish. Each has its own strengths for waterproofing.
- Epoxy: Very strong and waterproof
- Polyurethane: Flexible and clear finish
- Varnish: Easy to apply and dries fast
Application Methods
Apply sealants evenly over the lure’s surface. Use brushes or spray tools for smooth coverage.
Make sure to cover all sides and edges. Multiple thin coats work better than one thick coat.
- Brush on thin layers with a soft brush
- Spray for even and fast application
- Wipe off extra sealant to avoid drips
Drying And Curing
Let the sealant dry fully between coats. Follow the sealant label for recommended drying times.
After the last coat, allow the lure to cure. This makes the waterproof layer strong and durable.
- Dry in a dust-free area
- Keep lure flat to avoid uneven coating
- Wait at least 24 hours for curing
Attaching Hardware
Attaching hardware to wooden fishing lures is an important step. It helps the lure work well in water and catch fish.
You need to install hooks, add split rings, and balance the lure carefully. Each step affects how the lure moves.
Installing Hooks
Choose strong hooks that fit your lure size. Use a small drill to make holes where hooks will go. Screw in or attach the hooks firmly. Make sure hooks hang freely and do not block lure movement.
Adding Split Rings
Split rings connect hooks and lure body. They allow hooks to move freely. Use pliers to open split rings and slide them onto eyelets. Close the rings tightly to keep hooks secure.
- Select the right size split rings for your hooks
- Use split ring pliers for easier opening
- Attach split rings to lure eyelets before adding hooks
- Ensure rings close completely to avoid losing hooks
Balancing The Lure
Balance affects how the lure swims. Add weights inside or outside the lure to improve action. Check the lure in water and adjust weights if needed.
| Weight Location | Effect on Lure Movement |
| Front | Dives deeper and faster |
| Middle | Stable swimming action |
| Rear | Slower, wobbling motion |
Testing And Adjusting
Testing and adjusting wooden fishing lures is key to making them work well in water. This process helps you see how the lure moves and floats. You can fix problems before using the lure for fishing.
Two main areas need attention: how the lure acts in water and its weight and buoyancy. Both affect how fish react to the lure.
Water Testing Techniques
Test your lure in a small water container or a calm pond. Watch how it swims and floats. Notice if it dives, sinks, or stays on the surface. Check if the lure wiggles naturally or moves strangely.
- Place the lure in water and let it float freely.
- Pull the lure slowly to see its swimming action.
- Check if the lure sinks too fast or floats too high.
- Look for any spinning or unwanted rolling movements.
- Make notes on what needs to be changed or fixed.
Adjusting Weight And Buoyancy
Weight and buoyancy control how your lure behaves in water. Add or remove weight to change how deep it dives. Use light materials to help it float or heavy ones to sink. Balance is important for a natural look.
| Adjustment | Effect on Lure |
| Add Lead Weights | Helps lure dive deeper |
| Use Balsa Wood | Increases buoyancy, helps float |
| Drill Small Holes | Reduces weight, floats higher |
| Add Internal Rattles | Affects balance and sound |
| Cover with Waterproof Paint | Seals wood and keeps buoyancy consistent |
Tips For Durable Lures
Wooden fishing lures need care to last long. Using strong materials and good finishes helps. Proper maintenance keeps them working well.
Follow simple steps to protect your lures from wear and damage. This guide shares tips on keeping your wooden lures durable.
Maintenance Tips
Keep your lures clean and dry after each use. Remove dirt and water to avoid damage. Store lures in a dry box or case.
- Rinse lures with fresh water after fishing
- Dry them completely before storage
- Apply a thin coat of waterproof sealant yearly
- Check hooks and split rings for rust
- Sharpen hooks as needed to keep them effective
Repairing Damaged Lures
Small cracks or chips can be fixed easily. Repairing lures extends their life and saves money. Use the right tools and materials for repairs.
| Damage Type | Repair Method | Tools Needed |
| Small cracks | Fill with wood glue and sand smooth | Wood glue, sandpaper |
| Paint chips | Touch up with matching paint | Paintbrush, enamel paint |
| Loose hooks | Tighten or replace split rings | Split ring pliers, new split rings |
| Broken lip | Replace with new plastic or metal lip | Epoxy, replacement lip, small screws |

Credit: www.amazon.com

Credit: www.amazon.com
Frequently Asked Questions
What Materials Are Needed To Make Wooden Fishing Lures?
To make wooden fishing lures, you need basswood or cedar, carving tools, sandpaper, paint, hooks, and sealant. These materials help create durable, attractive, and functional lures for fishing.
How Do I Shape Wooden Lures For Better Fish Attraction?
Shape wooden lures by carving a fish-like form with smooth edges. Focus on the lure’s body size and shape to mimic prey and enhance water movement, attracting more fish effectively.
What Type Of Paint Is Best For Wooden Lures?
Use waterproof acrylic or enamel paint for wooden lures. These paints provide bright colors, durability, and resistance to water, ensuring your lure looks appealing and lasts longer during fishing.
How Do I Add Hooks To My Wooden Fishing Lures?
Attach hooks by drilling small holes at the lure’s front and rear ends. Use split rings to secure treble hooks tightly, ensuring they stay attached during fishing action.
Conclusion
Making wooden lures for fishing is a fun and rewarding hobby. You can create lures that attract many types of fish. Start with simple shapes and try different colors. Each lure you make teaches you something new. With practice, your skills will grow.
Wooden lures add a personal touch to your fishing trips. Enjoy the process and the time spent crafting. Soon, you will have unique lures ready for your next catch. Keep experimenting and have fun with your fishing projects.