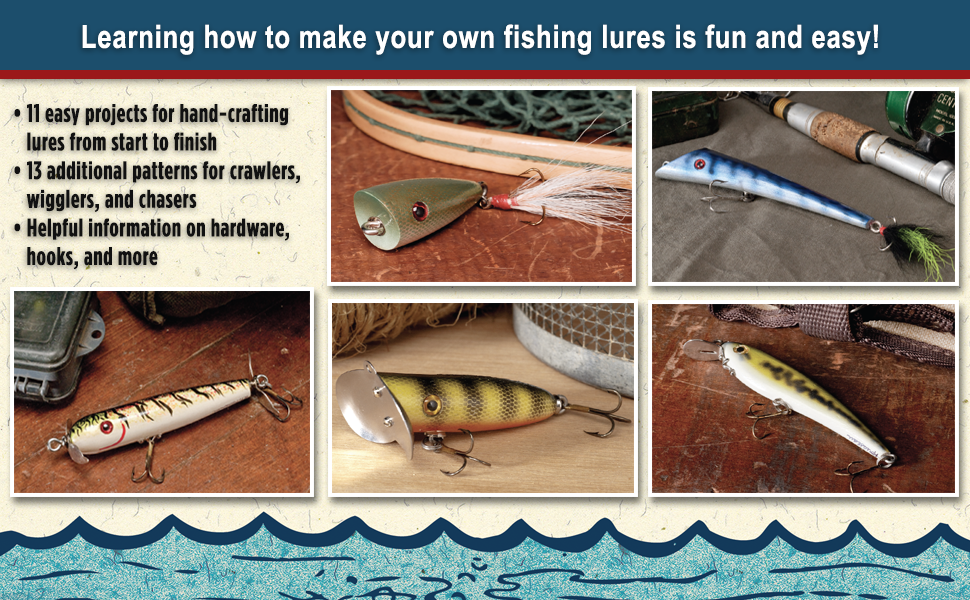
If you love fishing, making your own wooden lures can take your experience to a whole new level. Imagine catching fish with a lure you crafted yourself—something unique that no one else has.
It’s not as hard as you might think. With a few simple tools and some basic steps, you can create lures that look great and work even better. In this guide, you’ll discover exactly how to make wooden lures that will attract more fish and make your fishing trips more exciting.
Ready to dive in and start crafting? Let’s get started!
Choosing The Right Wood
Picking the right wood is important for making wooden fishing lures. Wood affects how the lure floats, moves, and lasts in water.
Some woods work better because of their weight and how easy they are to shape. Let’s look at the best woods for lures and what wood grain and density mean.
Best Wood Types For Lures
Different woods give different results. Here are some popular woods to use for wooden lures:
- Balsa: Very light and easy to carve. It floats well and works great for topwater lures.
- Cedar: Lightweight and strong. It has a nice grain and resists water damage.
- Basswood: Soft and easy to shape. It is a bit heavier but still good for many lures.
- Poplar: Medium weight and hard. It is durable and holds paint well.
- Paulownia: Light and water resistant. It is becoming more popular for lures.
Wood Grain And Density
Wood grain and density affect how the lure moves and how strong it is. Grain is the pattern of the wood fibers. Density is how heavy the wood is for its size.
| Wood Type | Grain Type | Density (lbs/ft³) |
| Balsa | Open, straight grain | 7-10 |
| Cedar | Fine, straight grain | 23-35 |
| Basswood | Fine, even grain | 22-28 |
| Poplar | Fine, straight grain | 26-31 |
| Paulownia | Open, straight grain | 15-20 |

Credit: www.amazon.com
Essential Tools And Materials
Making wooden fishing lures is a fun and creative hobby. You need some basic tools and materials to start carving and painting lures.
Choosing the right supplies helps you make lures that work well in water. This guide covers the essential tools and materials.
Basic Carving Tools
Carving tools shape the wood into a lure. You need sharp and safe tools for smooth cuts and details.
Start with small knives and chisels. These help cut and carve the wood easily.
- Whittling knife
- Small carving chisels
- Utility knife
- Wood rasp or file
- Cutting board or workbench
Sanding And Finishing Supplies
Sanding smooths the wood and removes rough edges. Different sandpaper grits help you get a nice finish.
Finishing supplies protect the lure and make it last longer in water.
- Sandpaper (80, 120, 220 grits)
- Small sanding block or sponge
- Fine steel wool for final smoothing
- Wood sealer or primer
- Clear varnish or polyurethane
Painting And Sealing Materials
Painting adds color and pattern to your lure. Use paints that stick well to wood and resist water.
Sealing the paint protects your work and keeps the lure strong in water.
- Acrylic paints in various colors
- Fine paintbrushes for detail work
- Masking tape for clean lines
- Clear waterproof sealant or epoxy
- Palette or mixing tray
Designing Your Lure
Designing a wooden fishing lure starts with a clear idea. You want it to look natural and move well in water.
Good design helps attract fish and makes your lure work better. Focus on shape, size, and weight.
Popular Lure Shapes
Many lures copy shapes of small fish or bugs. The shape controls how the lure moves in water.
Common shapes include minnows, crankbaits, and spoons. Each has a different action to attract fish.
- Minnow:Slim and long, imitates small fish. It swims straight and wobbles.
- Crankbait:Rounded body with a lip. It dives and bounces off objects.
- Spoon:Curved metal shape. It flashes and wobbles to catch attention.
- Topwater:Flat or hollow shapes. They float and create splashes on the surface.
Size And Weight Considerations
Size and weight affect how deep and far your lure will go. Choose these based on fishing spots.
Light lures float or move near the surface. Heavier lures sink deeper and cast farther.
- Small lures work well in clear water and for small fish.
- Medium lures attract a wide range of fish sizes.
- Large lures are best for big fish and deep water.
- Heavy lures help in strong currents and long casts.
Carving The Lure Body
Carving the body of a wooden lure is a key step in making a fishing lure. It shapes the lure’s size and form. This process requires patience and care to get the right look and feel.
Using simple tools and techniques, you can create a lure that moves well in water and attracts fish. This guide explains how to shape and add details to your wooden lure.
Shaping Techniques
Start by selecting a soft wood like basswood or cedar. Cut the wood block into a rough shape close to the final lure size. Use a saw or a carving knife for this step.
- Draw the lure shape on the wood block using a pencil.
- Cut the wood roughly along the lines with a saw.
- Use a carving knife or whittling tools to refine the shape.
- Sand the lure body with coarse sandpaper to smooth rough edges.
- Switch to finer sandpaper for a smooth finish.
Keep the lure symmetrical by checking both sides often. A balanced lure swims better and attracts more fish.
Creating Realistic Features
Adding realistic features makes your lure more attractive to fish. Carve small details like eyes, fins, and scales carefully.
| Feature | Tool Needed | Tip |
| Eyes | Small carving knife or drill | Make shallow holes or round shapes |
| Fins | Carving knife | Shape thin, curved edges |
| Scales | Wood burner or small gouge | Create small, repeated patterns |
| Gills | Carving knife | Carve shallow, curved lines |
After carving, use fine sandpaper to smooth out rough spots. This helps paint and finish stick better to the wood.
Sanding And Smoothing
Sanding and smoothing are key steps in making wooden fishing lures. They help remove rough spots and prepare the wood for painting.
Good sanding makes your lure look better and helps paint stick well. It also protects the wood from water damage.
Step-by-step Sanding Process
Start by using coarse sandpaper to shape the lure. Sand all edges and surfaces evenly. This removes large bumps and rough areas.
Next, switch to medium-grit sandpaper. This smooths the surface and removes scratches from the coarse paper. Sand with the grain of the wood.
- Use 80-grit sandpaper for shaping
- Follow with 120-grit for smoothing
- Finish with 220-grit for fine sanding
After sanding, wipe the lure with a damp cloth. This removes dust and helps you see any rough spots left behind.
Preparing For Painting
Make sure the lure is clean and dry before painting. Any dust or oil can stop the paint from sticking well.
Lightly sand the lure again with very fine sandpaper. This creates a smooth surface that holds paint better.
- Use 320-grit sandpaper for final sanding
- Remove all sanding dust with a soft cloth
- Keep the lure dry and free of oils
Painting And Detailing
Painting and detailing wooden lures is an important step to attract fish. It adds color and life to the lure. Careful painting also protects the wood from water damage.
In this section, we focus on choosing the right paint and adding patterns and eyes. These details make your lure look more real and appealing underwater.
Choosing Paint Types
Use paints that stick well to wood and resist water. Acrylic paints are popular because they dry fast and come in many colors. You can also use enamel paints for a glossy finish.
- Acrylic paint: water-based, dries quickly, good coverage
- Enamel paint: oil-based, durable, gives a shiny look
- Spray paint: easy to apply for base coats
- Clear coat: protects paint and adds shine
Adding Patterns And Eyes
Patterns and eyes give the lure a lifelike appearance. You can paint stripes, spots, or scales to mimic real fish. Adding eyes helps attract fish by making the lure look alive.
| Pattern Type | Effect |
| Stripes | Mimics baitfish movement |
| Spots | Looks like insects or small fish |
| Scales | Gives a realistic fish texture |
| Bright Eyes | Attracts attention from a distance |
Sealing And Waterproofing
Sealing wooden fishing lures protects them from water damage. It keeps the lure strong and looking good. Proper waterproofing helps your lure last through many fishing trips.
This guide explains the best sealants for durability and how to apply them correctly. Use these tips to make your wooden lures last longer in water.
Best Sealants For Durability
Choose sealants that create a hard, waterproof layer on your lure. Polyurethane and epoxy resins are popular choices. They resist scratches and water well. Spar urethane also works great for outdoor use.
- Polyurethane:Easy to apply and dries clear.
- Epoxy Resin:Very strong but takes longer to cure.
- Spar Urethane:Flexible and protects against UV rays.
Application Tips
Applying sealant properly is key to a smooth finish. Follow these steps to get the best result:
- Lightly sand the lure with fine-grit sandpaper before sealing.
- Clean the lure to remove dust and oils.
- Apply thin, even coats of sealant with a brush.
- Let each coat dry completely before applying the next.
- Sand lightly between coats for a smooth surface.
- Apply 3 to 4 coats for strong waterproofing.
| Tip | Reason |
| Use thin coats | Prevents drips and uneven drying |
| Sand between coats | Improves adhesion and smoothness |
| Allow full drying | Ensures durability and strength |
| Apply multiple coats | Creates a strong waterproof barrier |
Attaching Hooks And Hardware
Attaching hooks and hardware is key to making wooden lures work well. You need to pick the right hooks and fix them firmly. This part affects how the lure moves and catches fish.
In this guide, we focus on choosing hooks and securing them properly. Follow these tips to build strong, reliable lures for fishing.
Selecting Hooks
Choosing the right hook depends on the fish you want to catch and the lure size. Hooks come in many shapes and sizes. Pick hooks that match your lure’s weight and style.
- Use treble hooks for bigger fish and strong bites.
- Choose single hooks for smaller fish or weed-heavy waters.
- Pick corrosion-resistant hooks for saltwater fishing.
- Match hook size to lure size to keep balance and action.
Securing Hooks To Lures
Fixing hooks tightly to lures keeps them from falling off. You can use eye screws or split rings to attach hooks. Make sure the hardware is strong and well fastened.
| Hardware Type | Use | Tip |
| Eye Screw | Attach hooks directly to lure body | Drill pilot hole to avoid splitting wood |
| Split Ring | Connect hooks to lure for free movement | Use pliers to open and close rings carefully |
| Wire Loop | Secure hardware inside lure cavity | Wrap tightly to hold hardware in place |
Testing Your Lure
Testing your wooden fishing lure is a key step to ensure it works well in water. It helps you see how the lure moves and if fish will be attracted to it.
Good testing lets you fix any problems before you start fishing. This saves time and makes your lure more effective.
Water Test Techniques
Try your lure in a bucket, bathtub, or small pond. Watch how it floats and moves when you pull it through water.
- Check if the lure floats or sinks as planned.
- Pull the lure slowly and fast to see its action.
- Look for wobbling or spinning that may scare fish.
- Make sure the hooks do not drag in water.
- Test different water depths to watch the lure’s dive.
Adjusting Weight And Balance
Weight and balance affect how your lure moves and swims. You can add or remove weight to fix any problems found during water tests.
| Issue | Cause | Adjustment |
| Lure sinks too fast | Too much weight | Remove some weight or use lighter materials |
| Lure floats poorly | Weight too high or poorly placed | Shift weight lower or add small weights inside lure |
| Lure spins or flips | Weight unevenly placed | Balance weight evenly on both sides |
| Lure does not dive | Too light or poor balance | Add weight near the front or adjust hook placement |

Credit: www.amazon.com
Tips To Improve Catch Rates
Making wooden lures can be fun and effective for fishing. Using the right lure helps catch more fish.
Small changes in lure design and use can increase your chances of a good catch. Learn how to match lures and use them well.
Matching Lures To Fish Species
Each fish species prefers different colors and shapes of lures. Match your wooden lure to the fish you want to catch.
Use bright colors for fish in clear water. Darker or natural colors work better in murky water or low light.
- Bass like lures that look like small fish or frogs
- Trout prefer small, shiny lures that mimic insects
- Pike go for larger, bright lures with strong movements
- Walleye respond to lures that imitate baitfish with subtle colors
Fishing Techniques With Wooden Lures
How you move your wooden lure affects fish bites. Try different speeds and patterns to find what works best.
Pause your lure sometimes to make it look like an injured fish. This can attract more bites.
- Use a steady retrieve for active fish
- Twitch the lure to imitate a swimming or fleeing bait
- Let the lure float or sink slowly to match natural prey
- Change your retrieval speed to trigger strikes

Credit: www.battlbox.com
Frequently Asked Questions
What Materials Are Best For Making Wooden Lures?
The best materials for wooden lures include balsa, cedar, and basswood. These woods are lightweight and easy to carve. They provide excellent buoyancy and durability, enhancing lure performance. Choose quality wood for optimal results.
How Do You Shape A Wooden Fishing Lure?
Shaping a wooden lure involves carving with a knife or using power tools. Start with a rough outline, then refine the shape. Sand the lure until smooth for better performance. Ensure symmetry and balance to improve water movement.
What Type Of Paint Is Used On Wooden Lures?
Acrylic paint is commonly used on wooden lures due to its durability and quick drying time. It provides vibrant colors and withstands water exposure. Seal the paint with a clear coat to protect it from wear and tear.
How Do You Attach Hooks To Wooden Lures?
Attach hooks using screw eyes or split rings. Drill small holes for screw eyes, then secure them with epoxy. Attach split rings to the screw eyes, then add hooks. Ensure all components are secure to prevent losing fish.
Conclusion
Making wooden lures for fishing is a fun and rewarding hobby. You get to create unique designs that attract fish. Each lure you craft can improve your fishing experience. Practice helps you get better at shaping and painting. Use safe tools and materials for best results.
Remember, patience and creativity matter most. Try different shapes and colors to see what works. Enjoy the process as much as the catch. Keep learning and experimenting with new ideas. Your handmade lures can bring joy and success to fishing trips.