Thinking about upgrading your kitchen with a new wall oven? Before you rush to buy, it’s crucial to measure your space accurately.
Getting the measurements right saves you from costly mistakes and frustrating returns. In this guide, you’ll learn simple steps to measure for a replacement wall oven with confidence. By the end, you’ll know exactly what to look for, so your new oven fits perfectly and works seamlessly in your kitchen.
Keep reading to make your upgrade smooth and stress-free!
Tools Needed
Measuring for a replacement wall oven needs the right tools. These tools help you get exact sizes and avoid mistakes.
Using the correct tools makes the measuring process easier and faster. Make sure you have everything ready before you start.
Measuring Tape
A good measuring tape is key to find the width, height, and depth of your oven space. Choose a tape that locks in place and measures in inches and centimeters.
Level
A level tool helps check that the oven space is even. This is important for a proper fit and safe installation.
- Use a bubble or digital level
- Check the bottom, sides, and top of the oven space
- Mark any uneven spots to fix before installation
Notebook And Pen
Write down your measurements and notes clearly. This keeps your data organized and helps avoid confusion.
| Item | Purpose |
| Measuring Tape | Measure oven space dimensions |
| Level | Check if surface is even |
| Notebook and Pen | Record measurements and notes |
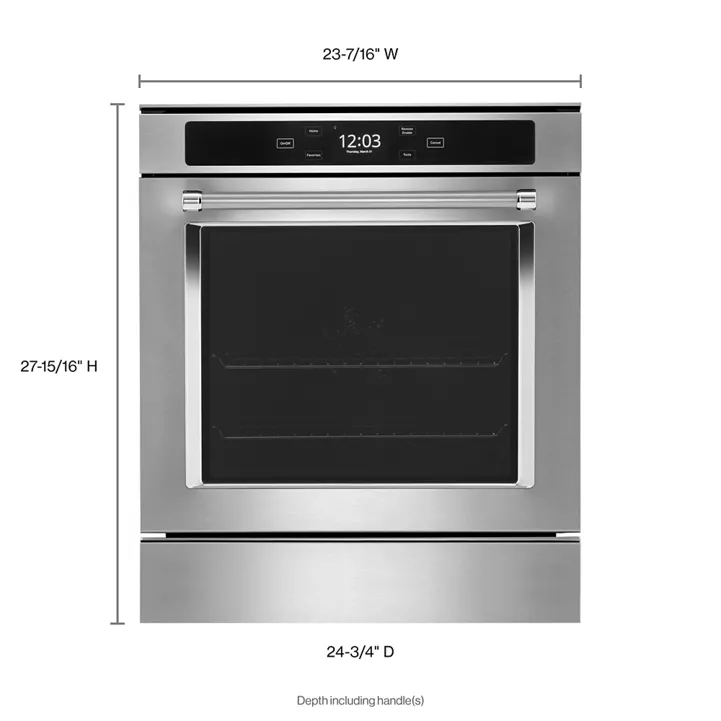
Credit: www.kitchenaid.com
Preparing The Area
Before measuring for a replacement wall oven, prepare the space carefully. This helps you get accurate measurements and stay safe.
Proper preparation makes the installation easier and avoids problems later.
Clear Surrounding Space
Remove all items near the wall oven area. This gives you room to work and measure without obstacles.
Clear space helps you see the oven opening and the wall clearly for exact measurements.
- Take away pots, pans, and other kitchen tools
- Move furniture or appliances near the oven spot
- Clean the area to spot any damage or uneven surfaces
Turn Off Power
Switch off the power to the oven before measuring or working near it. This stops electrical accidents.
Locate the breaker panel and turn off the circuit for the wall oven. Use a tester to confirm the power is off.
- Find the main electrical panel
- Identify the oven’s circuit breaker
- Flip the breaker to the “off” position
- Use a voltage tester to check the oven’s power
Measuring The Oven Opening
Measuring the oven opening helps you find the right size for your new wall oven. Accurate measurements ensure a perfect fit.
Use a tape measure and note down the width, height, and depth of the opening where the oven will go.
Width Measurement
Measure the width of the oven opening from left to right. Take the measurement at the top, middle, and bottom.
Use the smallest width to avoid choosing an oven that is too wide.
- Place the tape measure inside the cabinet opening.
- Measure at the top edge, center, and bottom edge.
- Record the smallest width measurement.
Height Measurement
Measure the height of the opening from top to bottom. Check the height at the left, center, and right sides.
Write down the smallest height measurement to ensure the oven fits well.
- Place the tape measure inside the opening vertically.
- Measure the height on the left, center, and right sides.
- Use the smallest height number for your reference.
Depth Measurement
Measure the depth of the oven opening from front to back. Check if the cabinet depth is enough for the oven.
Allow space at the back for ventilation and wiring as recommended by the oven manufacturer.
- Measure from the front edge of the cabinet to the back wall.
- Note the total depth available inside the cabinet.
- Check the oven’s required depth plus clearance space.
Checking Oven Door Clearance
Measuring oven door clearance is important for fitting a replacement wall oven. It ensures the door can open fully without hitting nearby surfaces.
Checking the clearance helps avoid damage to the oven and surrounding cabinets. It also makes using the oven safe and easy.
Front Clearance
Front clearance means the space in front of the oven door. You need enough room for the door to open fully.
Measure from the oven face to any counter or wall in front. Leave extra space for handles and to safely pull out racks.
- Open the oven door fully and measure the needed space.
- Check if any cabinets block the door from opening wide.
- Allow at least 20 inches of clear space in front.
Side Clearance
Side clearance means the space beside the oven door when it opens. This space lets the door swing out without hitting side cabinets.
Measure the gap between the oven edge and nearby walls or cabinets. Make sure there is enough room for the door hinges and handle.
- Check both left and right sides of the oven.
- Measure the distance from the door edge to the nearest obstacle.
- Keep at least 1.5 to 2 inches of side clearance.
Measuring Electrical Connections
Measuring electrical connections is key when replacing a wall oven. It ensures the new oven fits and works safely.
Check the power source and electrical requirements before buying your replacement oven.
Locate Power Source
Find where the wall oven gets its power. This is usually behind the oven or in a nearby cabinet.
Look for an electrical outlet or a hardwired connection. Make sure the power source is easy to access.
- Check for an outlet or junction box
- Note if the oven is plugged in or hardwired
- Ensure the power source location matches the new oven
Verify Voltage And Amperage
Check the voltage and amperage of your current oven’s power supply. This helps find a compatible replacement.
You can find this information on the oven’s label or in the user manual. If unsure, use a multimeter or call an electrician.
| Electrical Requirement | Typical Value |
|---|---|
| Voltage | Usually 240 volts |
| Amperage | Ranges from 30 to 50 amps |
Recording Measurements
Measuring for a replacement wall oven is important. This ensures a perfect fit in your kitchen space.
Accurate measurements prevent installation problems. Follow these steps to measure correctly.
Create A Measurement Chart
Making a chart helps you track measurements. It keeps all details organized.
| Measurement | Size (in inches) |
| Height | |
| Width | |
| Depth |
Use a ruler or tape measure for accuracy. Record each size in your chart.
Double Check Accuracy
Always verify your measurements. Double checking prevents errors later.
- Remeasure each dimension twice
- Check for any obstructions
- Ensure tape measure is straight
If unsure, ask someone to help. Accurate measurements save time and effort.
Selecting The Right Replacement Oven
Choosing a replacement wall oven requires careful measurement and consideration. Ensure you select a model that fits your space and meets your cooking needs.
Understanding the dimensions and features of the new oven is crucial. This guide will help you navigate these important steps.
Match Dimensions
Measuring your existing wall oven space accurately is essential. This ensures the new oven fits perfectly without additional modifications.
| Dimension | Measure |
| Height | Top to bottom of the space |
| Width | Side to side of the opening |
| Depth | Back to front of the space |
Consider Features And Styles
Modern ovens come with a variety of features. Choose the ones that suit your cooking habits and kitchen style.
- Look for convection settings for even baking.
- Consider self-cleaning options for convenience.
- Choose a style that matches your kitchen decor.
- Check for smart technology integration.

Credit: big-georges.com
Tips For A Smooth Installation
Measuring for a replacement wall oven is important for a good fit. Taking the right steps helps avoid problems during installation.
This guide will help you prepare and make the installation process easier and faster.
Hire A Professional
Choosing a professional to install your wall oven ensures safety and accuracy. They have the tools and skills to handle electrical and cabinet adjustments.
A professional can also spot issues that you might miss before installation begins.
- Check for licensed and insured installers
- Ask about experience with wall ovens
- Get quotes from multiple experts
- Schedule installation after delivery
Prepare For Delivery
Clear the area around your current oven before delivery. This space should be free of obstacles for easy access.
Measure the opening carefully and compare it to the new oven’s size to confirm a good fit.
- Remove items from nearby cabinets
- Protect floors and walls with blankets or cardboard
- Make sure doorways and hallways are clear
- Have tools ready for minor adjustments
Credit: www.jennair.com
Frequently Asked Questions
How Do I Measure My Wall Oven Space Correctly?
Measure the height, width, and depth of the oven cavity. Use a tape measure for accuracy. Note any vents or trim that affect space.
What Tools Are Needed To Measure For A Replacement Oven?
A tape measure and a level are essential. These tools ensure precise measurements and help avoid installation issues.
Should I Measure Existing Oven Or Cabinet Opening?
Measure the cabinet opening, not the oven. This ensures your new oven fits perfectly without gaps or pressure.
How To Account For Oven Trim Or Molding In Measurements?
Include trim thickness in width and height measurements. This prevents the new oven from fitting too tightly or loosely.
Conclusion
Measuring your wall oven correctly saves time and avoids mistakes. Take clear, exact measurements of height, width, and depth. Check the space around the oven for proper fitting and ventilation. Double-check your numbers before buying a new oven. This careful step helps you find the right replacement.
Enjoy cooking with your new oven without any hassle. Simple measuring makes your kitchen upgrade smooth and easy.