
Getting the right bike helmet starts with one simple step: measuring your head correctly. If your helmet doesn’t fit well, it won’t protect you properly—and that puts you at risk every time you ride.
But don’t worry, measuring your head is easier than you might think. In this guide, you’ll learn exactly how to find your perfect helmet size quickly and accurately. Keep reading to make sure your next ride is not only fun but safe too.
Why Proper Helmet Fit Matters
Wearing a bike helmet protects your head during a fall or crash. A helmet that fits well offers the best safety. A loose or tight helmet can cause discomfort or fail to protect you properly.
Measuring your head helps you find the right helmet size. This guide explains why fit matters and how to measure your head correctly.
Comfort And Safety
A helmet that fits well feels comfortable. You can wear it for a long time without pain or pressure. Comfort helps you keep the helmet on during your ride.
Safety depends on fit. A proper fit keeps the helmet stable on your head. It stops the helmet from moving during impact. This reduces the risk of injury.
How To Check Helmet Fit
Test the helmet fit before you buy. Put the helmet on and fasten the straps. Shake your head gently. The helmet should not slide or tilt. You should feel even pressure all around.
- Helmet sits low on your forehead, about one inch above eyebrows
- Straps form a “V” under each ear
- Chin strap is snug but allows you to open your mouth
- Helmet does not move when you shake your head
Measuring Your Head Size
Use a soft tape measure to find your head size. Wrap it around your head just above the eyebrows and ears. Keep the tape level and snug. Note the measurement in centimeters or inches.
| Head Circumference (cm) | Helmet Size |
| 50–54 | XS |
| 54–58 | M |
| 58–62 | L |
| 62+ | XL |
Why Size Charts Matter
Helmet sizes vary between brands. Use size charts to match your measurement with the right helmet. Buying the correct size helps ensure the best fit and protection.
Tip:Always try on a helmet before buying. Size charts guide your choice, but actual fit matters most.
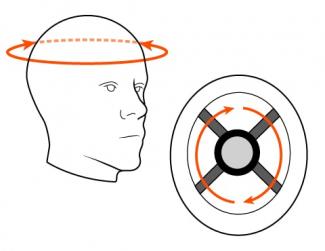
Credit: www.ergodyne.com
Tools Needed For Measurement
When choosing a bike helmet, it’s important to get the right fit. Measuring your head properly ensures safety and comfort. Here are the tools you need.
Gathering the correct tools before you start will make the process quick and easy. Let’s look at what’s necessary.
Measuring Tape
A flexible measuring tape is essential. It helps you accurately measure your head’s circumference.
- Choose a cloth or tailor’s tape measure
- Ensure it’s long enough to wrap around your head
- Use a metric tape for easier conversion
Mirror
A mirror helps you see if the measuring tape is level. This ensures an accurate measurement.
Pen And Paper
Having a pen and paper handy lets you jot down measurements. This helps in comparing helmet sizes later.
| Tool | Purpose |
| Measuring Tape | Measures head circumference |
| Mirror | Ensures tape is level |
| Pen and Paper | Records measurements |
Choosing The Right Measuring Tape
Choosing the right measuring tape is important to get an accurate head size. This helps in picking the perfect bike helmet that fits well and feels comfortable.
There are many measuring tapes available, but not all work well for measuring your head. Learn what features to look for and which types work best.
Material And Flexibility
A good measuring tape must be flexible to wrap around your head smoothly. Soft materials like cloth or flexible plastic work best. Metal tapes are too stiff.
Length Of The Tape
The tape should be long enough to fit around the largest part of your head. Usually, a tape that is at least 60 inches (150 cm) is enough.
Clear And Easy-to-read Markings
Look for a tape with clear numbers and marks. Both metric (cm) and imperial (inches) units are helpful. The markings should not fade easily.
- Choose tapes with large, clear numbers
- Check if the tape has both cm and inch units
- Avoid tapes with worn or unclear markings
Locking Mechanism And Ease Of Use
Some tapes have a lock to hold the tape in place. This helps get a steady measurement without the tape slipping. Look for tapes that are easy to handle alone.
| Feature | Why It Matters |
| Flexible Material | Wraps smoothly around the head |
| Length over 60 inches | Fits all head sizes comfortably |
| Clear Markings | Easy to read and accurate measurement |
| Locking Mechanism | Keeps tape steady during measuring |
Locating The Correct Measuring Points
Measuring your head correctly helps you find a bike helmet that fits well. You need to locate the right spots on your head for accurate measurement.
Using a soft tape measure, you wrap it around your head at specific points. These points guide you to get the right size for safety and comfort.
Positioning The Tape Above Eyebrows
Place the tape measure just above your eyebrows. This spot is near your forehead and helps get the widest part of your head.
Make sure the tape rests comfortably on your skin without pressing hard. This ensures the size is not too tight or loose.
- Start at the middle of your forehead, above the eyebrows
- Wrap the tape around your head from this point
- Keep the tape flat and snug, not tight
Ensuring Level Measurement Around The Head
Keep the tape level all around your head. It should be straight and not tilted up or down.
Check in a mirror or ask someone to help. A level tape gives the best measurement for your helmet size.
- Hold the tape parallel to the floor
- Make sure it wraps evenly around the back of your head
- Adjust if the tape slips or tilts
Step-by-step Measuring Process
Measuring your head correctly helps you find the right bike helmet size. A good fit keeps you safe and comfortable while riding.
Use a soft measuring tape for the best results. Follow these steps carefully to get an accurate measurement.
Wrapping The Tape Securely
Place the measuring tape around your head, just above your eyebrows. Make sure it sits level all the way around.
Keep the tape snug but not too tight. It should touch your skin without pressing hard.
- Start at the middle of your forehead
- Wrap the tape over the widest part of your head
- Ensure the tape stays level and straight
- Hold the tape steady to avoid slipping
Reading The Measurement Accurately
Look at the number where the tape meets the start point. This number is your head circumference.
Write down the measurement in centimeters or inches. Use the size chart from the helmet brand to choose your size.
- Check the tape’s zero mark aligns with the end
- Read the number at the tape overlap carefully
- Measure twice for accuracy
- Use the correct unit of measure
Converting Measurements To Helmet Sizes
Measuring your head is key to picking the right bike helmet size. A good fit keeps you safe and comfortable.
After you measure your head, you need to match that number to helmet sizes. This guide helps you do that easily.
Taking Your Head Measurement Correctly
Use a soft tape measure to wrap around your head. Place it just above your eyebrows and ears.
Keep the tape snug but not tight. Note the number in centimeters or inches.
Understanding Helmet Size Charts
Helmet brands list sizes like small, medium, and large. Each size matches a range of head measurements.
Look at the size chart to find where your measurement fits. This helps pick the best helmet size.
| Helmet Size | Head Circumference (cm) | Head Circumference (inches) |
|---|---|---|
| Small | 50 – 54 | 19.7 – 21.3 |
| Medium | 55 – 58 | 21.7 – 22.8 |
| Large | 59 – 62 | 23.2 – 24.4 |
| Extra Large | 63 – 65 | 24.8 – 25.6 |
Converting Between Inches And Centimeters
Some helmets use centimeters, others use inches. You can convert measurements to match the size chart.
- 1 inch equals 2.54 centimeters
- To convert inches to centimeters, multiply by 2.54
- To convert centimeters to inches, divide by 2.54
Use a calculator or do the math to get the right number for your helmet size.
Checking Fit After Conversion
Try the helmet on after choosing the size. It should feel snug but not squeeze your head.
Adjust straps and pads for comfort. A well-fitted helmet stays in place during rides.
Tips For Trying On The Helmet
Trying on a bike helmet correctly helps protect your head in case of a fall. A helmet that fits well feels comfortable and stays in place.
Follow these tips to check the fit and make adjustments before you buy or start riding.
Checking For Snugness
Place the helmet on your head so it sits level, not tilted back or forward. It should cover your forehead, about one to two finger widths above your eyebrows.
- Shake your head side to side and up and down. The helmet should move very little.
- If the helmet slides easily, it is too loose.
- Wear the helmet for a few minutes to ensure comfort.
- Check for pressure points or tight spots that cause pain.
- Make sure your hair does not affect the helmet’s fit.
Adjusting Straps And Pads
| Adjustment | How to Do It | Why It Matters |
| Side Straps | Form a “V” shape under your ears. Tighten or loosen so straps sit comfortably. | Keeps helmet stable and prevents it from tilting. |
| Chin Strap | Buckle the strap and tighten it until snug. You should fit one or two fingers under it. | Secures the helmet and stops it from falling off. |
| Internal Pads | Add or remove pads to improve fit and comfort inside the helmet. | Helps fill gaps and reduces helmet movement. |
Adjust the straps and pads slowly to avoid over-tightening. A well-adjusted helmet will feel secure but not painful.
Common Mistakes To Avoid
Measuring your head for a bike helmet needs care. Small errors can cause wrong size picks.
A well-fitted helmet keeps you safe. Avoid these common mistakes to get the right fit.
Using The Wrong Measuring Tool
Many use a regular ruler or string. These tools do not give an accurate head size.
A soft measuring tape is best. It fits around the head smoothly and shows precise numbers.
Placing The Tape Incorrectly
Placing the tape too high or too low causes wrong results. The tape should sit just above your eyebrows.
It must circle the widest part of your head. This is usually about one inch above your ears.
Measuring Over Hair Or Hats
Thick hair or hats change the measurement size. Measure your head without any covering.
Wet or styled hair may also affect the tape fitting. Keep hair natural and flat for best results.
Not Taking Multiple Measurements
One measurement might not be enough. Your head shape can cause size differences.
- Measure two or three times to confirm size
- Use the average number for accuracy
- Check measurements on different days if possible
Ignoring Helmet Sizing Charts
Helmet brands have different size charts. Ignoring them can cause buying wrong sizes.
| Brand | Head Size Range (cm) | Helmet Size |
| Brand A | 54-58 | Small/Medium |
| Brand B | 56-60 | Medium/Large |
| Brand C | 52-57 | Small |
When To Replace Your Helmet
Knowing when to replace your bike helmet is important for safety. A helmet protects your head by absorbing impact energy.
Over time, helmets lose their ability to protect you. This can happen even without visible damage.
Damage After A Crash
Always replace your helmet after a crash. The foam inside can crack or compress, making it unsafe.
Age Of The Helmet
Helmets should be replaced every few years. Materials weaken over time due to sweat, sunlight, and wear.
Visible Wear And Tear
Check your helmet for cracks, dents, or worn straps. These signs mean it might not protect well.
- Cracked or crushed foam
- Broken or frayed straps
- Cracked or damaged shell
- Loose or missing parts
Fit And Comfort Changes
If your helmet feels loose or uncomfortable, it may be time to replace it. A good fit is key for safety.
| Reason to Replace | Details |
|---|---|
| After a Crash | Helmet foam can be damaged even if no cracks show. |
| After 3-5 Years | Materials weaken from use, sun, and sweat. |
| Visible Damage | Cracks, dents, or strap damage reduces protection. |
| Poor Fit | Loose or uncomfortable helmets may not protect well. |

Credit: www.amazon.com

Credit: yankel.co.uk
Frequently Asked Questions
How Do I Measure My Head For A Bike Helmet?
Use a soft measuring tape around your head, 1 inch above your eyebrows. Keep tape snug but not tight. Note the circumference in centimeters or inches for accurate helmet sizing.
Why Is Accurate Head Measurement Important For Helmets?
Proper measurement ensures a secure, comfortable fit. A well-fitted helmet offers better protection and reduces injury risk during accidents. Ill-fitting helmets can cause discomfort or fail to protect effectively.
Can I Use A String Instead Of A Tape Measure?
Yes, wrap a string around your head at the correct position. Mark the string length, then measure it against a ruler. This method works if you don’t have a tape measure.
How Often Should I Measure My Head For A Helmet?
Measure your head before buying a new helmet or if your current helmet feels loose. Head size can change due to weight fluctuations or growth, especially in children.
Conclusion
Measuring your head for a bike helmet is simple and important. Use a soft tape measure around your head, just above the eyebrows. Note the size in centimeters or inches. This helps find a helmet that fits well and stays safe.
A good fit means more comfort and better protection. Always double-check your measurements before buying. Taking a little time now can save problems later. Ready to ride safely and comfortably? Keep these steps in mind every time you choose a helmet.