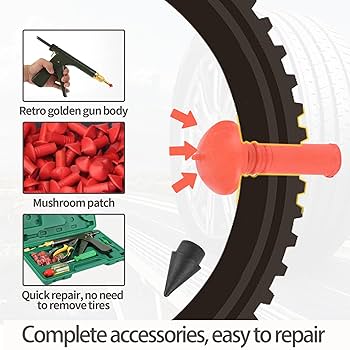
Your motorcycle tire suddenly loses air, and you’re stuck wondering what to do next. Fixing a flat tire might seem tricky, but patching it yourself is easier than you think.
Imagine saving time, money, and the hassle of waiting for roadside help—all by learning a simple skill. In this guide, you’ll discover step-by-step how to patch your motorcycle tire quickly and safely. Keep reading, and you’ll be ready to get back on the road with confidence in no time.
Tools Needed
Patching a motorcycle tire needs the right tools. Using proper tools makes the job easier and safer.
Below are the main tools you will use to fix a tire patch.
Patch Kit Components
A patch kit has all parts to fix a small hole in the tire. Most kits come with similar items.
- Rubber patches:Small pieces that cover the hole.
- Rubber cement:Glue that bonds the patch to the tire.
- Sandpaper or rasp tool:Used to roughen the tire surface for better grip.
- Tire buffer or scraper:Helps clean and prepare the area around the hole.
- Instructions:Step-by-step guide on using the kit parts correctly.
Additional Supplies
You may need a few extra items to help with the patching process. These supplies make the repair smoother and safer.
- Tire levers:Tools to remove the tire from the rim.
- Air pump or compressor:To inflate the tire after patching.
- Gloves:Protect your hands from dirt and chemicals.
- Rag or cloth:For cleaning the tire surface before repair.
- Marker or chalk:To mark the puncture spot clearly.

Credit: www.bikesales.com.au
Preparing The Tire
Fixing a motorcycle tire needs careful preparation. This helps the patch stick well and last long.
First, find the hole in the tire. Then, take the tire off the wheel for better access.
Locating The Puncture
Look closely at the tire to find where the air is leaking. You can use water and soap to spot bubbles.
- Inflate the tire slightly to see the hole better.
- Spray soapy water over the tire surface.
- Watch for bubbles that show escaping air.
- Mark the puncture spot with chalk or a marker.
Removing The Tire
Remove the tire from the wheel carefully to avoid damage. Use tire irons or special tools.
| Tool | Purpose |
| Tire irons | Lift and remove tire edges from the rim |
| Valve core remover | Deflate tire quickly by removing valve core |
| Bead breaker | Separate tire bead from rim |
Cleaning The Area
Cleaning the area around the motorcycle tire puncture is important. It helps the patch stick better and last longer.
Take time to prepare the surface before applying the patch. A clean area ensures a strong repair.
Removing Debris
Start by removing dirt, dust, and small stones from the tire surface. Use a brush or cloth to clean the area well.
Clear debris helps the patch stick smoothly without gaps or bumps.
- Use a stiff brush to sweep away dirt
- Wipe the area with a clean cloth
- Check for any nails or sharp objects
- Remove anything stuck in the tire
Sanding The Surface
Lightly sand the area around the puncture with sandpaper. This roughens the surface for better glue grip.
Do not sand too hard. Just enough to dull the shiny rubber and create a rough texture.
- Use fine-grit sandpaper (around 80 to 120 grit)
- Sand in small circular motions
- Cover about 1 inch around the hole
- Wipe away dust after sanding

Credit: www.amazon.com
Applying The Patch
Fixing a motorcycle tire with a patch is a simple process. You need to follow a few key steps to make sure the patch sticks well. This guide will help you apply the patch correctly.
Start by preparing the tire surface and the patch materials. Then, apply the glue, place the patch, and press it firmly. Patience is important for a lasting repair.
Using The Glue
Apply a thin, even layer of rubber cement or glue over the cleaned puncture area. Make sure the glue covers slightly more than the patch size. Let the glue dry for about 5 minutes until it feels tacky but not wet.
- Clean the puncture spot thoroughly.
- Spread a thin coat of glue over the area.
- Wait for the glue to become sticky.
Placing The Patch
Remove the patch backing carefully. Place the patch over the glued area. Make sure the patch covers the puncture completely. Press it down to remove air bubbles and ensure full contact with the tire.
| Patch Placement Tips |
| Center the patch on the puncture |
| Press out air bubbles from the center outward |
| Do not move the patch once placed |
Pressing And Waiting
Use a roller or a firm tool to press the patch firmly. Hold pressure for at least 2 minutes. Then, let the tire sit undisturbed for 30 minutes to let the glue cure fully. This helps the patch bond strong and last longer.
- Press the patch firmly with a roller
- Hold pressure steadily for 2 minutes
- Let the tire cure for 30 minutes without moving
Reassembling The Tire
After patching the motorcycle tire, it is important to put everything back correctly. Reassembling the tire ensures it works well and stays safe to ride.
Take your time to follow each step carefully. This will help avoid damage and keep the tire balanced on the wheel.
Reinstalling The Tire
Place the tire back onto the rim, starting with one side. Use your hands or tire levers to gently push the tire bead over the rim edge.
Make sure the tire sits evenly around the rim. Avoid forcing the tire, as this can cause damage to the patch or the tire bead.
- Align the tire valve stem with the rim hole
- Push one side of the tire onto the rim first
- Work around the rim to fit the tire bead completely
- Check that the tire bead fits snugly and evenly
Inflating And Checking For Leaks
Slowly inflate the tire to the recommended pressure. Watch the tire bead to make sure it stays seated on the rim.
Check the patched area and the entire tire for leaks. You can spray soapy water on the tire and look for bubbles to find air escaping.
- Inflate the tire to the correct pressure slowly
- Watch for any air escaping from the patch or tire
- Use soapy water to spot leaks by looking for bubbles
- Fix any leaks before reinstalling the wheel on the motorcycle

Credit: www.youtube.com
Tips For Long-lasting Repairs
Patching a motorcycle tire can save money and extend tire life. Proper steps make repairs last longer.
Using the right tools and following safety tips helps keep your ride safe after a patch.
Avoiding Common Mistakes
Many tire patches fail because of simple errors. Avoid these to make repairs strong and safe.
- Clean the tire surface well before applying the patch.
- Do not patch large or sidewall damage; patches only work on small holes.
- Use a proper tire patch kit designed for motorcycle tires.
- Roughen the area around the hole for better patch adhesion.
- Allow the glue to dry fully before pressing the patch on.
- Check the tire pressure after repair and before riding.
When To Replace The Tire
Some damage needs tire replacement instead of patching. Knowing when to replace is key for safety.
| Damage Type | Repairable | Replace Tire |
| Small puncture in tread | Yes | No |
| Sidewall cuts or cracks | No | Yes |
| Large puncture over 6mm | No | Yes |
| Bulges or bubbles | No | Yes |
| Worn tread below legal limit | No | Yes |
Frequently Asked Questions
How Do I Know If My Motorcycle Tire Needs Patching?
Check for slow air leaks or visible punctures on the tire surface. If the tire loses pressure frequently, it likely needs patching.
What Materials Are Needed To Patch A Motorcycle Tire?
You need a tire patch kit, including rubber cement, a patch, a rasp tool, and tire levers for removal.
Can I Patch A Motorcycle Tire At Home Safely?
Yes, with the right tools and careful steps, you can safely patch your tire at home.
How Long Does A Motorcycle Tire Patch Last?
A properly applied patch can last the tire’s remaining life if no further damage occurs.
Conclusion
Patching a motorcycle tire can save time and money. Follow each step carefully for best results. Check the tire for holes and clean the area well. Use the right patch kit and apply it firmly. Let the patch set before riding again.
Always carry a patch kit for emergencies. Regular tire checks help avoid sudden problems. Stay safe and keep your bike ready to ride. Simple repairs can extend your tire’s life. Try this easy fix next time you face a flat.