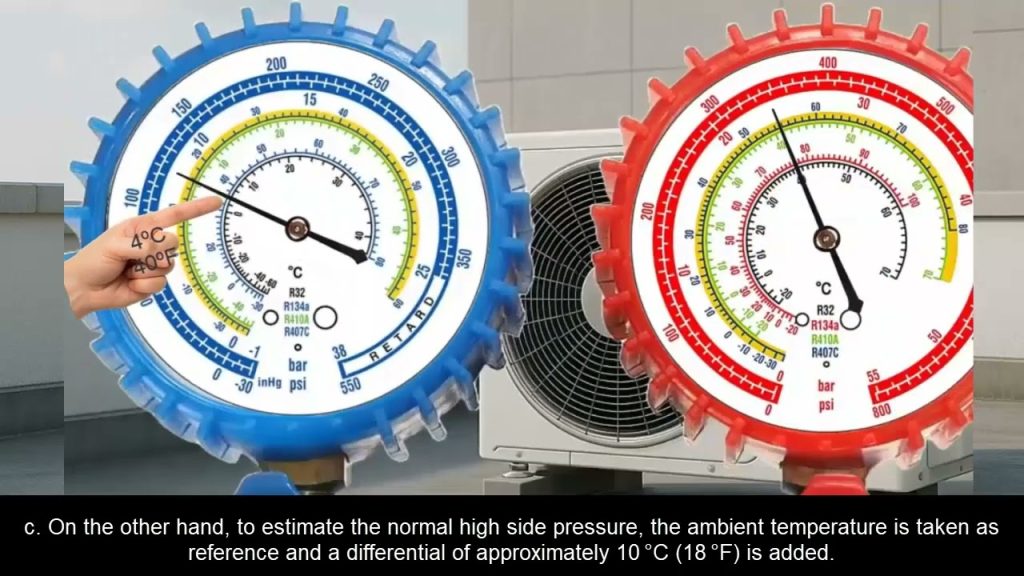
Have you ever stood in front of a set of refrigerant gauges, feeling overwhelmed by the colorful dials and numbers staring back at you? You’re not alone.
Many people find themselves puzzled when it comes to understanding these essential tools. But here’s the good news: mastering refrigerant gauges is easier than you think, and it can make a world of difference in maintaining your HVAC systems. Imagine being able to diagnose issues with confidence, saving both time and money by taking control of your equipment’s efficiency.
In this guide, we’ll break down the process step-by-step, using simple language and clear explanations. By the end, you’ll not only know how to read refrigerant gauges, but you’ll also understand what those readings mean for your system’s health. Ready to transform your approach to HVAC maintenance and become the go-to expert in your circle? Keep reading to unlock the secrets of refrigerant gauges and empower yourself with knowledge that makes a real impact.

Credit: www.reddit.com
Refrigerant Gauges Basics
Refrigerant gauges are essential tools for HVAC technicians and DIY enthusiasts. They measure pressure in cooling systems to ensure proper operation. Understanding the basics of these gauges helps maintain and troubleshoot air conditioners and refrigerators effectively.
Types Of Refrigerant Gauges
There are mainly two types of refrigerant gauges:
- Low-Pressure Gauges:Used to measure suction pressure in the system.
- High-Pressure Gauges:Measure discharge pressure from the compressor.
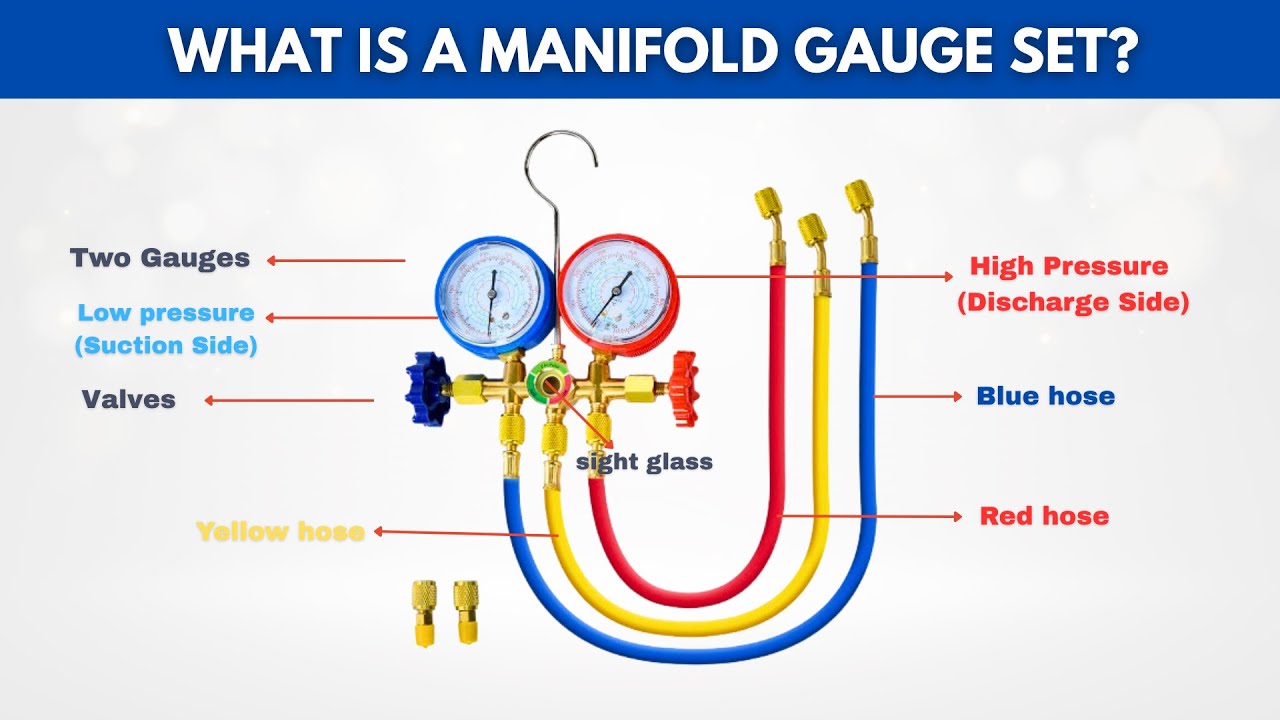
Both gauges are often combined in a manifold gauge set. This tool lets you check both pressures simultaneously.
Gauge Components And Functions
Refrigerant gauges have several key parts. Each part plays a role in accurate pressure reading.
- Dial:Displays the pressure reading in psi or bar units.
- Needle:Moves to indicate current pressure on the dial.
- Hoses:Connect the gauge to the system for pressure measurement.
- Valves:Control refrigerant flow and allow pressure isolation.
- Manifold Body:Holds the gauges and valves together in one unit.
Knowing these components helps you read and use refrigerant gauges correctly.
Credit: www.youtube.com
Setting Up The Gauges
Setting up refrigerant gauges correctly is crucial before you dive into reading pressures and diagnosing HVAC systems. If you don’t attach them properly or overlook safety, you risk inaccurate readings or even injury. Let’s focus on how to connect your gauges right and keep yourself safe throughout the process.
Connecting To The System
First, locate the service ports on your HVAC system. These are typically found on the low-pressure and high-pressure sides of the unit. Make sure you identify each port correctly to avoid mixing up the connections.
Attach the blue hose to the low-pressure port and the red hose to the high-pressure port. The center hose usually connects to a vacuum pump or refrigerant canister, depending on your task. Tighten the couplers securely by hand to prevent leaks but avoid over-tightening which can damage the fittings.
Before connecting, purge any air from the hoses by briefly opening the valves to let a small amount of refrigerant flow out. This step prevents air contamination, which can skew your readings. Have you ever wondered why some technicians skip this step? It’s often the cause of faulty pressure readings.
Safety Precautions
Always wear safety glasses and gloves to protect your eyes and hands from refrigerant burns or accidental sprays. Refrigerants can cause frostbite upon contact, so handling with care is non-negotiable. Keep your face away from the gauges while connecting or disconnecting hoses.
Work in a well-ventilated area to avoid inhaling refrigerant fumes. If you smell refrigerant or feel dizzy, stop immediately and get fresh air. Never connect gauges to a system that’s under high pressure without checking the manufacturer’s guidelines first.
Have you checked your gauge set recently? Using damaged or worn-out hoses can cause leaks or sudden bursts. Routine inspection of your equipment ensures you stay safe and get accurate readings every time.
Reading Pressure Measurements
Reading pressure measurements on refrigerant gauges is a skill that can save you time and money during HVAC maintenance or troubleshooting. Understanding what the numbers mean helps you identify if a system is working correctly or if there is an issue like a leak or blockage. Let’s break down how to interpret these readings on both the high-pressure and low-pressure sides of the system.
High-pressure Side
The high-pressure side of your refrigerant gauge shows the pressure in the system after the compressor has compressed the refrigerant. This pressure is generally much higher than on the low side and is critical for diagnosing the health of the condenser and the overall system.
When you look at the high-pressure gauge, notice whether the needle is within the expected range for your specific refrigerant type. Too high a reading might mean the condenser is dirty or airflow is restricted, causing overheating. Too low could indicate a refrigerant undercharge or a problem with the compressor itself.
Think about the last time you checked a high-pressure gauge and saw an unusual spike. That spike often pointed directly to a blocked condenser coil. Have you ever noticed how small issues like dirt buildup can drastically affect the pressure readings here?
Low-pressure Side
The low-pressure gauge measures the pressure in the evaporator coil before the refrigerant enters the compressor. This side typically operates at a much lower pressure and helps you assess the evaporator’s performance and refrigerant charge.
If the low-pressure reading is too low, it could mean the system is low on refrigerant or there’s a restriction in the expansion valve. Conversely, a high reading on this side may suggest poor airflow across the evaporator or an overcharged system.
When you read the low-pressure side, pay close attention to how it compares with the system’s temperature. Matching these numbers against manufacturer specs can reveal hidden issues that aren’t obvious just by looking at the equipment. How often do you double-check these readings against ambient conditions?
Interpreting Temperature And Pressure
Understanding temperature and pressure readings from refrigerant gauges is key to maintaining HVAC systems. These two factors work together to reveal how well the system operates. Correctly interpreting them helps diagnose problems and ensures efficient performance.
Pressure gauges measure the force the refrigerant puts on the system. Temperature readings show how hot or cold the refrigerant is at different points. Combining these readings offers a clear picture of the system’s condition.
Using Pressure-temperature Charts
Pressure-temperature charts link refrigerant pressure to its temperature. Each refrigerant type has a specific chart. Use these charts to find the expected temperature for a given pressure.
Follow these steps:
- Check the pressure on your gauge.
- Find the matching refrigerant on the chart.
- Locate the pressure value on the chart’s scale.
- Read the corresponding temperature next to it.
This method confirms if the refrigerant is at the correct temperature for the pressure. It helps verify the system runs within safe limits and avoids damage.
Identifying System Issues
Temperature and pressure readings reveal common problems. Low pressure with low temperature may mean a refrigerant leak. High pressure and high temperature can signal a blockage or dirty condenser.
Look out for these signs:
- Pressure too high or too low compared to chart values.
- Temperature far from normal operating range.
- Inconsistent readings between gauges.
Spotting these issues early prevents costly repairs. Accurate gauge reading guides effective troubleshooting and maintenance.
Common Diagnostic Scenarios
Refrigerant gauges help spot common issues in cooling systems fast. Reading these gauges correctly saves time and money on repairs. Understanding typical problems shown on the gauges helps diagnose system health quickly.
Low Refrigerant Levels
Low refrigerant causes weak cooling and high compressor pressure. Gauges will show low pressure on the low side and low to normal pressure on the high side. This often means a leak or undercharge in the system. Low refrigerant can damage the compressor over time.
Overcharged Systems
Too much refrigerant raises pressure on both gauge sides. The high side pressure will be very high, while the low side pressure may also increase. Overcharging reduces cooling efficiency and can cause system components to fail. Careful measurement is needed to adjust the charge properly.
Leaks And Blockages
Leaks cause pressure drops and uneven readings between gauges. Blockages show as abnormal pressure differences or spikes in readings. A blockage may cause high pressure on one side and low pressure on the other. Identifying these signs early prevents major system damage and costly repairs.
Tips For Accurate Gauge Readings
Getting accurate readings from your refrigerant gauges is key to diagnosing and fixing HVAC issues correctly. Without precision, you risk misinterpreting the system’s condition, which can lead to improper repairs or wasted refrigerant. Here are some practical tips to help you nail those gauge readings every time.
Calibration Checks
Start by verifying that your gauges are properly calibrated. Even a slight calibration error can throw off your entire reading and cause you to make wrong decisions. Use a known pressure source or a calibration tool to compare the gauge reading against a standard.
If you notice any discrepancies, it’s time to recalibrate or replace the gauge. I once missed a small leak because my gauge was off by just a few PSI; a quick calibration check would have saved me hours of troubleshooting.
Make calibration checks a regular part of your routine, especially before critical jobs. This small step ensures that every reading you take reflects the true pressure in the system.
Avoiding Common Mistakes
Many HVAC technicians overlook simple mistakes that skew gauge readings. Are you opening valves too quickly? This can cause pressure spikes that give false high readings. Always open valves slowly and watch the gauge stabilize before recording numbers.
Check your connections for leaks or loose fittings. Even minor leaks around the gauge hoses can drop pressure and mislead your diagnosis. Tighten fittings securely and inspect hoses for cracks or damage before use.
Also, be mindful of the temperature around your gauges. Extreme heat or cold can affect the accuracy of analog gauges. Store and use your gauges in moderate conditions when possible.
Have you ever found your readings didn’t match the system’s actual performance? These small mistakes might be why. Paying attention to these details can save you from unnecessary guesswork and keep your repair work on point.
Advanced Troubleshooting Techniques
Advanced troubleshooting with refrigerant gauges pushes beyond simple pressure readings. It involves precise calculations and the use of modern tools to diagnose system issues accurately. Mastering these techniques can save you time and prevent costly mistakes in your HVAC work.
Superheat And Subcooling Calculations
Superheat and subcooling give you a clearer picture of how well a system is performing. Superheat measures the temperature increase of refrigerant vapor above its boiling point, indicating if the system has enough refrigerant. Subcooling measures the temperature drop below the condensing point, showing how much liquid refrigerant is present.
To calculate superheat, you subtract the refrigerant’s saturation temperature (found from the low-side gauge pressure) from the actual suction line temperature. For subcooling, subtract the liquid line temperature from the saturation temperature (from the high-side gauge pressure).
These numbers tell you if the system is undercharged, overcharged, or if there are other issues like restriction or poor airflow. Have you ever caught a low refrigerant charge by spotting an unusually high superheat? It’s a powerful diagnostic clue that you can’t get from pressure readings alone.
Using Digital Gauges
Digital gauges make troubleshooting simpler and more accurate. They provide exact pressure and temperature readings and often include built-in calculators for superheat and subcooling. This removes guesswork and speeds up your diagnostics.
Many digital gauges also allow you to log data over time, which helps spot intermittent problems that manual readings might miss. Have you tried using data logging during a system’s cycling? It can reveal hidden faults that show up only under certain conditions.
Using digital tools doesn’t just improve accuracy; it changes how you approach problems. You can confirm your findings quickly and confidently, making your repairs more effective and reducing callbacks.

Credit: www.electrafixbc.ca
Frequently Asked Questions
What Are Refrigerant Gauges Used For?
Refrigerant gauges measure pressure in HVAC systems. They help diagnose system performance, detect leaks, and ensure proper refrigerant charge. Accurate readings prevent damage and improve efficiency.
How Do I Connect Refrigerant Gauges Correctly?
Attach the blue hose to the low-pressure port and the red hose to the high-pressure port. Ensure all connections are tight to avoid leaks. Always use the correct gauge set for your refrigerant type.
What Do High And Low Pressure Readings Indicate?
Low pressure shows system suction side performance, while high pressure reflects the discharge side. Abnormal readings may indicate leaks, blockages, or incorrect refrigerant levels requiring adjustment.
Can Refrigerant Gauges Detect Leaks?
Yes, gauges can help identify leaks by showing abnormal pressure drops. Regular monitoring during operation highlights pressure inconsistencies, signaling possible leaks or system faults needing repair.
Conclusion
Reading refrigerant gauges helps you check cooling system health. Watch the needle carefully and know what the numbers mean. This skill prevents damage and keeps systems working well. Practice often to build confidence and accuracy. Stay safe by following all instructions and wearing protection.
Understanding gauges saves time and money on repairs. Keep your tools clean and in good shape. Remember, clear readings lead to better decisions. Small steps make a big difference in maintenance. Keep learning and checking to keep systems cool and efficient.